Categories
DIY Holidays Lifestyle My Projects Parties and Events Projects

Thanksgiving Pumpkin Place Cards

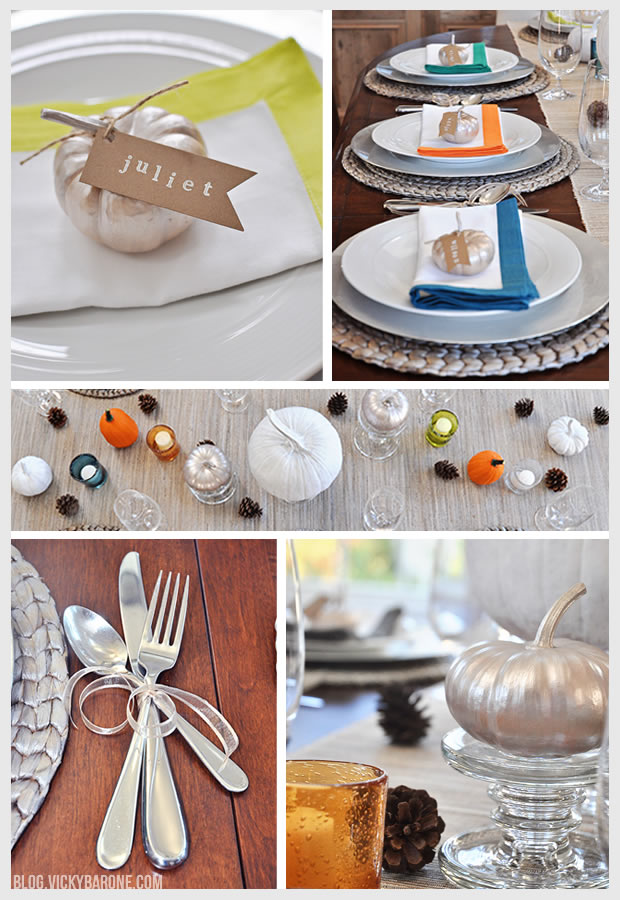
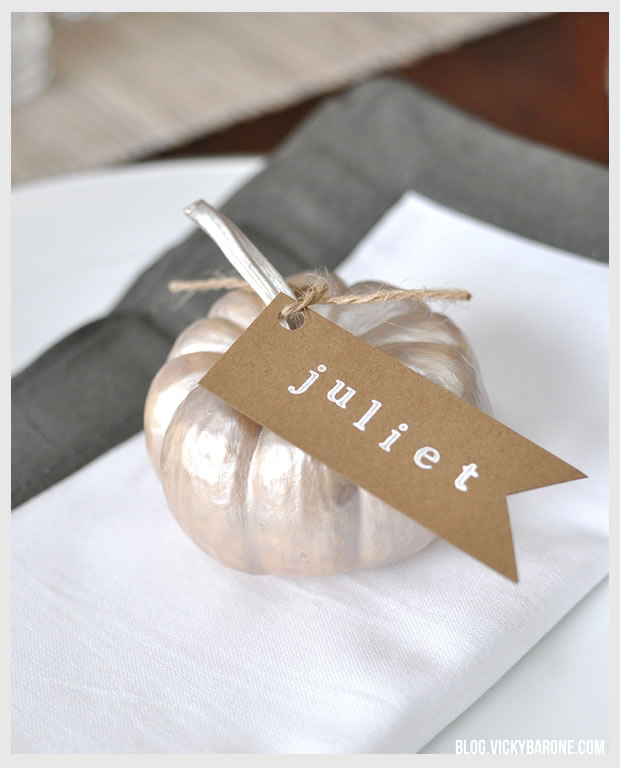
Here’s our favorite detail from our Thanksgiving Table this year! We painted the tiniest pumpkins we could find at the farmer’s market, added our own kraft paper tags et voila! Everyone gets their own baby pumpkin on their plate!

DIY Thanksgiving Pumpkin Place Cards
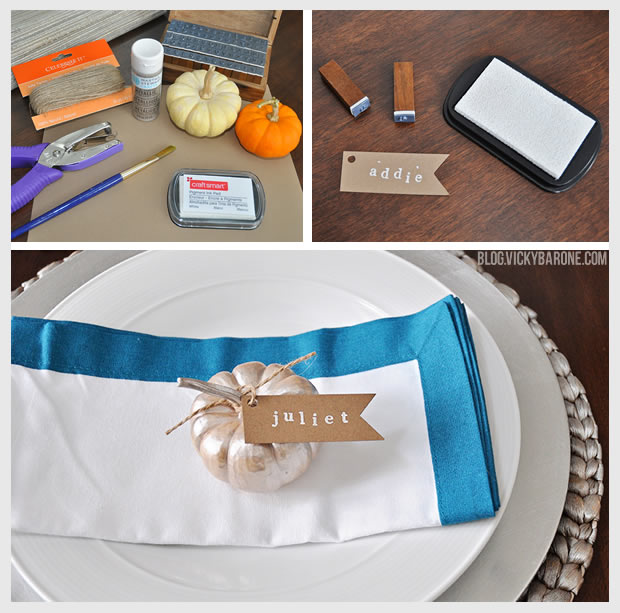
Materials: Mini pumpkins, metallic acrylic paint, a paint brush, kraft paper, scissors, hole punch, white stamp pad, alphabet stamps, and twine.

Directions:
1. Clean pumpkins with a wet paper towel and dry off completely.
2. Paint pumpkins with acrylic paint and let dry completely (We used white pumpkins so we only needed one coat of paint to cover them! You might need two or three coats with an orange pumpkin).
3. Cut kraft paper into tags and hole punch a little hole in the top left corner for the twine.
4. Using the stamps and stamp pad, add names to each tag. Let dry.
5. Thread twine through the hole in the tag and tie around pumpkin stem loosely.

DIY Thanksgiving Pumpkin Place Cards

DIY Thanksgiving Pumpkin Place Cards

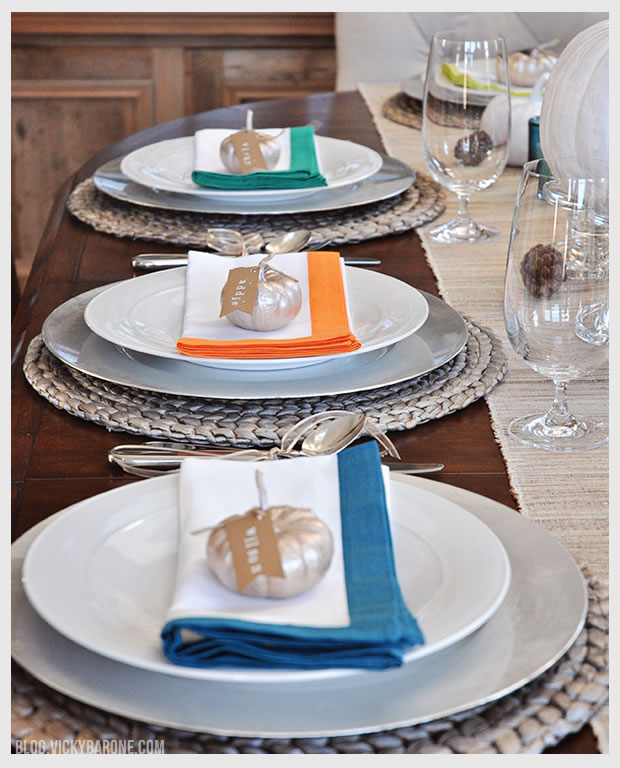
Don’t they look pretty on our multicolored napkins?
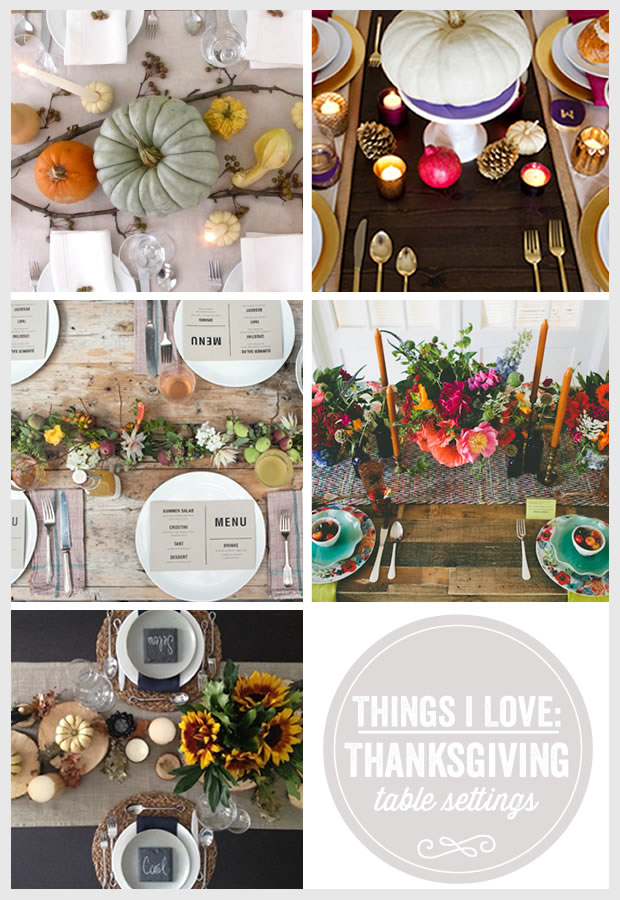
We hope everyone is having fun with their Thanksgiving plans! Check out our table set up for more ideas!

Categories
Thoughts

Happy One Year to the Blog!

Today is our one year anniversary! We are so happy to see how far we’ve come in our first year and excited to see where we’ll go next. Thank you to everyone for all of your support! We love your comments, subscriptions, pingbacks, and re-pins! We wouldn’t be here without you!

Here are our most popular posts from the past year!
1. DIY Tissue Paper Pom Poms
2. Happy Birthday, Cooper Dog!
3. Jack’s First Birthday Party
4. Things I Love: Disney World
5. Interchangeable Felt Flower Wreath

If you haven’t already, please subscribe by email or follow us on Bloglovin’ to see what we have in store for the next year!

P.S. Our very first post!

Categories
DIY Holidays Lifestyle Parties and Events

Thanksgiving Table Setting

Tada! Our very own Thanksgiving table setting! You might have seen some of our favorite inspirations here, but now we’ve styled our very own! We mixed very simple natural elements with bright pops of color to create a modern and rustic Thanksgiving table. We’re so excited to add food and family and make the holiday complete!

Thanksgiving Table SettingHere are some of the elements we pulled together for our table:
Painted Pumpkin place cards
Metallic Placemats from Pier 1 Imports
Table Runner from Pier 1 Imports
Multicolor Border Napkins from Crate and Barrel
Glass Votives from Target
Ribbon tied silverware
Decorative pine cones from Joann
Pumpkins from North Carolina State Farmers Market

We hope you are all having fun planning your own Thanksgiving celebrations! Check back to see more ideas as the holidays approach!

Categories
DIY Holidays Kids Lifestyle My Projects Parties and Events Projects

DIY Thanksgiving Garland

Thanksgiving is only 22 days away! Today we have a garland project that is perfect to make ahead of time. It’s also interchangeable so it’s great for any holiday!

DIY Thanksgiving GarlandMaterials: Kraft paper, adhesive chipboard alphabet letters, white acrylic paint, a paint brush, scissors, mini clothes pins, and twine (the gold acrylic paint pictured was for the clothes pins, but we decided later to keep them unpainted).
You can find all of these materials at your local craft store!

Directions:
1. Paint each letter white with the acrylic paint (My oldest son helped paint! It was an easy project for him and he enjoyed being a part of the Thanksgiving preparations!).
2. Cut kraft paper into 4×7 inch rectangles using a paper cutter.
3. Using scissors, cut a triangle out of the bottom of each paper rectangle. We made a stencil out of scrap paper to make sure each triangle cut was the same.
4. Once the letters are dry, remove the backing and attach one to each piece of kraft paper (the adhesive wasn’t very sticky on ours so we placed heavy books on top of each until they set).
5. Cut one long piece of twine and attach each flag with two mini clothespins, leaving equal space between the flags and extra twine on each end for hanging.

DIY Thanksgiving Garland

DIY Thanksgiving GarlandWe first made the garland on one long strand of twine to hang on the bar in the dining room as well as the mantle in the living room.

DIY Thanksgiving GarlandYou can also  put each word on its own piece of twine to create multiple levels!

DIY Thanksgiving Garland

We love our “Give Thanks” garland and we hope you do too! Subscribe to blog.vickybarone.com by email or on Bloglovin’ to see more of our Thanksgiving coming soon!

P.S. Our Thanksgiving Table Setting!

Categories
Holidays Kids Press Products

Holiday Ornaments Exclusively at The Land of Nod

In addition to the 22 personalized holiday ornaments I have available in my Etsy shop, I created three others exclusively for The Land of Nod!

Click here to see all three, or click on the pictures below to see each: a beaver, a nutcracker, and a Scottie dog!

Personalized Holiday Ornaments by Vicky Barone for Land of NodPersonalized Holiday Ornaments by Vicky Barone for Land of NodPersonalized Holiday Ornaments by Vicky Barone for Land of Nod


*Photography by The Land of Nod

Categories
DIY Holidays Lifestyle Parties and Events Projects

DIY Fall Flower Arrangement

Fresh flowers are beautiful, but buying them from a flower shop in already-made arrangements can be pricey. Here’s a quick and simple way to make your own arrangement using a cheap bouquet from the grocery store. We used a 4 dollar bouquet and a simple glass vase from the dollar store and created this low arrangement that’s perfect for our Thanksgiving table!

DIY Fall Flower Arrangement

Materials: A small bouquet of fresh flowers, a vase, tape, and scissors.

Directions:
1. Put water and flower food into your vase, making sure the outside of the vase is dry so the tape will stick.
2. Use tape to create a crisscross pattern on the top of the vase.
3. Cut each flower stem at a diagonal and place each into their own hole in the tape lattice.

Now you have a beautiful low flower arrangement to add to your Thanksgiving centerpiece.
Check out the flower arrangements we made for our Pizza and Champagne Party!

P.S. With the support of the tape and a few more bouquets, you can make an even bigger arrangement! Martha Stewart shows you how with this large bowl and some beautiful dahlias.

Categories
Holidays Lifestyle Parties and Events Things I Love

Things I Love: Thanksgiving Table Settings

Happy first day of November! As we gear up for Thanksgiving, we wanted to share some of our favorite table settings!


Things I Love: thanksgiving Table Settings
1. Jenny Hobick | 2. Confetti Pop | 3. Daily Candy | 4. Scout Blog | 5. Nyla Free Designs

We’re so excited to pull together our own table setting and celebrate the holidays with our loved ones. We will be posting different elements from our Thanksgiving table as we create them, so check back soon to see what we’ve come up with!

P.S. Check out our Thanksgiving Table Setting here!

Categories
Family Holidays Kids

Happy Halloween!

Happy Halloween everyone!  We started our celebration last night at a Halloween party.  Here are the boys in all their glory.  This is the only shot I could get of them both facing forward and somewhat looking at the camera.  After about 10 minutes of attempting to corral them into some semblance of a posed picture, I gave up.  It’s just way too exciting being in our costumes and trick-or-treating.  If you’re looking for a cute big brother-little brother costume combo, the tried-and-true Batman and Robin does the trick.  I’m amazed at how incredible the Batman costume is!  Apparently costume manufacturing has come a long way since I was a kid because I vaguely remember costumes in the stores being big plastic bags that featured a hole for your head, arm holes and pictures on the front and/or back of whatever the costume was-which is why my mom usually made our amazing get-ups.  The more elaborate ones included a plastic hat of some kind too.  Last night my little guy was the real Batman and I’m pretty sure he won’t forget it.  His cohort Robin had no idea who he was, but he was very excited to have a costume on too (although he adamantly refused to wear his mask, so this one was added in Photoshop).  Later in the night, Robin attempted a candy snag which Batman didn’t appreciate (don’t worry, Robin had his own candy pail too!).  I guess just like brothers, Batman and Robin had their moments as well.

Happy Halloween | Batman and Robin

Happy Halloween!

As you can see, it was equally as difficult to get a picture of the three of us without costume adjustments and distractions. By the way, did you know that Batman and Robin’s mother was a viking?

Happy Halloween everyone! Have fun and be safe!