Categories
DIY

DIY Felt Holly Coffee Sleeve

Christmas is just 11 days away, can you believe it?! Today we’re sharing a holly coffee sleeve to get you and your coffee into the Christmas spirit!

DIY Felt Holly Coffee Sleeve | Vicky Barone

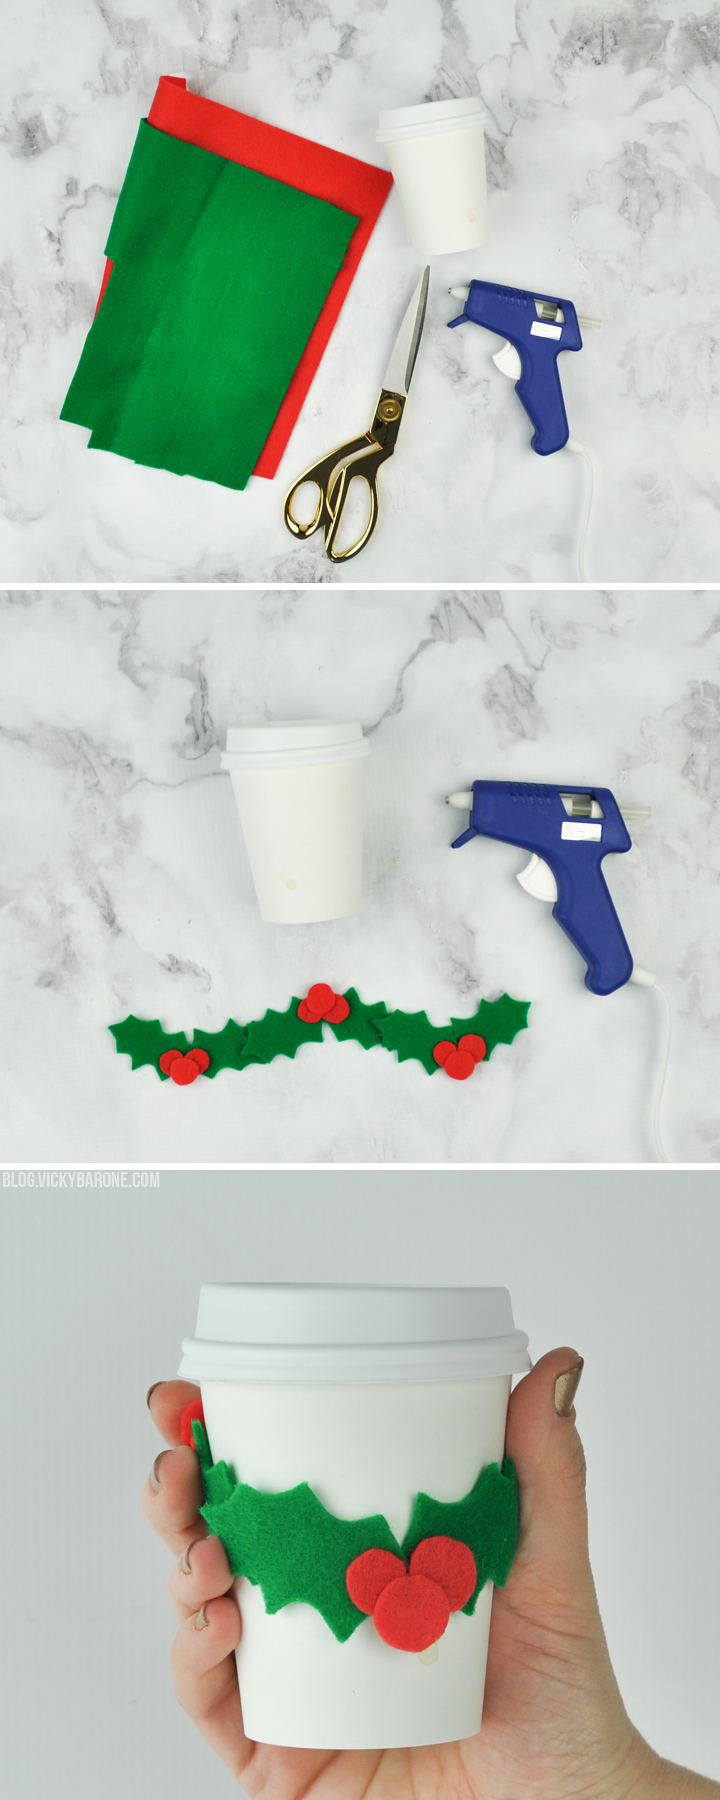
Supplies: red and green felt, scissors, and hot glue.

Directions:
1. Cut holly leaves out of the green felt. We sketched up a holly leaf we liked on card stock and cut it out to make a stencil so each of the leaves were identical.
2. Cut holly berries out of the red felt.
3. Glue holly pieces together in sections. Glue two holly leaves together and add berries on top until you have three holly shapes.
4. Measure around your to-go cup to see how much length you will need.
5. Glue holly shapes together, overlapping them if necessary to make the circle the right size for the cup.
6. Slide the holly sleeve over your cup and enjoy!

DIY Felt Holly Coffee Sleeve | Vicky Barone DIY Felt Holly Coffee Sleeve | Vicky Barone

These would make great last minute DIY gifts for friends and family! We hope you’re having a wonderful week and getting excited for the holidays!

Categories
DIY Holidays Recipes

DIY Chocolate Spoons

This post contains affiliate links. If purchased, I will receive a commission, but the price stays the same for you!

We are SO excited to share all the new Christmas content we’ve been working on! First up, some delicious chocolate spoons to give as gifts, to add to a hot cocoa bar, or just keep for yourself to stir your coffee! Here’s how to make your own…

DIY Wilton Chocolate Spoons | Vicky Barone

Supplies: chocolate candy melts, spoon-shaped candy mold, white candy melts, and sprinkles.

Directions:
1. Thoroughly wash and dry the silicone candy mold before using.
2. Melt chocolate candy melts in a microwave safe bowl for 30 second intervals, stirring frequently until smooth.
3. Scoop melted chocolate directly into each mold OR scoop the chocolate into a Ziploc bag and then pipe it into the molds.**
4. Gently shake and tap the mold to release any air bubbles. Add more chocolate as needed.
5. Place silicone mold in the fridge for the chocolate to harden.
6. Carefully remove spoons from mold. If any snap, you can put them back together by using some melted chocolate as glue and popping them back in the fridge.
7. Melt white candy melts.
8. Scoop white candy melts into a Ziploc bag and cut a very small corner of the bag.
9. Drizzle the white chocolate over the spoons and immediately top with sprinkles.
10. Enjoy with coffee, cocoa, or milk!

**The silicone mold packaging directions suggest breaking the candy melts into small pieces, adding them directly to the mold, and microwaving the chocolate in the mold. We tried it both ways and preferred melting the chocolate before placing it into the mold!

DIY Wilton Chocolate Spoons | Vicky Barone DIY Wilton Chocolate Spoons | Vicky Barone DIY Wilton Chocolate Spoons | Vicky Barone

We hope you’re having a sweet week! Don’t forget to follow Vicky Barone on Instagram for lots more Holiday inspiration, cards, giveaways, and more!

Categories
Holidays Things I Love

Holiday Gift Guide 2016: Etsy Finds

Happy Cyber Monday! In honor of this super-sale occasion, we are kicking off our 2016 Holiday Gift Guides with some of our favorite finds from around Etsy! We love shopping small and supporting local and handmade business, so we gathered some awesome products we think you’ll love. Click the links below to check them out!

Holiday Gift Guide 2016 | Etsy Finds | Vicky Barone

1 | 2 | 3 | 4 | 5 | 6 | 7 | 8 | 9 | 10

Happy shopping! And don’t forget – we have a sale going on in the Vicky Barone Designs Etsy shop. Use the code CELEBRATE15 to save 15% off your total purchase!

Categories
DIY Holidays Kids

Personalized Holiday Thank You Cards by Places for Faces

The holidays are over, which means it’s time to put away the Christmas decorations, and start those thank you notes! Whether you’d like to thank someone for having you as a house guest, or you’d like your kids to thank their friends and family for all their awesome new toys, Places for Faces is here to help make the process easier!

From thank you cards to fill-in thank you notes, Places for Faces has you covered! Check out all the ways you can use Places for Faces long after the holidays have passed…

Personalized Holiday Thank You Cards by Places for Faces | Vicky Barone

Personalized Holiday Thank You Cards by Places for Faces | Vicky Barone

Choose from flat cards that print two to a sheet or folded cards. Once you purchase a PDF, you can print it as many times as you’d like! Never worry about having to run back out to the store when you run out of cards. You’ll have endless thank you notes just waiting in your email inbox.

Personalized Holiday Thank You Cards by Places for Faces | Vicky Barone

Places for Faces now offers fill-in thank you notes! Choose from the basic template above, or the kids’ version below!

Personalized Holiday Thank You Cards by Places for Faces | Vicky Barone

Personalized Holiday Thank You Cards by Places for Faces | Vicky Barone

All your little ones have to do is fill in the blanks! They’ll be soaring through their thank yous in no time at all (and they’ll love seeing their little faces at the top!).

Personalized Holiday Thank You Cards by Places for Faces | Vicky Barone

Personalized Holiday Thank You Cards by Places for Faces | Vicky Barone

As a special treat for all our readers, here’s a coupon code for 50% off any template! Use the code: THANKS2016 at checkout and your template will ring it at just 99 cents. And don’t forget, you can print your purchased templates as many times as you want!

Follow @placesforfaces on Instagram for updates, deals, and lots of holiday inspiration. Use #placesforfaces for a chance to be featured on our social media sites! We’re on Facebook too! “Like” Places for Faces on Facebook to stay in the loop on upcoming specials and new stickers and templates! We can’t wait to see your personalized Places for Faces creations!

Categories
Holidays Parties and Events Recipes

Peppermint Martini

Happy Friday! Today we’re sharing a deliciously festive cocktail that’s perfect for your upcoming holiday parties (or just a quiet night home on the couch watching Christmas movies!).

Peppermint Martini | Vicky Barone

Peppermint Martini
serves one

vanilla frosting
candy canes
1 oz Kahlua (try Peppermint Mocha!)
1 oz Iced Cake vodka
2 oz sweetened creamer (we used french vanilla coffee creamer)

Directions:
1. Use a knife to spread the frosting around the rim of the martini glass.
2. Place a few candy canes in a Ziploc bag and seal shut. Crush the candy canes using a hard object like a rolling pin or the bottom of a glass jar.
3. Pour the crushed candy canes onto a round plate.
4. Dip the martini glass rim into the crushed candy canes until all of the frosting is covered.
5. Add Kahlua, vodka, and creamer to the glass.
6. Stir with a candy cane and enjoy!

Check out the timelapse video below to see exactly how we made them:


Peppermint Martini | Vicky Barone

Peppermint Martini | Vicky Barone

Peppermint Martini | Vicky Barone

Have a wonderful weekend, everyone!

Categories
Holidays Parties and Events Recipes

White Cranberry Mimosas

Looking for a quick and impressive cocktail for a holiday party this year? These white cranberry mimosas are real head-turners and SO delicious. White Cranberry Mimosas | Vicky Barone

Ingredients:
Prosecco
White Cranberry Juice (We used Apple with White Cranberry juice!)
Frozen cranberries

Pour an ounce of juice in a champagne glass and top with prosecco. Stick a few cranberries on a cocktail pick and rest them on the rim of the glass.

White Cranberry Mimosas | Vicky BaroneEt voila! Holiday mimosas to celebrate the season. Enjoy!


Categories
DIY Holidays Kids

DIY Bead & Pipe Cleaner Christmas Ornaments

Today we’re sharing some classic DIY ornaments that you might have made when you were a kid! These candy canes and wreaths are super simple and so much fun for kids.

DIY Bead & Pipe Cleaner Christmas Ornaments | Vicky Barone

For the candy canes you will need red or white pipe cleaners, red and white tri-beads, and some red ribbon. Take a pipe cleaner and add one bead, then secure the end of the pipe cleaner to that bead. Add more beads, alternating between red and white, until you cover about 2/3 of the pipe cleaner. Twist the end of the pipe cleaner around the last bead and cut off excess. Bend the bead-covered pipe cleaner into the shape of a candy cane and tie on a ribbon where it will hang on a tree branch.

For the wreaths you will need green pipe cleaner, red and green plastic beads, and a metal ornament hook. Alternate between groups of green beads and a groups of red beads, or groups of green beads and a single red bead. Great creative! When you cover about 2/3 of the pipe cleaner, curve it into a circle and twist the two ends together to secure the wreath. Cut off excess pipe cleaner and add an ornament hook.

That’s it! Simple ornaments your little ones will love that will make you feel like a kid again!

Categories
DIY Holidays

DIY Wine Bottle Santa

Two years ago we sewed up some goofy holiday sweaters to put on wine bottles and give as gifts over the holidays. This year, we went a step further and made a Santa suit!

DIY Wine Bottle Santa | Vicky Barone

Materials:
– A free printable template found here.
– Felt in red, white, black, and gold.
– Three white buttons.
– A white pom pom.
– A sewing machine.
– A needle and thread.
– A hot glue gun.
– Fabric scissors.

Directions:
1. Print the template from this post. Trace it onto the red felt twice and cut it out.
2. For the suit: cut out two thin strips of white felt the same width as the base of the suit. Cut six pieces of white felt the same thickness to correspond with the sleeve cuffs and the neck. Sew each of these pieces onto the front and back of the suit.
3. For the belt: cut out two strips of black felt the same width as the template suit to create the belt. Cut a rectangle out of gold and a smaller rectangle out of black to create the buckle. Sew the belt onto the suit and hot glue the buckle to the belt.
4. For the hat: making the base the same width as the neck of the suit, cut two hat outlines out of red felt. Cut two strips of white felt for the base of the hat. Sew the white strips to the bottoms of each side of the hat.
5. Sew the three buttons onto the front of the suit using a needle and thread (or use hot glue).
6. Once all of the little pieces are sewn onto the suit, you will have just the front and the back of the suit as well as the front and back of the hat. With the details facing out, sew the suit together leaving the base, neck, and arm holes open. Sew the hat together, leaving the base open.
7. Use hot glue to attach the pom pom to the tip of the hat.
8. Use fabric scissors to cut away excess felt and thread on the suit and the hat.
9. Slip the Santa suit over a bottle of wine and add the hat on top! Use as decoration for the holidays or give as a hostess gift.

DIY Wine Bottle Santa | Vicky BaroneIsn’t he cute? Subscribe to Vicky Barone in the right sidebar to stay in the loop for MUCH for Holiday inspirations to come!