Every Fall I find myself looking in stores for the perfect wreath for my front door and every Fall I find myself disappointed that I can’t find exactly what I’m looking for. I usually end up spending money on something seasonal that I’m “eh” about and I secretly envy the people who have beautiful handmade wreaths adorning their equally beautiful doors. It’s usually a question of how much time I really have to spend making the perfect wreath for my door that I love for exactly 2 months. Then, I’ll get tired of it, and probably spend more money buying a storage solution for the garage where it will sit and wait for its inevitable trip to the dump one day when I’m feeling extra feisty and actually have the time and energy to clean out the garage.
I’ve seen some really beautiful yarn-wrapped foam wreaths that I’ve been admiring for some time now and this year decided that I’d give it a try. One weekend I thought I’d be able to complete a yarn-wrapped wreath during the variable time in the afternoon when the kids have their ‘quiet time.’ Ha. Sadly to say, I spent the day feverishly working to try to finish the “wrapping” which proved to be much more time consuming than I had hoped. In all, I’d say it took about 3 hours. About halfway through, I was ready to quit, but it was by sheer determination that I didn’t get the supplies for naught that kept me going. I pushed through among kids wandering around me and intermittent noise/dogs barking/kids yelling. Once I was done, I was really happy with the result but was determined to not have to yarn-wrap a wreath ever again (or at least for a couple of years).
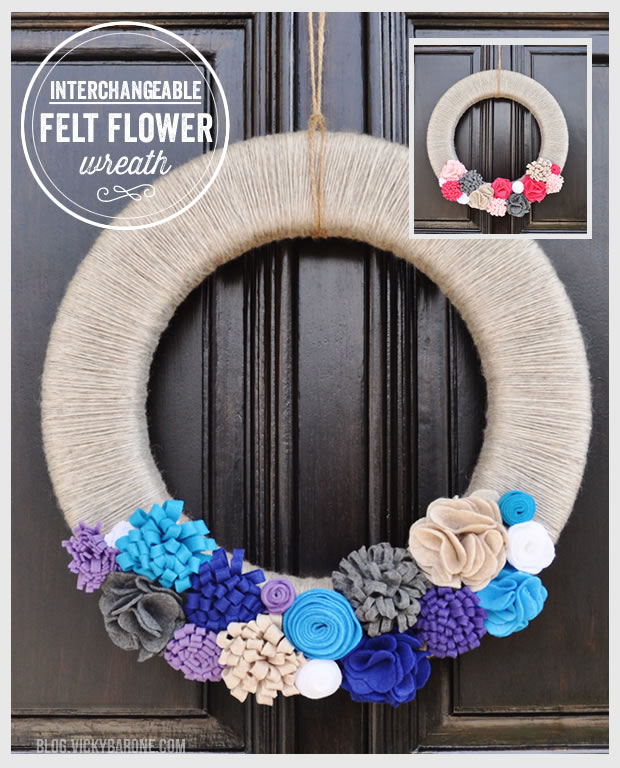
My plan was to adorn the wreath with felt flowers (again something I’ve been admiring on sites like Pinterest and Etsy). I was originally going to hot glue them directly to the yarn-wrapped wreath (which secretly made me cringe inside because I was sure it would ruin the wreath if I ever tried to remove them). Then it hit me! I could reuse the wreath seasonally and swap out the colors, theme, etc. if I could find a way to attach the felt flowers in a way that wouldn’t damage the wreath. This is what I came up with:

Materials: A foam wreath, yarn, a hot glue gun, hot glue sticks, felt, scissors, and bobby pins.
What to do:
1. Gathering as much patience as you can muster, wrap the foam wreath with yarn. Instead of wielding the entire skein, I unraveled a section of yarn around my hand – wrapping it around about 35 times so I had a little wad of yarn I could easily maneuver through the wreath. When that piece was done, I tied a new piece to it making sure the knot was on the back.
2. Make felt flowers! We cleared out the felt section of Michael’s of every color they had to make sure we were well equipped for every season. Check out the links below for some great tutorials on felt flowers!
1. rolled felt flowers ¦ 2. felt hydrangeas ¦ 3. slanted petal rolled flowers ¦ 4. felt rosettes
3. Cut out a small circle of felt and put a bobby pin in the center of it (for bigger flowers, the length of the bobby pin can also be centered as the ends will be hidden under the petals – for smaller flowers, push the bobby pin all the way onto the circle so that only one end hangs off. This will make it easier to hide just one end under another flower).
4. Put hot glue on the bobby pinned circle and press to the bottom of a flower.
5. Slide the flowers onto the wreath by slipping the bobby pin under a few strands of yarn until it feels secure.
You can hang the wreath using some leftover yarn or a piece of twine like we did!
Enjoy your interchangeable wreath for any season by swapping out colors and mix and matching all of your different felt flowers! With so many great holidays coming up, we will be back soon with new color schemes!


15 responses to “Interchangeable Felt Flower Wreath”
[…] first is our fabulous fall wreath! This is an interchangeable felt flower wreath we made last month that is already going to good use with this Fall-inspired color […]
[…] at Virginia Tech this weekend! We’re showing a little Hokie pride with a maroon and orange felt flower wreath and our VT flag waving proudly out front. Happy Homecoming and go […]
[…] best part about our felt flower wreath is that it’s seasonal! Here is what it looks like this week, complete with fuzzy clip-on […]
[…] yet! Our next project is this candy cane striped Christmas wreath! You might recognize it from the Interchangeable Felt Flower Wreath we made earlier this year. It has served us so well over the past few months during the fall, […]
[…] just a week away! Here is the last touch to this year’s Thanksgiving decor: our ever-changing felt flower wreath! We decided to brighten up the traditional fall color palette to match our vibrant table […]
[…] Living Succulents | 3. Crepe Paper Flowers | 4. Rattan Balls | 5. Hydrangeas | 6. Easter Bunny | 7. Felt Flowers | 8. Baby’s […]
This Is my exact same idea!!!! I’m determined to do this and your article made me laugh because it was as if I was writing it. Glad I’m not alone! Thanks for the info!
Great minds think alike! Have so much fun making your wreath!
[…] here to find the original instructions for this interchangeable wreath and you’ll be ready for […]
[…] this St. Patrick’s Day decor, we pulled out our trusty Interchangeable Wreath. But instead of adorning it with felt flowers, we made a handful of felt shamrocks! Keep reading to […]
[…] trusty seasonal wreath is back at it, just in time for the 4th of July! This time we added felt buntings to give it some […]
[…] middle photo above). 2. Create your felt flower. We linked to four different felt flower tutorials in this post, if you’d like to see. For these napkin rings, we made miniature versions of two different […]
[…] up of some of our favorite felt flower wreath designs from the past few years. Here’s the original post if you’d like to see how the interchangeable felt flower wreath came to be! We have had so […]
[…] the flowers in a box. If you start to click some of these links, you’ll see other options, like wreaths, headbands, […]
[…] From Blog.VickyBarone.com […]