Happy Thanksgiving! We hope your day is filled with lots of food, love, and thankfulness! We thought we’d share a little garland round up if you’re looking for some last-minute decor. Click the links below to see how to make each one!


Happy Thanksgiving! We hope your day is filled with lots of food, love, and thankfulness! We thought we’d share a little garland round up if you’re looking for some last-minute decor. Click the links below to see how to make each one!
This post contains affiliate links. If purchased, I will receive a commission, but the price stays the same for you!
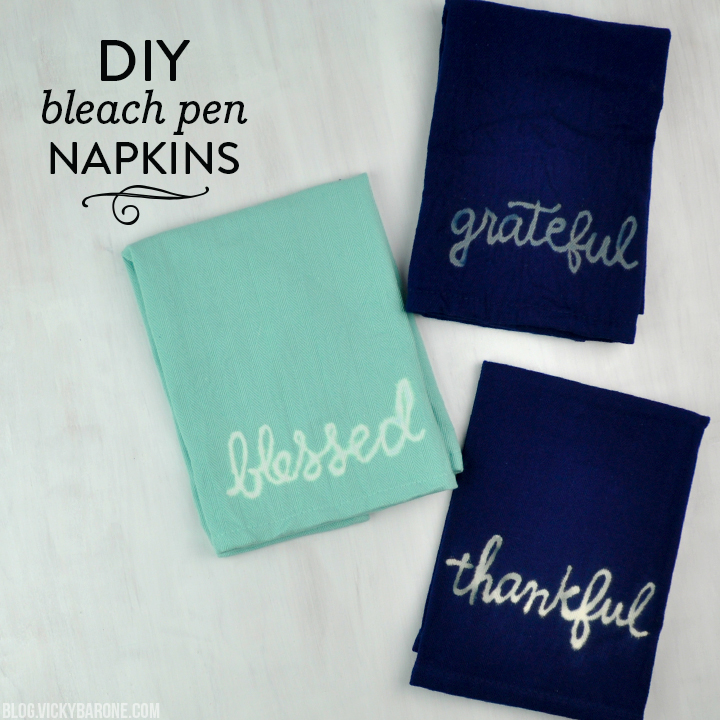
We are so excited for Thanksgiving tomorrow! Today we’re sharing a fun DIY to personalize your table settings. Here’s how…
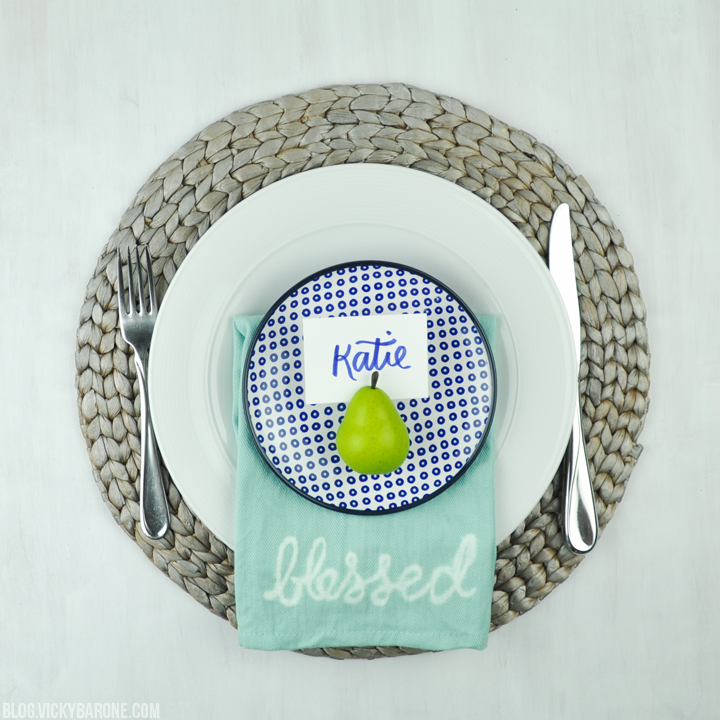
We have seen the idea for bleach pen napkins all over Pinterest and we just had to try it out for ourselves.
Supplies: fabric napkins (ours were from Target), a bleach pen, and cardboard.
Directions:
1. Test out your bleach pen writing skills on a piece of scrap cardboard before using it on a napkin. Once you feel comfortable with the flow of the bleach, you can get started!
2. Place another piece of cardboard underneath a napkin to catch any bleach that may seep through.
3. Choose the place on your napkin that you want your word or design and carefully draw it on with the bleach pen.
4. Set a timer for 10 minutes and check on your napkin. We found that with the lighter napkins, the bleach worked very quickly, but the darker napkins needed more time.
5. When the bleach has done it’s job, put the napkin under running water to remove the excess bleach.
6. Let the napkins dry and they are ready to go!

P.S. Find these DIY pear place cards right here!
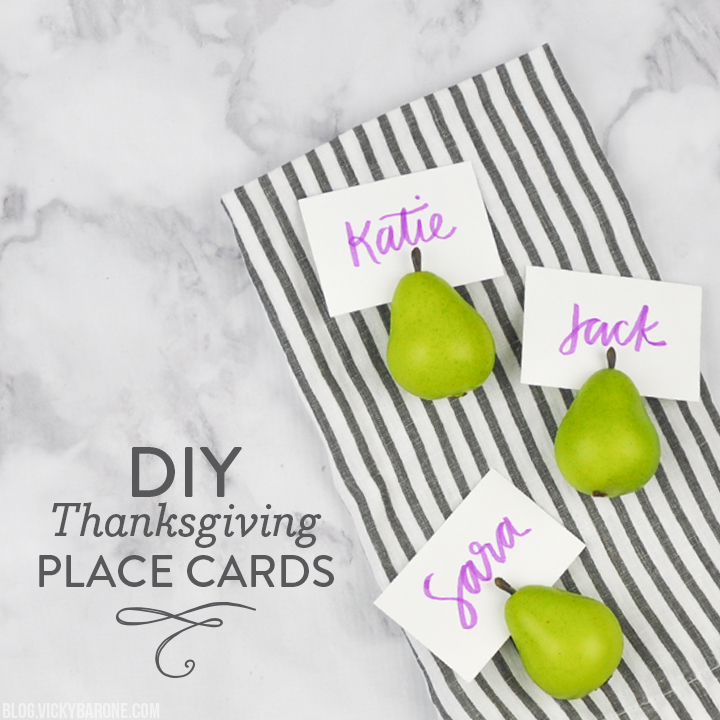
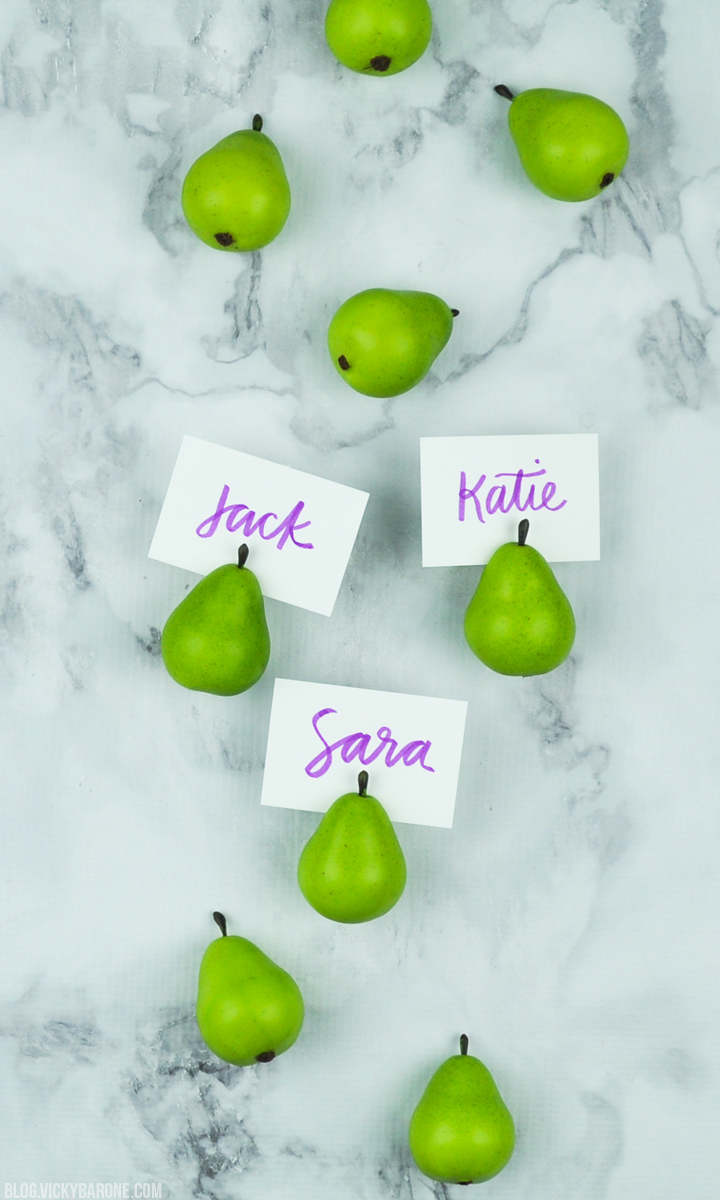
Happy Thanksgiving week! Today we’re sharing a super easy, last-minute place card tutorial to spice up your Thanksgiving tablescape! Here’s how to make your own…

Materials:
– Faux pears (we got ours at Marshalls, but you can find faux fruit at any craft store!)
– An X-acto knife
– White card stock
– A pen or marker (we used Tombow Dual Brush Pens)
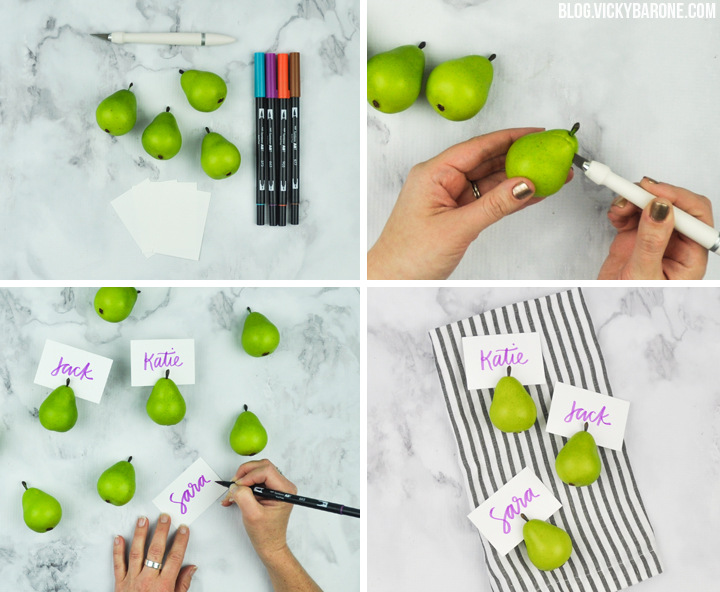
Directions:
1. Cut white card stock into small rectangles. Ours were about 2×3″
2. Use the X-acto knife to make a slit in the top of each of the pears.
3. Use a pen or marker to write names on each card (you can also print out name cards with your favorite font!).
4. Insert cards into pears and set on the table!

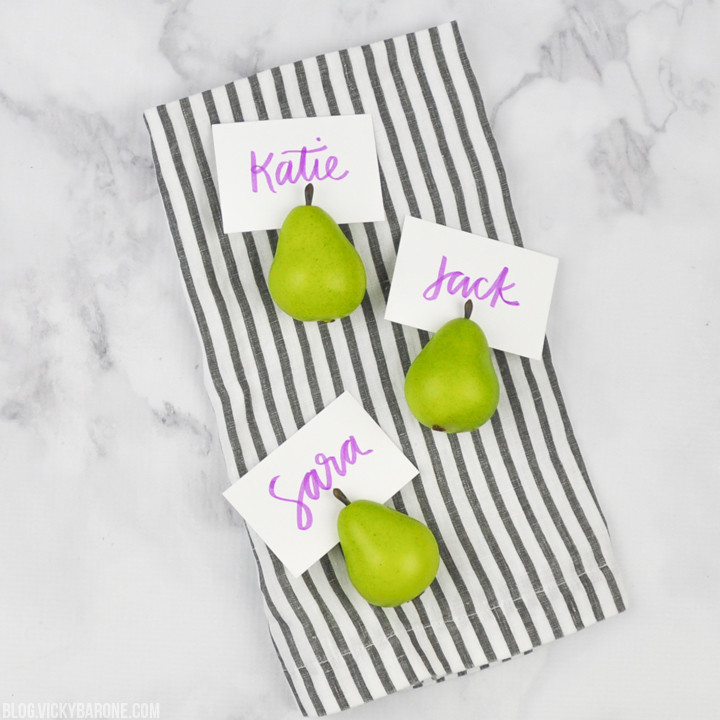
We hope you have the most wonderful Thanksgiving! For even more table setting ideas, click here!
For ideas about how to put together a functional and elegant table setting, check this out!

Before you pack away or toss out your Halloween decorations, how about a little spray paint to transition them into Thanksgiving mode? We took these mini plastic jack-o-lanterns and made them November-ready with a little metallic sheen. Here’s how…
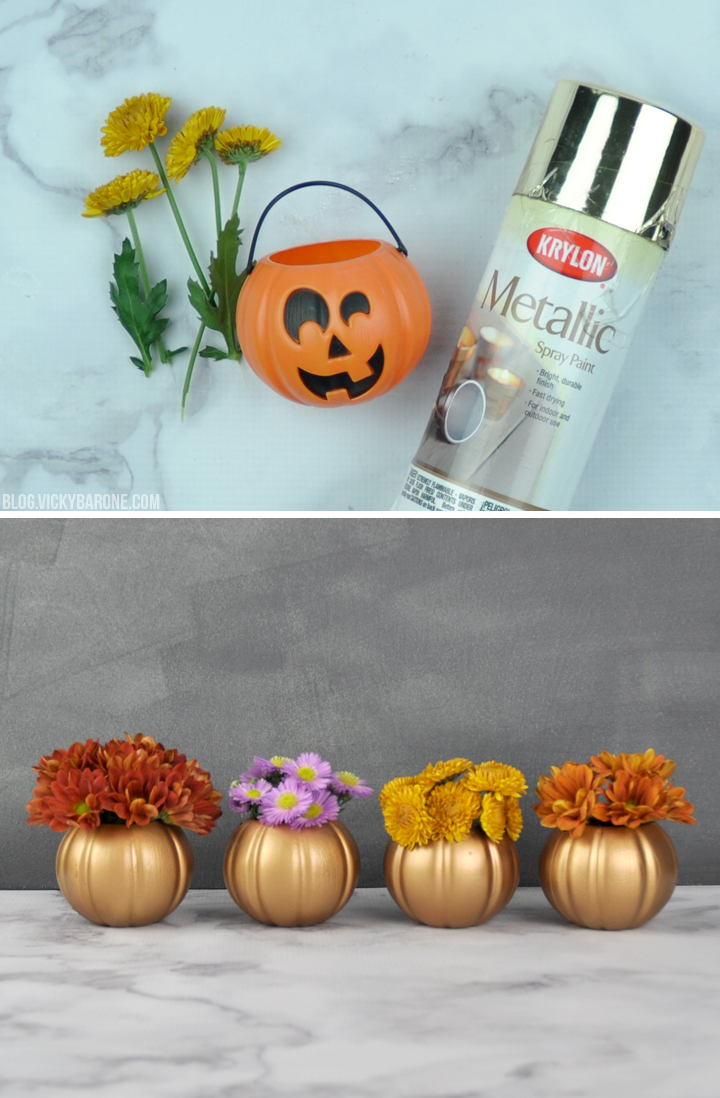
Supplies: mini plastic jack-o-lantern buckets (we got ours at Target, but they can be found in the Dollar Store too!), metallic spray paint, and fresh flowers.
Directions:
1. Remove the plastic handles and discard.
2. In a well-ventilated area (preferably outside!) spray paint the pumpkins.
3. When they pumpkins are fully coated and dry, add some water and fresh flowers.

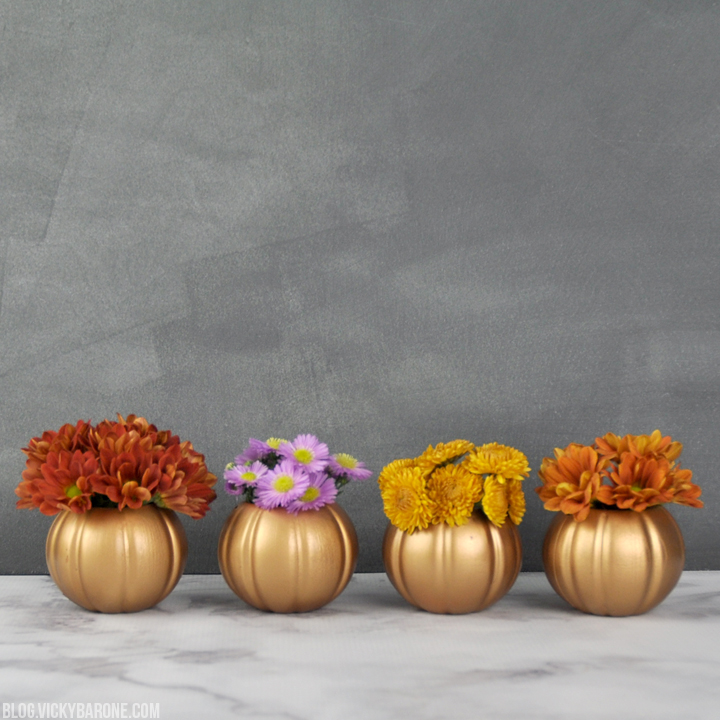

Aren’t they sweet? How will you decorate with your metallic planters?
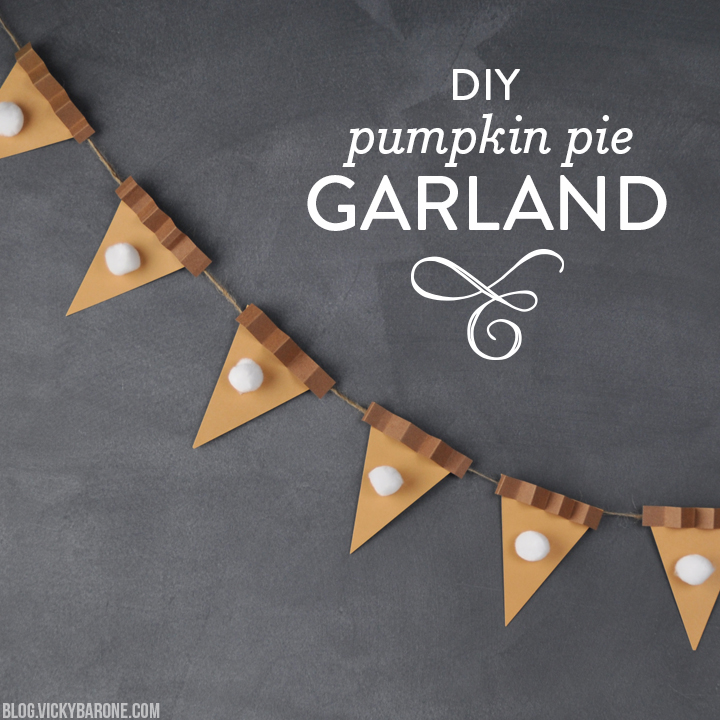
Thanksgiving is coming up and we are making fun decor to get into the spirit! Today we’re sharing a DIY paper garland with everyone’s favorite Thanksgiving dessert…
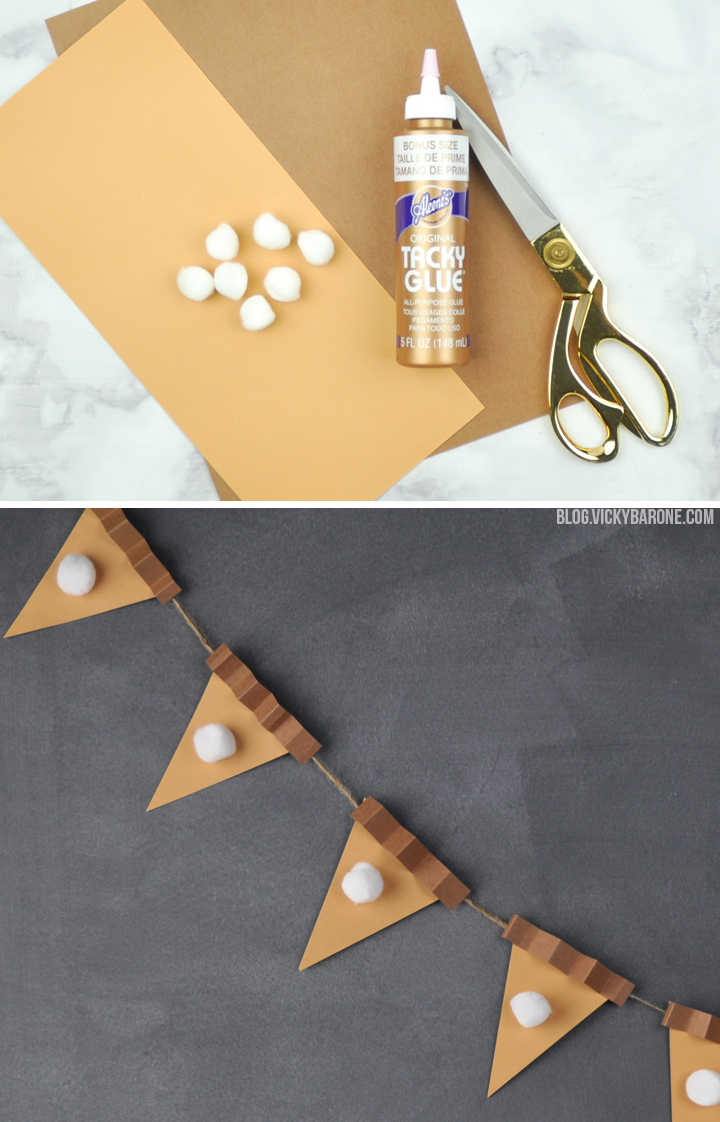
Supplies: brown and tan paper, mini white pom poms, craft glue, scissors, and twine.
Directions:
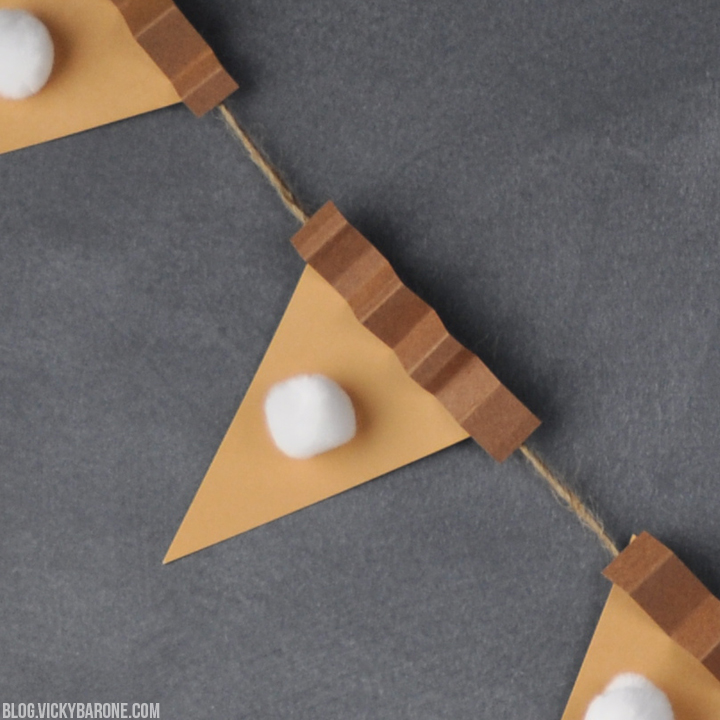
1. Cut triangles out of the tan paper to create the base of the pie slices.
2. Cut the brown paper into thin strips.
3. Accordion fold the brown paper and trim to fit the top of the tan pie slices.
4. Glue the brown paper crust to the top of the tan pie slices.
5. Glue the pom poms to the center of each pie slice.
6. When all the glue is dry, flip each of the pie slices over and attach twine to the backs.
7. Hang up your delicious garland and enjoy!
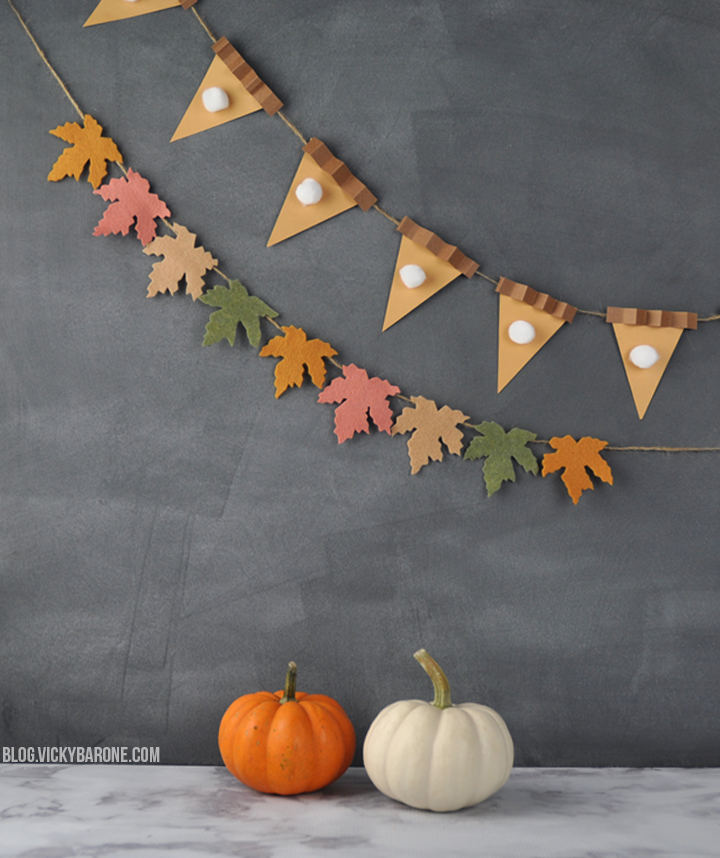
Want to make the felt leaf garland? Click here!


Be sure to follow Vicky Barone on Instagram for lots more holiday inspiration!

Need a little last-minute inspiration for your Thanksgiving table? Here are 10 beautiful and simple name tag ideas to add a personalized touch to each place setting.
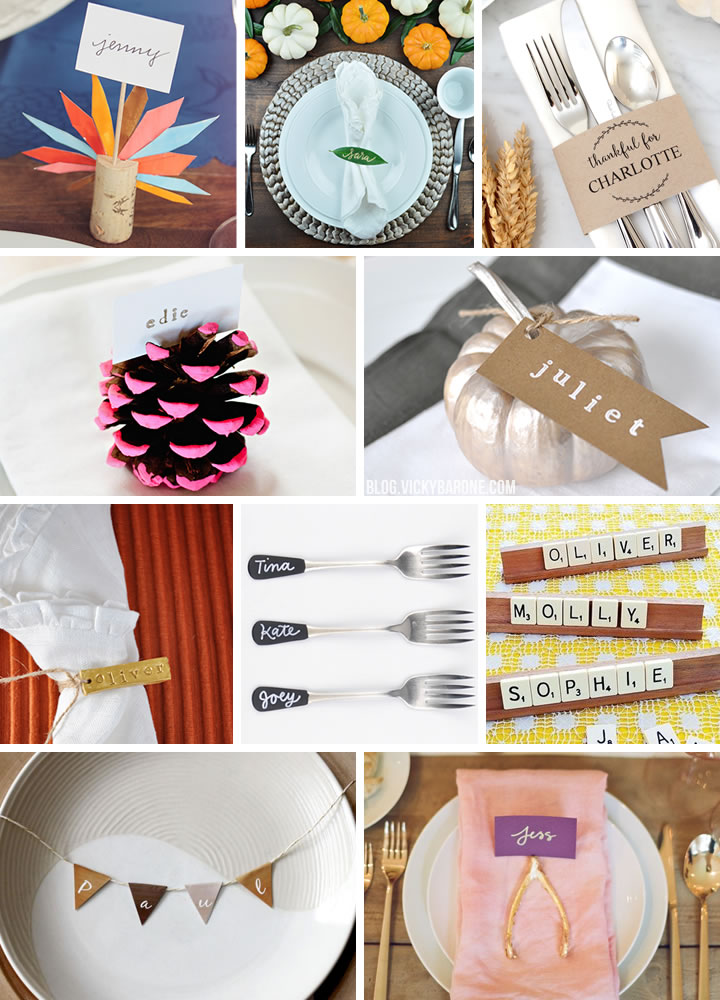 1. Turkey Feather | 2. Gold Lettered Leaf | 3. Printable Napkin Ring
4. Neon Pinecone | 5. Metallic Mini Pumpkin
6. Stamped Clay |7. Chalkboard Flatware | 8. Scrabble Names
9. Mini Bunting | 10. Gold Wishbone
Wishing you and yours a FABULOUS Thanksgiving!
We will be back on Friday with some Black Friday through Cyber Monday deals! Follow Vicky Barone on Instagram to stay in the loop!

It may not come as a surprise that we have a little obsession with candy eyeballs (see exhibit A, B, C, D, and E). We made no exception when decorating these cake pop turkeys for Thanksgiving! These delicious little treats take no time at all to put together (and they’re easier than they look!).

Supplies: cake pops, cake pop sticks, candy eyes, candy corn, pretzels, and dark cocoa candy melts.
Directions:
1. Bake cake pops using a mold or a machine. Let cool completely. Place in freezer overnight or until frozen.
2. Melt candy melts according to directions.
3. Dip a cake pop stick into the candy melts and then insert into center of cake pop.
4. Dip the cake pop into the candy melts and coat completely.
5. On a cookie sheet lined with waxed paper, lay down pretzels. Lay the cake pop down directly onto the bottom center of the pretzel. The candy coated cake pop will adhere to the pretzel as the candy melts harden.
6. Immediately press a candy corn and two candy eyes onto the front of the cake pop. If the candy melts harden too quickly, add a little more from the bowl of melted chocolate to the back of the candy corn and candy eyes and press onto the face.


No cake pop machine or mold? No problem! You can also use a marshmallow! To make the candy corn feathers, first spread a small circle of candy melts onto the waxed paper before resting the coated marshmallow down. Then add candy corn to the circle and let harden.

Have a wonderful weekend, everyone!
P.S. We are hosting a GIVEAWAY on Instagram! Head on over to this photo and check out how you can win TWO personalized ceramic ornaments!
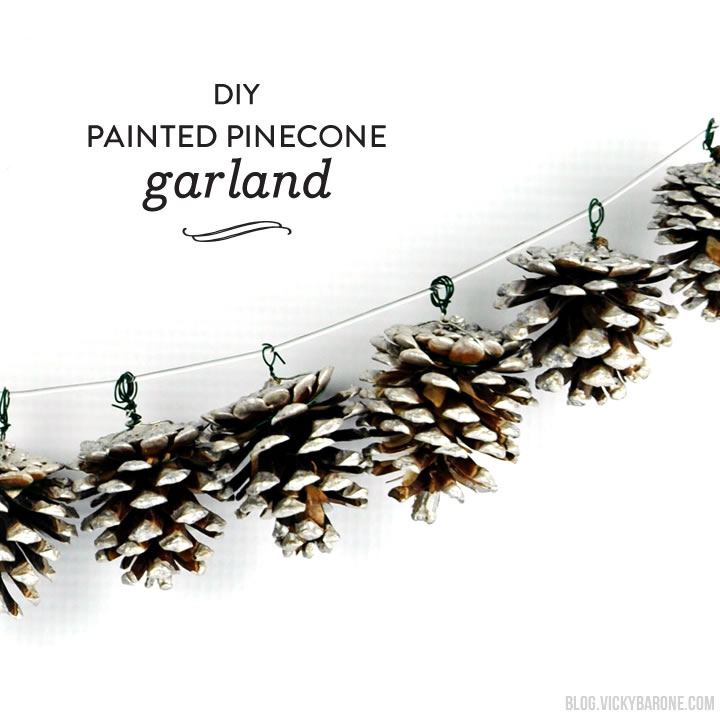
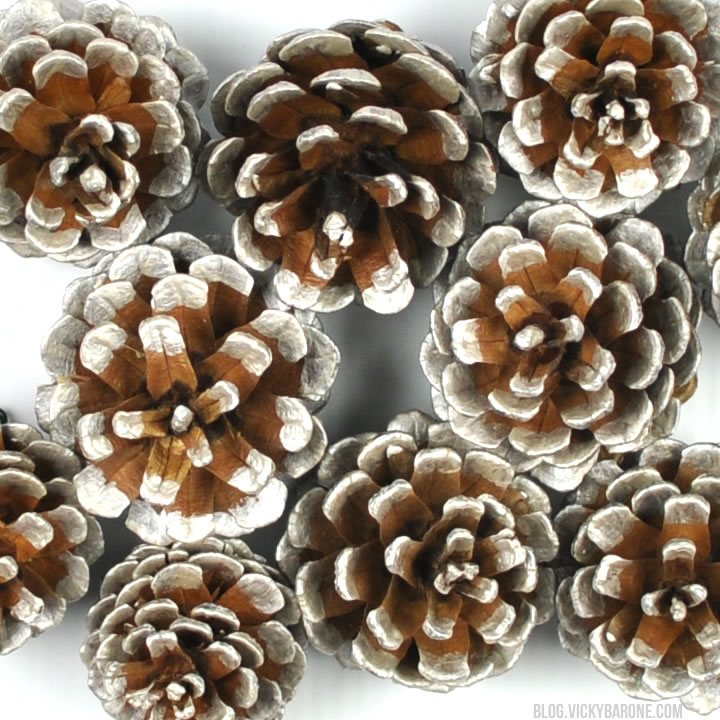
What a rainy week it has been. We thought we’d never see the sun! Fortunately, we know that the key to combating the weather is to create! Today we’re sharing the perfect rainy or chilly day activity: painted pinecones. Keep reading to see how we turned them into a garland that’s perfect for Fall and Winter…
 Painting pinecones, believe it or not, is a very calming activity. A faster way to decorate pinecones is by dipping the entire thing in paint and letting it dry. The outcome is super cute, but we were looking for just a touch of metallic, while still keeping an earthy feel.

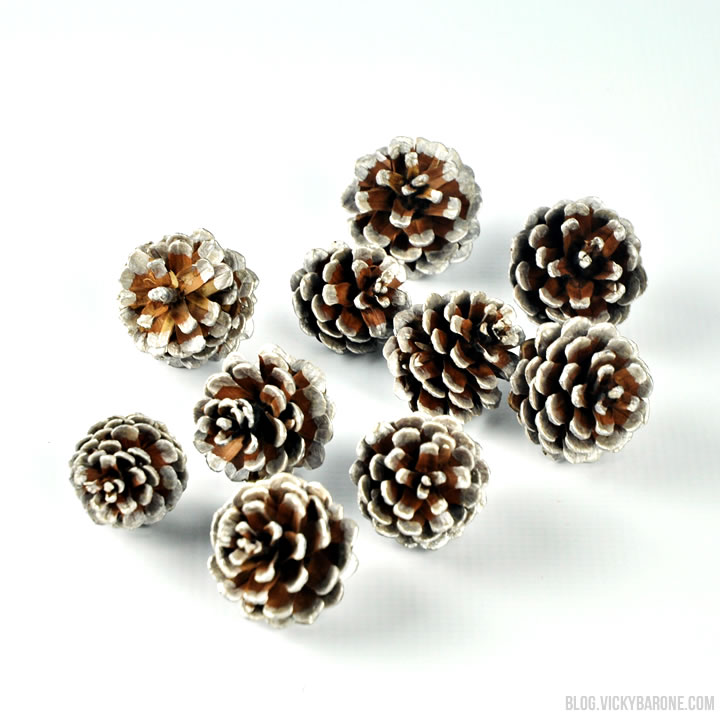
Supplies: pinecones, floral wire, metallic acrylic paint, a paint brush, and clear cord.
Directions:
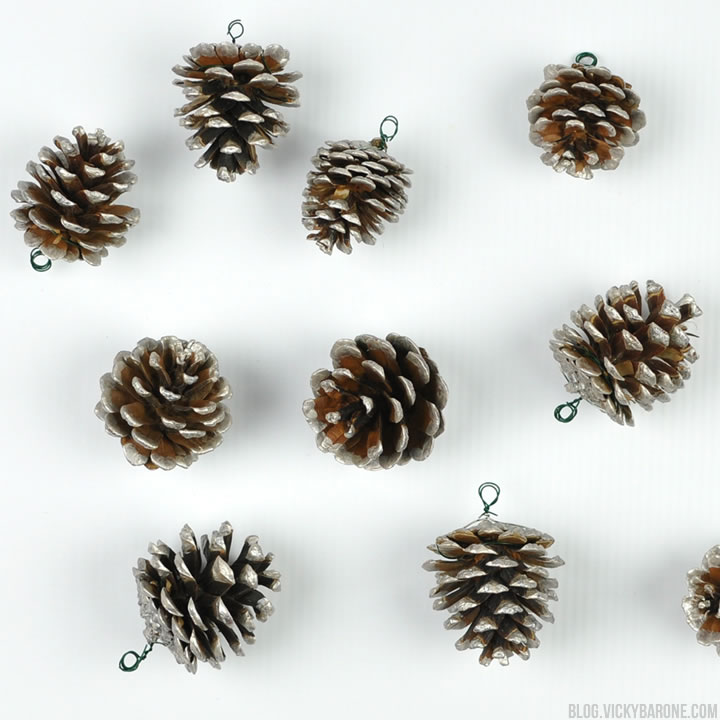
1. Cut about 6-8 inches of floral wire. Wrap it around the base of a pinecone (between the bottom layer and the second-from-the-bottom layer) once. Cross the two ends of wire as they pass each other and bend them up towards the base of the pinecone, opposite each other. Twist the ends together on the center of the base. Create a loop with the ends of the wire by wrapping them around a pen as many times as they’ll go. Slide the loop off the pen.
2. Now that you have loops on all the pinecones, you have a place to grip them while you paint! We painted the entire bottom of the pinecone, but only the outer tips of each scale, top and bottom.
3. When the paint is dry, string the pinecones onto the clear cord and hang your garland!

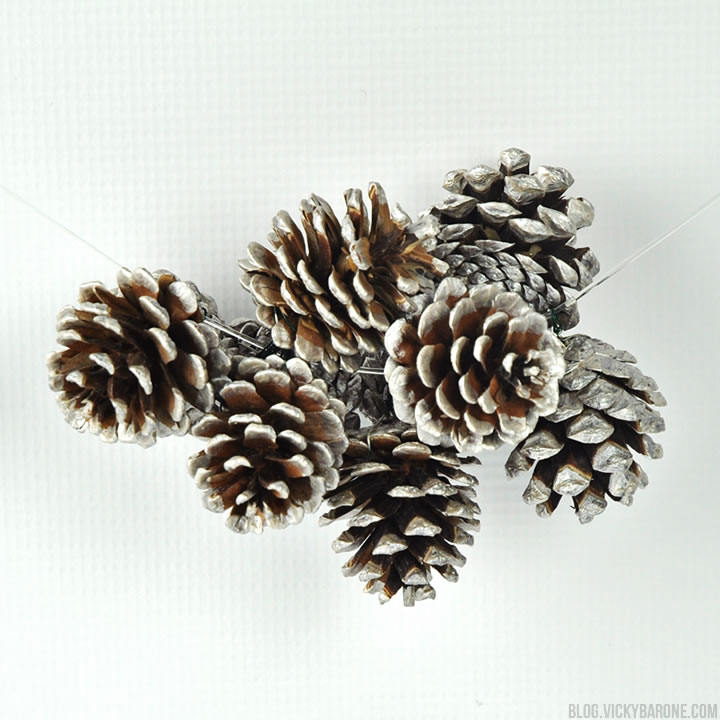
To make a cluster of pinecones, we pushed them to the center of the cord, letting them rest on top of one another (see above photo).

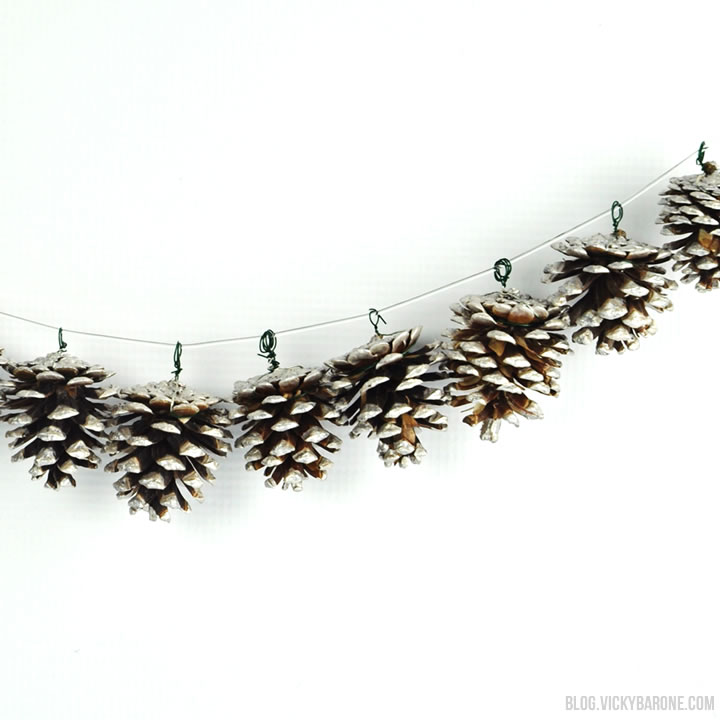
Hang this garland on your mantle or wrap it around your Christmas tree – the possibilities are truly endless. You could even just paint the pinecones and not add floral wire. They would look great scattered down the table runner on your Thanksgiving table or in a pretty bowl in the center of your coffee table.