Categories
DIY Holidays Recipes

Rice Krispie Halloween Characters

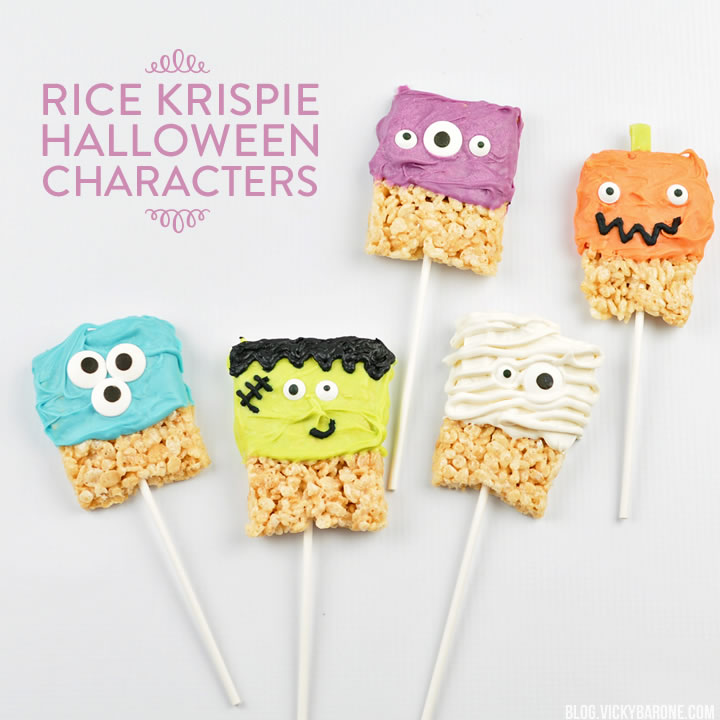
Our love for googly eyes is only paralleled by our love for candy eyeballs (the googly eyes of the dessert world). They took these rice krispie treats from a chocolate dipped dessert to a cast of hilarious Halloween characters in no time at all. Please, take our advice and keep a package of candy eyes in your pantry. You never know when you’ll need to add some personality to an otherwise emotionless treat!

Here’s how to make your own Halloween Rice Krispie Characters:

Rice Krispie Halloween Characters | Vicky Barone

Supplies: rice krispie treats (store bought or homemade), cake pop sticks, candy melts, black decorating icing, and candy eyeballs.

Rice Krispie Halloween Characters | Vicky Barone
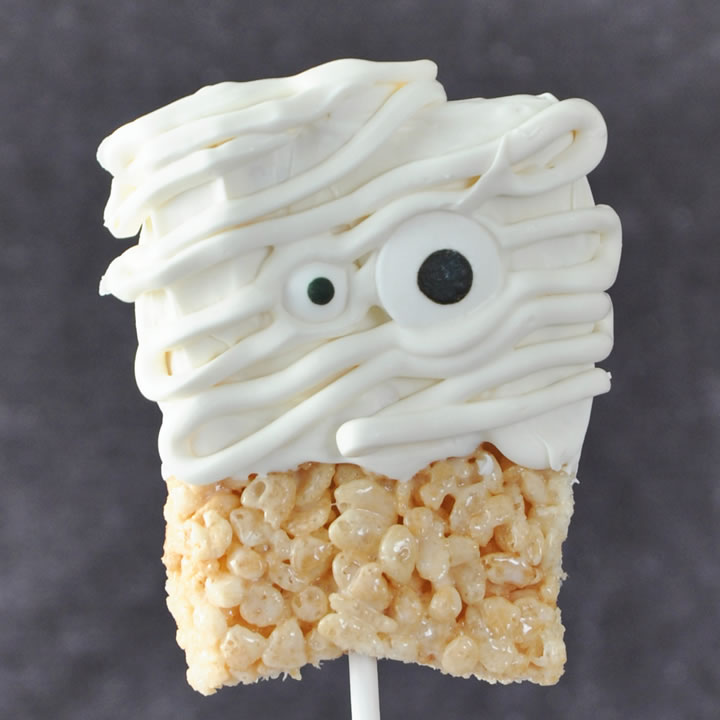
Mummy: Melt a bowl of white candy melts. Add a cake pop stick to the center of the rice krispie treat and dip the top of the treat into the melted chocolate. Use a spoon to help spread the chocolate around. Place treat on a cookie sheet lined with wax paper. Place in fridge to harden chocolate. Once hardened, scoop some more of the melted chocolate into a ziploc bag and cut off a small corner. Pipe the chocolate over the treat in diagonal zig zags to create the wrapped-up mummy look. Place two candy eyeballs on top and press down slightly so they look like they are between the wraps.

Rice Krispie Halloween Characters | Vicky Barone
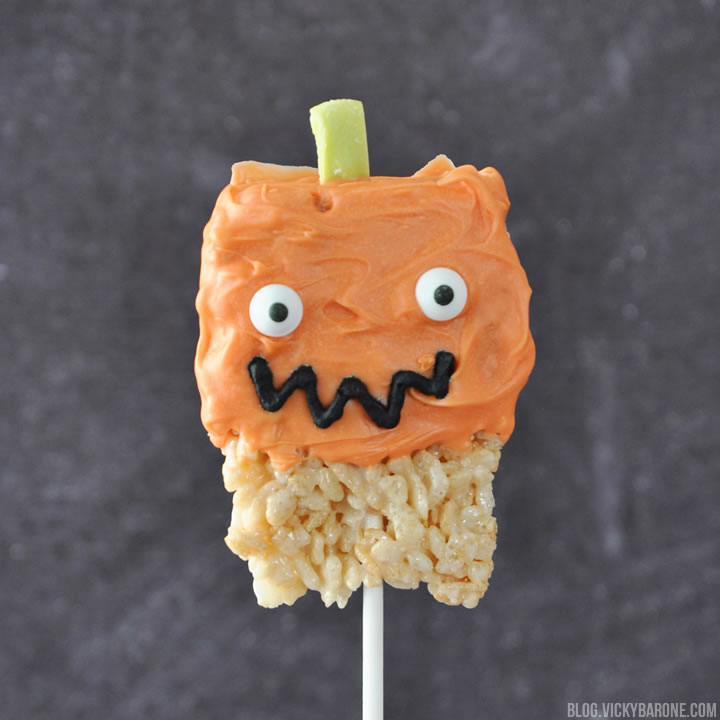
Jack-o-lantern: Dip top half of treat in melted orange candy melts and place on the cookie sheet. Immediately press candy eyeballs into the melted chocolate. Create a stem by cutting a green candy melt and sticking it in the top of the pumpkin. You can also use an Airhead or a green twizzler. Use the black decorating icing to create the mouth.

Rice Krispie Halloween Characters | Vicky Barone
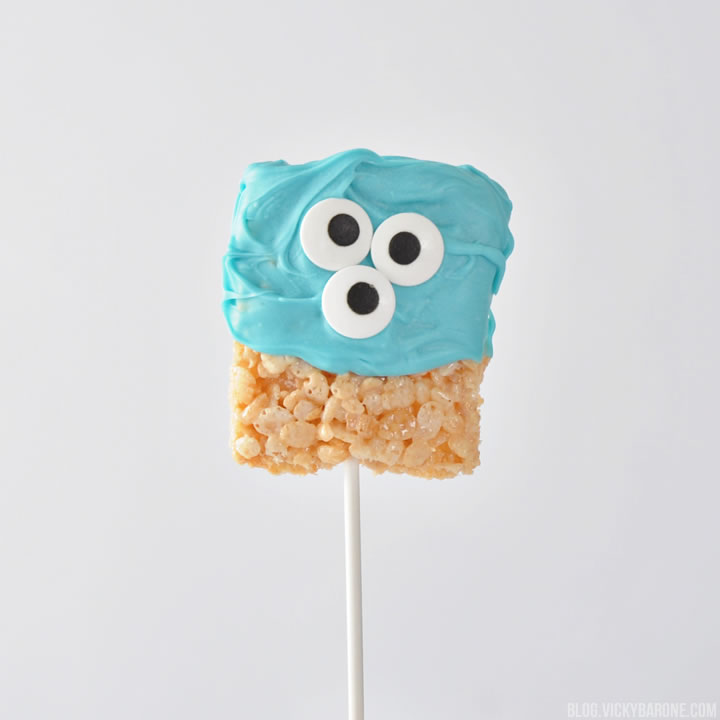
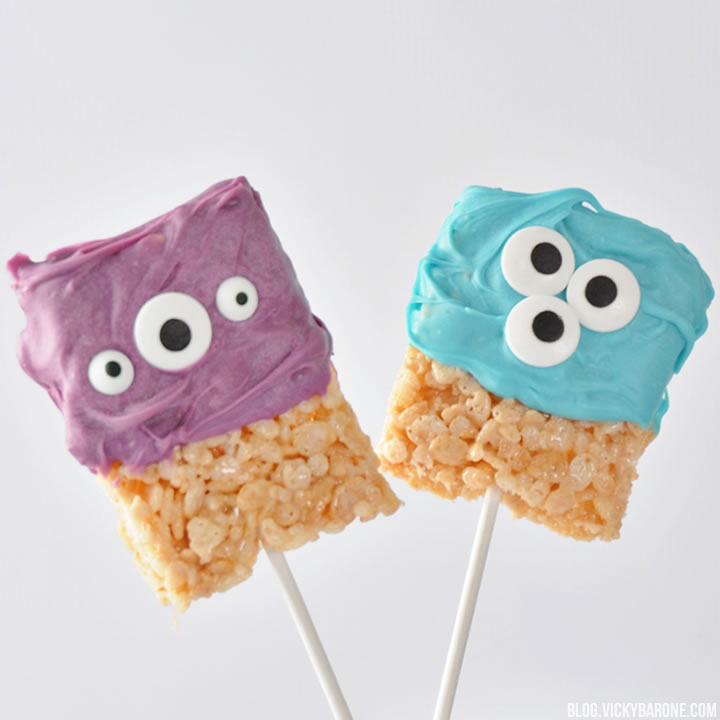
Monsters: Dip one treat in blue candy melts and one in purple. Use a mix of large and small candy eyeballs to create goofy monster faces.

Rice Krispie Halloween Characters | Vicky Barone
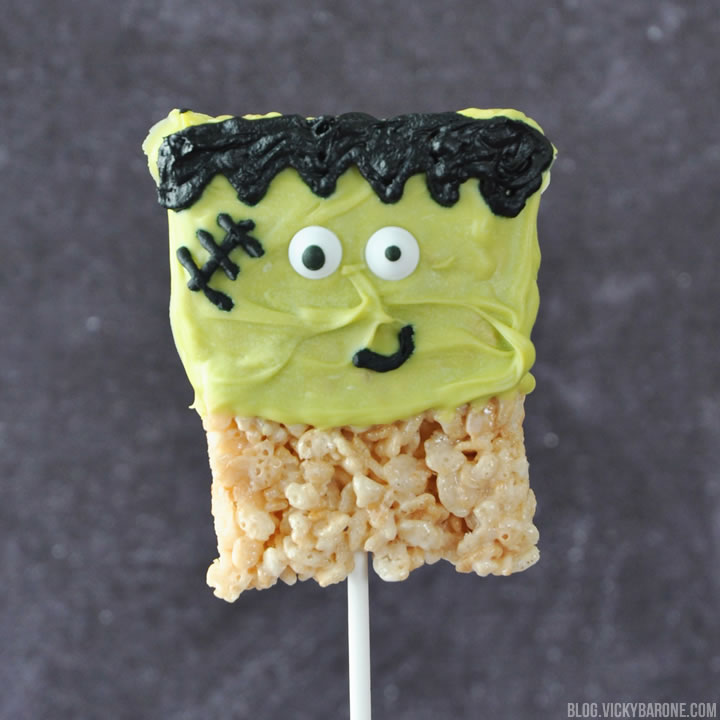
Frankenstein: Dip treat in green candy melts and immediately press in two candy eyeballs. Use decorating icing to draw on hair, stitches, and a mouth. You can even add neck bolts by cutting up some black licorice and sticking it in the sides!

Rice Krispie Halloween Characters | Vicky Barone

Rice Krispie Halloween Characters | Vicky Barone Rice Krispie Halloween Characters | Vicky Barone

If you make these, we would LOVE to see them! We can’t resist some silly candy eyes 🙂

Categories
DIY Holidays Parties and Events Recipes

Halloween Graveyard Cake

Planning a Halloween party? We have the perfect (and most affordable) accessory for you…

Halloween Graveyard Cake | Vicky Barone

We found these skeleton hands at Dollar Tree in the Halloween party section. They came in a pack of two and were labeled salad tongs! How hilarious is that?!

Halloween Graveyard Cake | Vicky Barone

(We had a lot of fun with these guys during the photoshoot…how could we not?)

Halloween Graveyard Cake | Vicky Barone

To create this graveyard cake you will need: chocolate box cake mix, chocolate frosting, and brownie box mix.

Directions:
1. Bake the chocolate cake and let cool completely.
2. Bake the brownies and let cool.
3. Frost the cake with the chocolate frosting.
4. Cut a square of brownie and crumble with your hands or in a bowl with a wooden spoon. Sprinkle the crumbled brownie on top of the cake to create the look of dirt. Sprinkle more crumbled brownie around the cake plate if desired.
5. Stick a skeleton hand in the center of the cake (the taller the cake, the more supported the skeleton hand will be!).

Halloween Graveyard Cake | Vicky Barone

That’s it! You are just a few dollars away from a deliciously spooky graveyard cake.

Stay tuned for more Halloween party ideas! And don’t forget to follow Vicky Barone on Instagram to catch more skeleton hands in action 🙂

Halloween Graveyard Cake | Vicky Barone | Skeleton Hands holding Pumpkin

Categories
DIY Holidays Kids

DIY Finger Puppet Ghosts

These little guys (like anything we glue googly eyes to) crack us up. Just look at their shock and bewilderment! We can’t help but laugh.

Case in point:

We’re having a little too much fun prepping for Halloween ??? #fingerpuppets #halloween #ghost #diy

A video posted by Vicky Barone | Greeting Cards (@vicky_barone) on

These felt finger puppets are super easy to make. You and your little ones will be putting on puppet shows in no time.

DIY Finger Puppet Ghosts | Vicky Barone]

Supplies: white felt, googly eyes, fabric scissors, and hot glue.

Directions:
1. Trace ghost shapes onto a piece of white felt.
2. Stack another piece of white felt underneath and cut out the ghost shapes (you’ll have double of each shape- top and bottom).
3. Take the “bottom” of a ghost shape and draw a line of hot glue around the perimeter, excluding the wavy base of the ghost. Immediately press the “top” of the ghost to the glue, making sure the shapes match up.
4. Use two dots of hot glue to attach the googly eyes.

DIY Finger Puppet Ghosts | Vicky Barone

That’s it! Now you can make a fleet of silly ghosts and put on a show.

DIY Finger Puppet Ghosts | Vicky Barone

DIY Finger Puppet Ghosts | Vicky Barone

Find more easy felt finger puppets here. And don’t forget to follow Vicky Barone on Instagram!

Categories
DIY Holidays

DIY No-Sew Felt Bat Garland

Happy Monday, friends! It is getting mighty chilly on the east coast, which makes all of these Halloween (and Christmas?!) decorations feel a lot more appropriate. Sure, we’d love a few more Summery days, but this Autumn air is all too welcome.

DIY No-Sew Felt Bat Garland | Vicky Barone

Today we’re sharing a bat garland that requires absolutely NO sewing! Grab your felt, scissor, and hot glue, and follow us…

DIY No-Sew Felt Bat Garland | Vicky Barone

Supplies: black felt, fabric scissors, chalk or a white marker, string, and hot glue.

Directions:
1. Hand draw or print out a bat shape onto a piece of paper. When you like the size and shape, trace it onto a small piece of card stock or thin cardboard and cut it out. This will be your template!
2. Trace around the template onto a piece of black felt using chalk or a white marker.
3. Cut the bat shapes out of the black felt.
4. Cut out a length of string for your garland. We used thin gold thread.
5. Heat up your hot glue gun and make two or three glue dots onto the back of a bat shape. We made three dots of glue – one on each wing and one in the center so the string made a V-shape when glued down (this way the string wouldn’t show between the wings when hung).
6. Quickly press the string to the glue dots.

DIY No-Sew Felt Bat Garland | Vicky Barone

Hang your spooky garland and enjoy!

DIY No-Sew Felt Bat Garland | Vicky Barone

Looking for more garlands? You’re in luck! Click here to see more.

Categories
DIY Holidays Kids

Jack-o-Lantern Apple Stamps

It’s Friday, which means we’re another week closer to Halloween! To keep you and your little ones busy while you wait, we have a super fun DIY that you can make with materials already in your home (and kitchen!).Jack-o-Lantern Apple Stamps | Vicky Barone

These sweet little jack-o-lanterns are made from apples! Similar to our St. Patrick’s Day Shamrock Pepper Stamps, we used produce to create the perfect pumpkin shape.

Jack-o-Lantern Apple Stamps | Vicky Barone

Supplies: apples, a knife, a cutting board, acrylic paint (in orange, black, and green), a paint brush, a paper plate, and a Sharpie (optional).

Directions:
1. Cut an apple in half and remove any seeds that look like they could fall out during the painting process.
2. Pour some orange paint onto a paper plate and dip an apple half into it.
3. Dab off some of the paint and give the apple stamp a few test runs to see how thick you’d like the paint. We had an extra piece of paper to test on.
4. Press the paint-covered apple half onto your work surface as many times as you’d like! You can create a pumpkin patch, or just a hodge podge of floating jack-o-lanterns.
5. When the orange paint has dried completely, use a paint brush and some black paint to create the jack-o-lantern faces and green paint to create leaves and curly vines.
6. I wrote a Happy Halloween message with a black Sharpie, but you can use more black paint if you’re feeling brave!

Jack-o-Lantern Apple Stamps | Vicky Barone

Have fun with it! This is a great project for kids — they will love using fruit as a stamp (just don’t let them take a paint covered bite!).

Jack-o-Lantern Apple Stamps | Vicky Barone

Looking for even more Halloween ideas? Check out my Instagram and Pinterest for tons of fun and festive ideas.

Categories
DIY Holidays Kids

Halloween Bat Pumpkins

Fall is in full swing and pumpkins are taking over! If you’re anything like us, you frequently find yourself leaving the grocery store, farmer’s market, and craft store with more and more mini pumpkins. We don’t blame you! They’re irresistible (especially to little ones tagging along on your errands). Thankfully, there are endless things to do with those little orange wonders to give them a multitude of purposes around the house.

Halloween Bat Pumpkins | Vicky Barone

Today we’re sharing a super simple DIY to turn your mini pumpkins into bats for Halloween!

Halloween Bat Pumpkins | Vicky Barone

Supplies: mini pumpkins, a thumb tack, patterned black and gray scrapbook paper, scissors, toothpicks, and tape.

Directions:
1. Cut bat wings out of scrapbook paper. We made a template to trace by holding a pumpkin on its side and sketching some wings to the left and right. One curved swoop out, and four curved swoops in. Once you get the shape you like, cut out the wings and use them to trace the shape onto the back of the patterned scrapbook paper. Cut the scrapbook paper wings with scissors.
2. Tape a toothpick to the back of each wing, leaving 1/4 inch of toothpick sticking out past each wing.
3. Use a thumbtack to make two holes in the sides of a pumpkin. To make the wings stick out at different angles, make the thumbtack hole in the center, the top, or the bottom.
4. Insert the wings into the holes, pressing them in until the paper meets up with the pumpkin and you can’t see the toothpick.

Halloween Bat Pumpkins | Vicky Barone

Decorate your home with your bat pumpkins! We put ours on candle sticks on the dining room table for a Halloween-themed tablescape.

Halloween Bat Pumpkins | Vicky Barone

If you like these bat pumpkins, you’ll love our spider pumpkins!

Are you decorating for Halloween yet? How about Christmas? 😉

Categories
Kids Recipes Things I Love

Healthy Halloween Snacks

Halloween is around the corner, which means lots of fun and lots of sweets! We’ve compiled some healthier snacking options that are still deliciously spooky. These treats are festive, fun to make, and kids are sure to love them. Click the links below for recipes and info on each! Happy snacking 🙂

Healthy Halloween Snacks | Vicky Barone

1. Roasted Pumpkin Seeds | 2. Pumpkin Eggs | 3. “Boo”nana Pops
4. Sweet Potato Fries | 5. Clementine Jack-o-Lanterns | 6. Cheese Eyeballs
7. Strawberry Ghosts | 8. Witch Brooms | 9. Spider Web Fruit Plate

Categories
DIY Holidays Kids

Clementine Jack-o-Lanterns

Halloween is in three days! Surprise your kids with a mini jack-o-lantern in their lunch box this week!

Clementine Jack-o-Lanterns | Vicky Barone

All you need are some clementines and a Sharpie you have yourself a mini jack-o-lantern. Since we had so many clementines, we decided to make a little Happy Halloween display with them! Make a bunch of funny faced jack-o-lanterns and put them in a large bowl for a healthy Halloween centerpiece.

Is everyone almost ready for Halloween? For more ideas, check out what we’ve created so far this season here!