Categories
DIY Kids

DIY Paper Plate Crab

School’s out for Summer!!! And now that I’ve got a little one back at home with me before camp starts, we are in need of some crafts! This paper plate crab is super fun to put together. Your kids will love celebrating Summer with a sweet little beach creature!

DIY Paper Plate Crab | Summer Craft for Kids | Vicky Barone

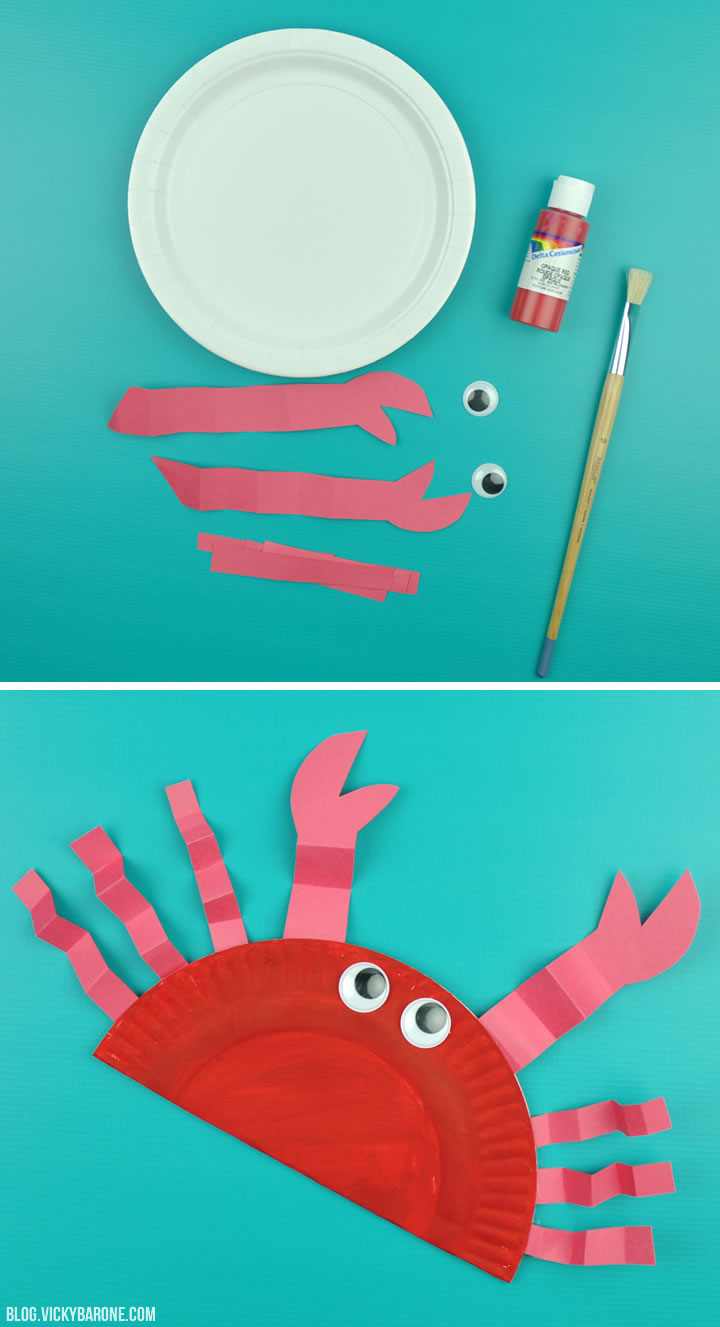
Supplies: a paper plate, red acrylic paint, a paint brush, red construction paper, scissors, glue, and googly eyes.

Directions:
1. Flatten the paper plate and paint one side with the red acrylic paint. Let dry.
2. While the paint is drying, cut a piece of construction paper into six thin strips and two thicker strips with claws on the ends!
3. Fold the thin strips accordion style. Fold the thick strips accordion style until you get to the claws.
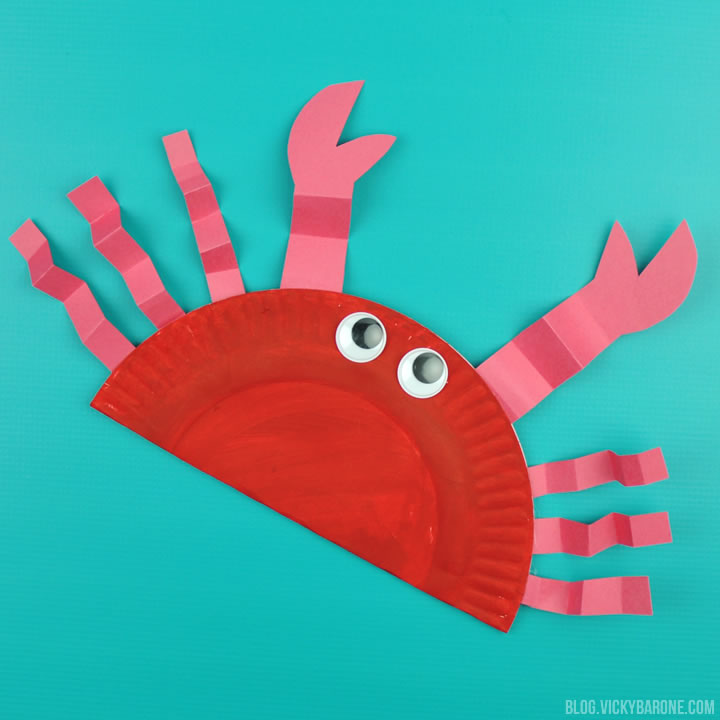
4. When the plate is dry, flip it over so the white is facing up and glue the legs onto the edge of one half.
5. Add glue to the other half of the plate and fold in half.
6. Glue on googly eyes. Let dry.

DIY Paper Plate Crab | Summer Craft for Kids | Vicky Barone

There you have it! A fun and simple craft to keep your little ones busy (at least for a few minutes 😉 ).

What are your favorite Summer crafts? We’d love to hear!

Categories
DIY Holidays Kids

DIY Bunny Ears

Happy Friday! Today we have a super easy Easter craft that you can make with your little bunnies! All you need are some headbands and pipe cleaners…

DIY Bunny Ears | Vicky Barone

We got our headbands from the dollar store and these fluffy white pipe cleaners from the craft store!

DIY Bunny Ears | Vicky Barone

Just wrap the pipe cleaners around the headband to cover the top and fashion some bunny ears along the way! You will need 2-3 pipe cleaners for each headband, depending upon how big you make the ears.

DIY Bunny Ears | Vicky Barone

DIY Bunny Ears | Vicky Barone DIY Bunny Ears | Vicky Barone

How cute are they on our little bunny?!

Looking for more Spring inspiration? Check out Vicky Barone on Instagram!

Categories
DIY Holidays Kids

DIY Finger Puppet Ghosts

These little guys (like anything we glue googly eyes to) crack us up. Just look at their shock and bewilderment! We can’t help but laugh.

Case in point:

We’re having a little too much fun prepping for Halloween ??? #fingerpuppets #halloween #ghost #diy

A video posted by Vicky Barone | Greeting Cards (@vicky_barone) on

These felt finger puppets are super easy to make. You and your little ones will be putting on puppet shows in no time.

DIY Finger Puppet Ghosts | Vicky Barone]

Supplies: white felt, googly eyes, fabric scissors, and hot glue.

Directions:
1. Trace ghost shapes onto a piece of white felt.
2. Stack another piece of white felt underneath and cut out the ghost shapes (you’ll have double of each shape- top and bottom).
3. Take the “bottom” of a ghost shape and draw a line of hot glue around the perimeter, excluding the wavy base of the ghost. Immediately press the “top” of the ghost to the glue, making sure the shapes match up.
4. Use two dots of hot glue to attach the googly eyes.

DIY Finger Puppet Ghosts | Vicky Barone

That’s it! Now you can make a fleet of silly ghosts and put on a show.

DIY Finger Puppet Ghosts | Vicky Barone

DIY Finger Puppet Ghosts | Vicky Barone

Find more easy felt finger puppets here. And don’t forget to follow Vicky Barone on Instagram!

Categories
DIY Holidays Kids

Jack-o-Lantern Apple Stamps

It’s Friday, which means we’re another week closer to Halloween! To keep you and your little ones busy while you wait, we have a super fun DIY that you can make with materials already in your home (and kitchen!).Jack-o-Lantern Apple Stamps | Vicky Barone

These sweet little jack-o-lanterns are made from apples! Similar to our St. Patrick’s Day Shamrock Pepper Stamps, we used produce to create the perfect pumpkin shape.

Jack-o-Lantern Apple Stamps | Vicky Barone

Supplies: apples, a knife, a cutting board, acrylic paint (in orange, black, and green), a paint brush, a paper plate, and a Sharpie (optional).

Directions:
1. Cut an apple in half and remove any seeds that look like they could fall out during the painting process.
2. Pour some orange paint onto a paper plate and dip an apple half into it.
3. Dab off some of the paint and give the apple stamp a few test runs to see how thick you’d like the paint. We had an extra piece of paper to test on.
4. Press the paint-covered apple half onto your work surface as many times as you’d like! You can create a pumpkin patch, or just a hodge podge of floating jack-o-lanterns.
5. When the orange paint has dried completely, use a paint brush and some black paint to create the jack-o-lantern faces and green paint to create leaves and curly vines.
6. I wrote a Happy Halloween message with a black Sharpie, but you can use more black paint if you’re feeling brave!

Jack-o-Lantern Apple Stamps | Vicky Barone

Have fun with it! This is a great project for kids — they will love using fruit as a stamp (just don’t let them take a paint covered bite!).

Jack-o-Lantern Apple Stamps | Vicky Barone

Looking for even more Halloween ideas? Check out my Instagram and Pinterest for tons of fun and festive ideas.

Categories
DIY Kids

Rain Cloud Craft

April showers indeed! Let’s hope this dreary weather brings those May flowers. In the meantime, we made a rainy day (literally!) craft your kids will love. This Rain Cloud Craft is easy to put together and is cute enough to hang somewhere in your house other than the side of the fridge! Check it out…

Rain Cloud Craft | Vicky Barone

Supplies: blue card stock or scrapbook paper, scissors, glue, mini white pom poms, tape, and blue embroidery floss.

Directions:
1. Cut a cloud shape out of a big piece of card stock. With the scrap pieces, cut out raindrop shapes (we cut out 18).
2. Cover a section of the cloud with glue and arrange the pom poms, filling in every space and adding glue as necessary. Continue section by section until the cloud is covered.
3. Cut different lengths of the blue embroidery floss. Glue two raindrops together with the string in the middle.
4. When all the glue is dry, tape the strings to the back of the cloud.

Rain Cloud Craft | Vicky BaroneWhat are your favorite rainy day activities? Check out this Pinterest board for more ideas!


Categories
DIY Holidays Kids

DIY Bead & Pipe Cleaner Christmas Ornaments

Today we’re sharing some classic DIY ornaments that you might have made when you were a kid! These candy canes and wreaths are super simple and so much fun for kids.

DIY Bead & Pipe Cleaner Christmas Ornaments | Vicky Barone

For the candy canes you will need red or white pipe cleaners, red and white tri-beads, and some red ribbon. Take a pipe cleaner and add one bead, then secure the end of the pipe cleaner to that bead. Add more beads, alternating between red and white, until you cover about 2/3 of the pipe cleaner. Twist the end of the pipe cleaner around the last bead and cut off excess. Bend the bead-covered pipe cleaner into the shape of a candy cane and tie on a ribbon where it will hang on a tree branch.

For the wreaths you will need green pipe cleaner, red and green plastic beads, and a metal ornament hook. Alternate between groups of green beads and a groups of red beads, or groups of green beads and a single red bead. Great creative! When you cover about 2/3 of the pipe cleaner, curve it into a circle and twist the two ends together to secure the wreath. Cut off excess pipe cleaner and add an ornament hook.

That’s it! Simple ornaments your little ones will love that will make you feel like a kid again!

Categories
DIY

DIY Coasters

These wooden coasters are super easy to create, and they make for a great last-minute hostess gift! Here’s how we made them:

DIY Coasters | Vicky Barone

Materials: unfinished wood squares, sandpaper, masking tape or painter’s tape, acrylic paint, acrylic sealant, and felt pads.

Directions:
1. Sand the edges and corners of the unfinished wood squares.
2. Tape off the design you would like with tape. Press tape down with fingernail or credit card to create clean lines.
3. Paint two to three coats of acrylic paint onto wooden square. Let dry completely.
4. Remove tape.
5. In a well ventilated area, spray each painted coaster with acrylic coating to seal the design and make the coaster waterproof.
6. When the sealant is dry, flip over the coaster and attach the foam pads.

DIY Coasters | Vicky Barone

That’s it! Stack the coasters and tie with a ribbon to give as a gift or keep them for yourself!

Check out the DIY Memory Game we made – they make for great coasters too!