Categories
DIY Holidays Parties and Events

DIY Felt Flower Napkin Rings

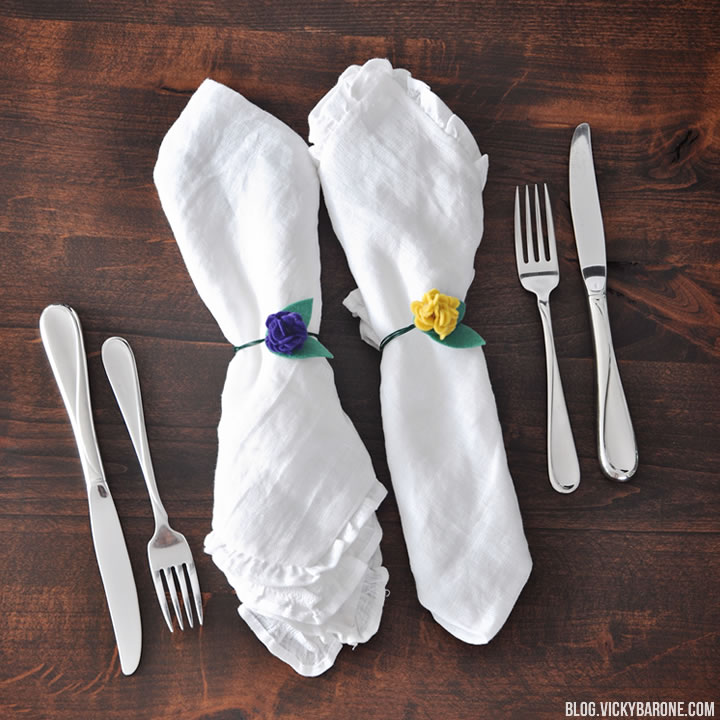
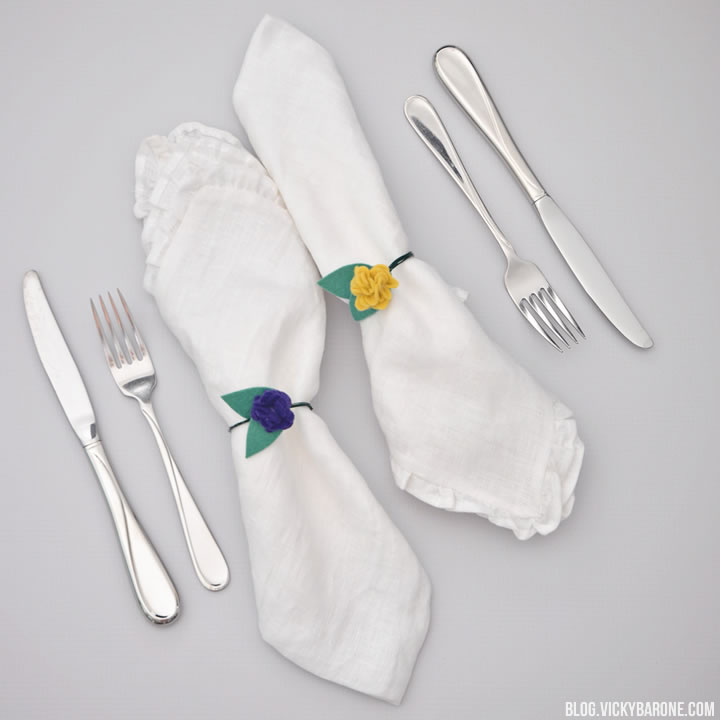
It’s no secret that we love making felt flowers, but we’ve gone to a new level with these miniature versions! A handful of mini flowers and some floral wire are all you need to create these adorable DIY napkin rings. They are perfect for any gathering around the dinner table and can be personalized with a variety of colors. Keep scrolling to find out how to easily make your own!

DIY Felt Flower Napkin Rings | Vicky Barone

DIY Felt Flower Napkin Rings | Vicky Barone

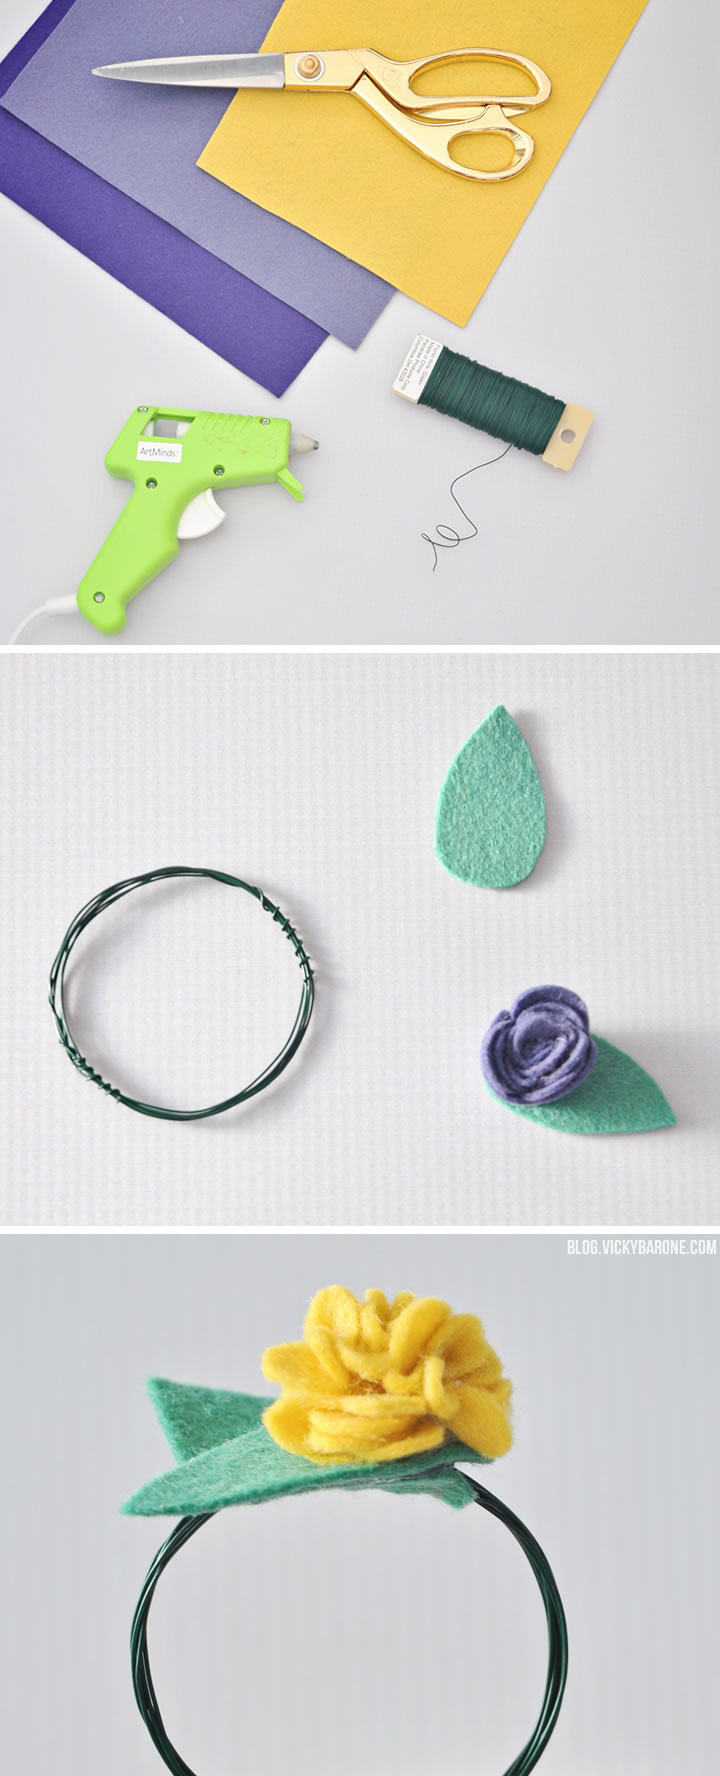
Supplies: felt, floral wire, hot glue, and scissors.

Directions:
1. Cut a long piece of floral wire and wrap it around a cylindrical object to create an even circle. Wrap the wire around the object as many times as you can, and slide the loop off of the object when you run out of wire. Secure the ends and keep the loop from uncoiling by wrapping them tightly around the loop (as seen in the middle photo above).
2. Create your felt flower. We linked to four different felt flower tutorials in this post, if you’d like to see. For these napkin rings, we made miniature versions of two different felt flowers that are no more than an inch or an inch and a half in diameter.
3. Cut two leaves out of green felt. Put hot glue on the bottom of a felt flower and attach it to one of the leaves.
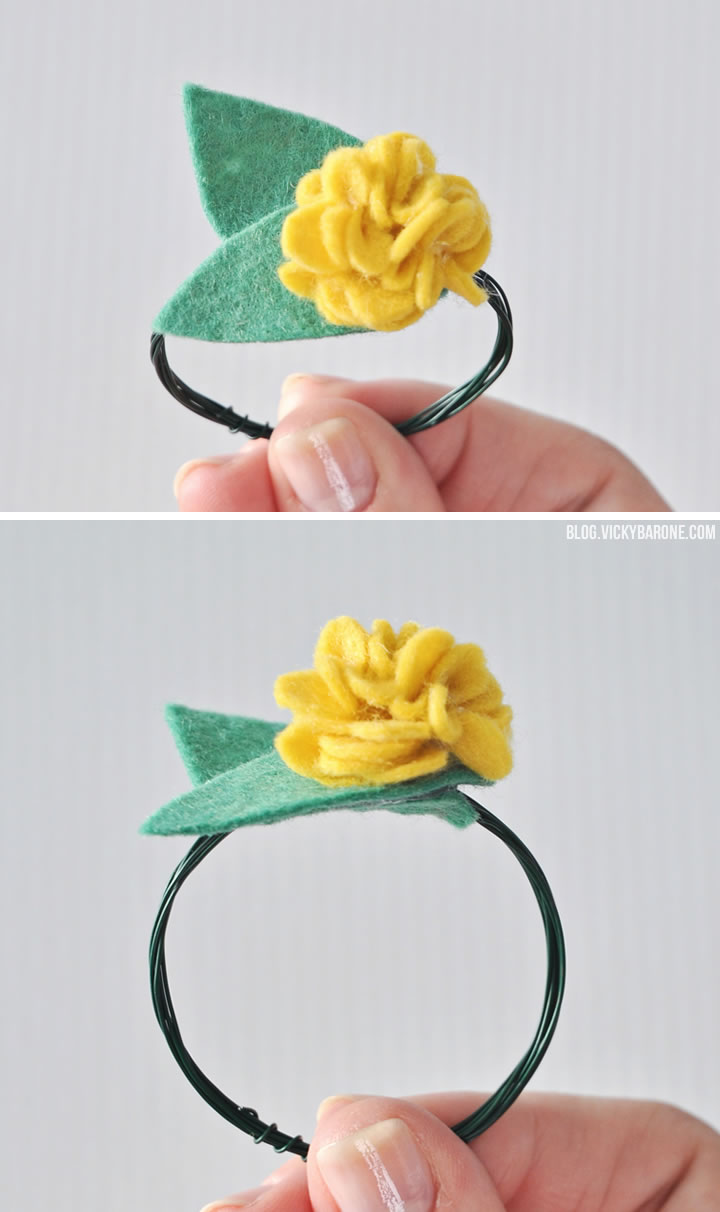
4. Add hot glue to the second leaf and press it onto the under side of the wire ring.
5. Add more hot glue to the bottom of the leaf with a flower on it and press it onto the top of the wire ring. The napkin ring should be sandwiched between the two leaves.

DIY Felt Flower Napkin Rings | Vicky Barone

Repeat these steps until you’ve created as many napkin rings as you’d like!

DIY Felt Flower Napkin Rings | Vicky Barone

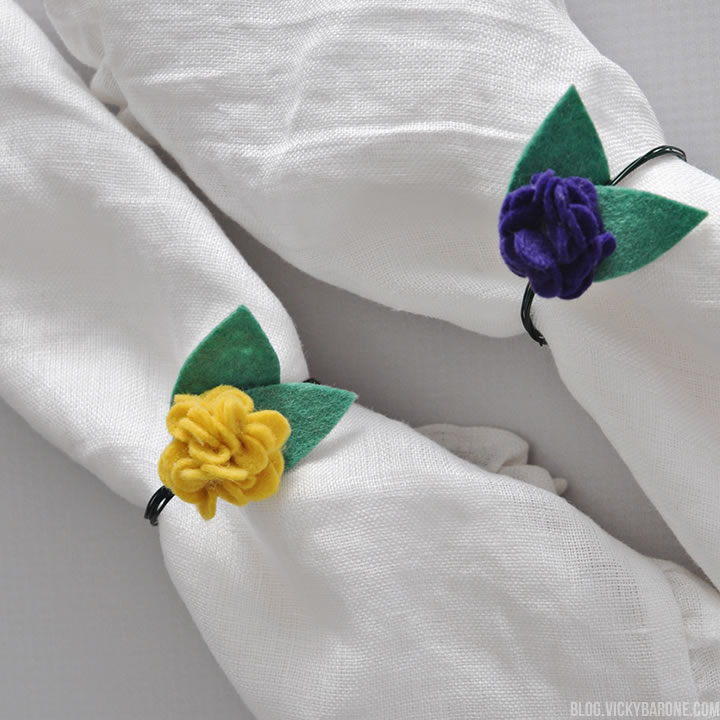
These napkin rings would be perfect to set the table for Thanksgiving dinner! Make a set of matching rings or use a variety of colors to match whatever theme you’re going for.

DIY Felt Flower Napkin Rings | Vicky Barone

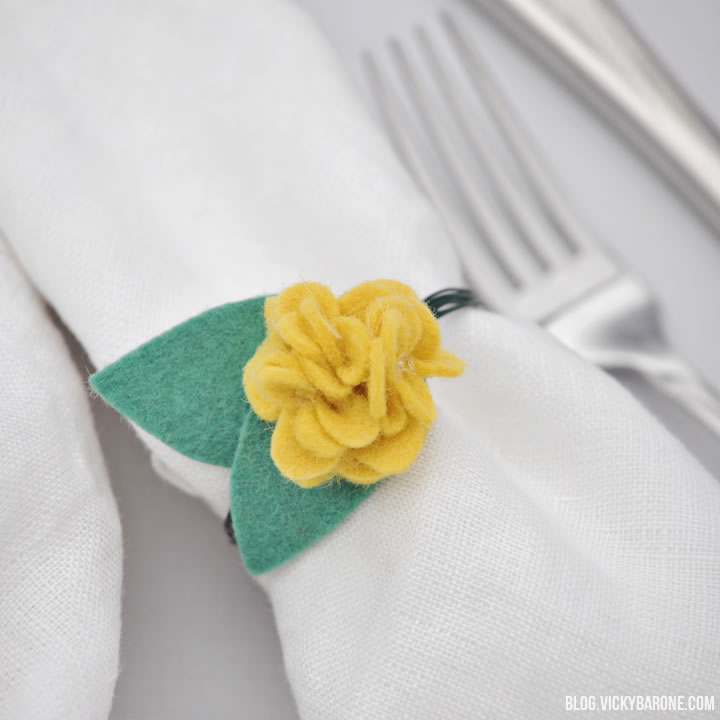
These would also make great hostess gifts or even add a DIY touch to a wedding reception.

DIY Felt Flower Napkin Rings | Vicky Barone

Have a wonderful week, everyone! Happy crafting!

Categories
DIY Holidays

DIY Wine Bottle Santa

Two years ago we sewed up some goofy holiday sweaters to put on wine bottles and give as gifts over the holidays. This year, we went a step further and made a Santa suit!

DIY Wine Bottle Santa | Vicky Barone

Materials:
– A free printable template found here.
– Felt in red, white, black, and gold.
– Three white buttons.
– A white pom pom.
– A sewing machine.
– A needle and thread.
– A hot glue gun.
– Fabric scissors.

Directions:
1. Print the template from this post. Trace it onto the red felt twice and cut it out.
2. For the suit: cut out two thin strips of white felt the same width as the base of the suit. Cut six pieces of white felt the same thickness to correspond with the sleeve cuffs and the neck. Sew each of these pieces onto the front and back of the suit.
3. For the belt: cut out two strips of black felt the same width as the template suit to create the belt. Cut a rectangle out of gold and a smaller rectangle out of black to create the buckle. Sew the belt onto the suit and hot glue the buckle to the belt.
4. For the hat: making the base the same width as the neck of the suit, cut two hat outlines out of red felt. Cut two strips of white felt for the base of the hat. Sew the white strips to the bottoms of each side of the hat.
5. Sew the three buttons onto the front of the suit using a needle and thread (or use hot glue).
6. Once all of the little pieces are sewn onto the suit, you will have just the front and the back of the suit as well as the front and back of the hat. With the details facing out, sew the suit together leaving the base, neck, and arm holes open. Sew the hat together, leaving the base open.
7. Use hot glue to attach the pom pom to the tip of the hat.
8. Use fabric scissors to cut away excess felt and thread on the suit and the hat.
9. Slip the Santa suit over a bottle of wine and add the hat on top! Use as decoration for the holidays or give as a hostess gift.

DIY Wine Bottle Santa | Vicky BaroneIsn’t he cute? Subscribe to Vicky Barone in the right sidebar to stay in the loop for MUCH for Holiday inspirations to come!


Categories
DIY Things I Love

Things I Love: DIY Coasters

1. Scrabble Pieces | 2. Bead and Cord | 3. Agate Stone
4. Natural Branch | 5. Maps | 6. Sisal
7. Ombre Leather | 8. Pom Poms | 9. Polaroid
10. Painted Wood | 11. Citrus Felt | 12. Mini Pallets

How cute are all of these coasters? Each of these DIY projects would make a beautiful addition to your home as well as an impressive hostess gift! Click the links above to see how you can make your own.

Categories
DIY

DIY Stamped Tea Towels

These tea towels make the perfect personalized hostess gift or even just a fun and simple rainy day activity. Create your own design or choose an inspirational phrase or quotation to decorate your tea towel and add a sweet touch to your kitchen.

DIY Stamped Tea Towels | Vicky Barone

Supplies:
Tea Towels
– Flower stamps or alphabet stamps
– A paint brush
– Fabric Paint (we used regular acrylic paint because we don’t plan to use these for anything other than decoration).
– Cardboard

DIY Stamped Tea Towels | Vicky Barone

Directions:
1. Wash and dry tea towels.
2. Arrange a tea towel over a piece of cardboard (so that any paint that may seep through does not ruin your work surface).
3. Using the paintbrush, paint a thin layer of paint on a stamp. Test this stamp on a paper plate or a piece of scrap fabric to see if you like the paint thickness.
4. Stamp the towel and let dry completely!

DIY Stamped Tea Towels | Vicky Barone

To make the “Be Yourself” tea towel, we taped off the section where we wanted the words to go and marked off where each letter would fit. We also tested it on a piece of cardstock first to see how the letters would need to be spaced out. Have fun with it! The handmade look is the best part!

DIY Stamped Tea Towels | Vicky Barone

For the floral tea towel, we started the stamping at one of the corners of the towel. We stamped the flowers in a concentrated pattern in the corner and made them more spread out as we worked our way up.

DIY Stamped Tea Towels | Vicky Barone

Have fun and enjoy your handmade tea towels!

Categories
DIY

DIY Coasters

These wooden coasters are super easy to create, and they make for a great last-minute hostess gift! Here’s how we made them:

DIY Coasters | Vicky Barone

Materials: unfinished wood squares, sandpaper, masking tape or painter’s tape, acrylic paint, acrylic sealant, and felt pads.

Directions:
1. Sand the edges and corners of the unfinished wood squares.
2. Tape off the design you would like with tape. Press tape down with fingernail or credit card to create clean lines.
3. Paint two to three coats of acrylic paint onto wooden square. Let dry completely.
4. Remove tape.
5. In a well ventilated area, spray each painted coaster with acrylic coating to seal the design and make the coaster waterproof.
6. When the sealant is dry, flip over the coaster and attach the foam pads.

DIY Coasters | Vicky Barone

That’s it! Stack the coasters and tie with a ribbon to give as a gift or keep them for yourself!

Check out the DIY Memory Game we made – they make for great coasters too!

Categories
DIY Holidays Lifestyle Parties and Events Things I Love

Things I Love: Wine Gifting

1. Hat and Scarf | 2. Santas | 3. Sweater Sleeves | 4. Happy Holidays Tote | 5. Tea Towel | 6. Burlap Gift Bags | 7. Ugly Christmas Sweaters

What better hostess gift is there than a nice bottle of wine? If that’s your go-to favor, you will love this collection of wine bottle wrappings. From sophisticated to goofy, we’ve put together our favorite ways to dress up those boring bottles.

Call us biased, but our favorites are the ugly Christmas sweatered bottles we made last year:
Things I Love: Wine Gifting | DIY Ugly Christmas Sweater Wine Bottles
Aren’t they hysterical? Check out the tutorial and free printable template here!

Happy gifting!

Categories
DIY Freebies Holidays Printables Projects

DIY Wine Bottle Holiday Sweaters

Here’s a cheap and creative way to dress up a hostess gift this holiday season!

Do it yourself wine bottle sweaters for the holidays! We got this idea from a catalog that featured wine bottles snuggled up in some cute “ugly” Christmas sweaters.

What you need: felt, thread, buttons, hot glue, a sewing machine, and whatever other decorations you can use to dress up your sweater (pom poms, ribbon, etc.). Oh, and of course a wine bottle that needs some outerwear. We had some fun using all of the different stitching options on the sewing machine to decorate the red stripes on the gray sweater. Be creative!

Vicky Barone Wine Bottle Cover Template

Here’s a PDF template you can use to get your sweater to fit just right! It’s sized so that you can do the stitching on the outside where it is visible (we think it’s super cute like that!). If you’d like to hide the stitching, you can extend the template a quarter of an inch or so, but be warned that the felt will be very bulky when you flip it right side out after it’s sewn.

These are great to have on hand to fancy up a bottle of holiday spirits you might be sharing with friends and family this season. They also look great on the kitchen counter as Christmas decor if you can’t seem to part with them!

Check out my Holidays + Ornaments Pinterest board for more fun Holiday ideas!