Categories
DIY Holidays

DIY Jack-o-Lantern Soda Bottles

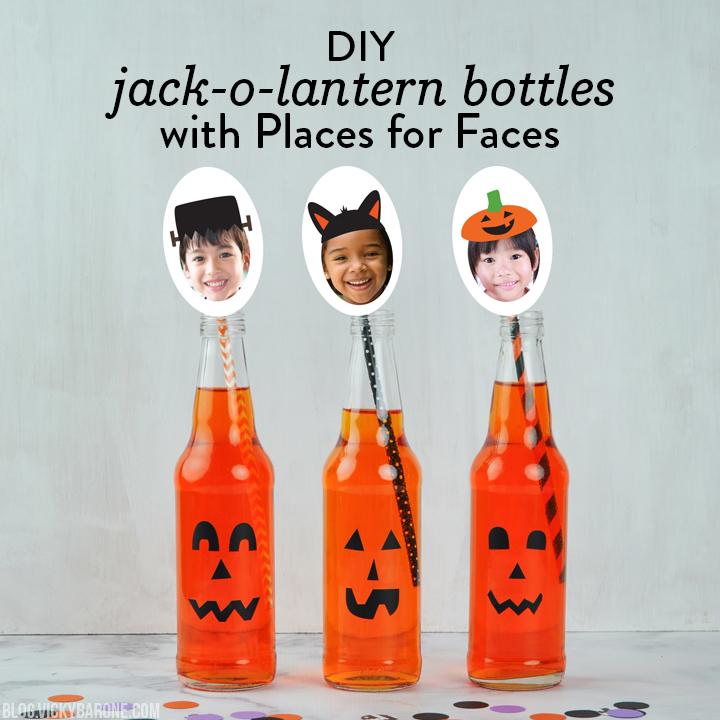
Looking to add some spooky details to your Halloween party? How about these jack-o-lantern soda bottles with sweet faces and even sweeter orange soda! Here’s how we made our own and topped them off with Places for Faces…

DIY Jack-o-Lantern Soda Bottles | Vicky Barone | Places for Faces

Supplies: glass bottles, black vinyl stickers, scissors, Places for Faces, tape, and paper straws.

Directions:
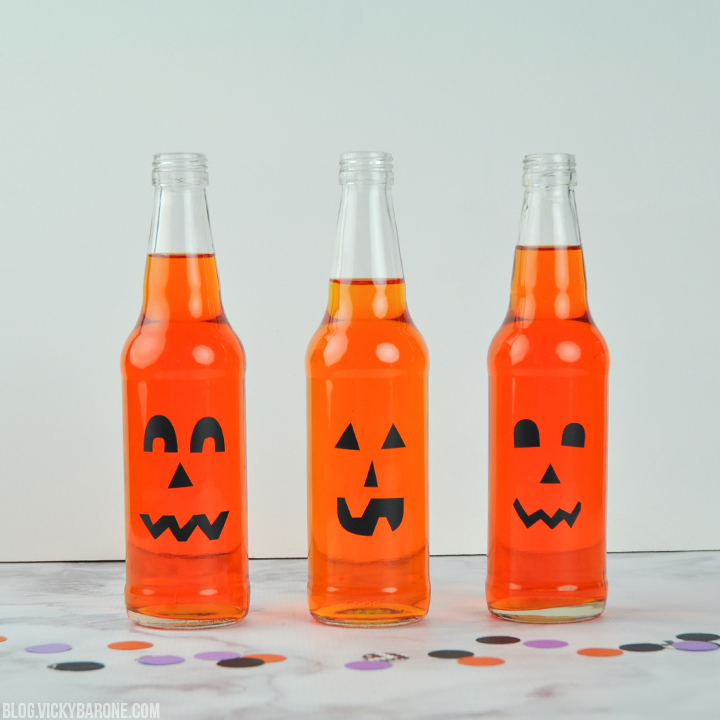
1. Clean your soda bottles thoroughly and let dry.
2. Cut silly jack-o-lantern faces out of the black vinyl (we used scraps from other sticker projects!).**
3. Add the stickers to the soda bottles to create faces.
4. Use Places for Faces to create your own personalized dessert toppers.
5. Print out the template and cut out the faces.
6. Tape each one to a paper straw.
4. Add some orange soda and the straw to the bottle and enjoy!

**you can also draw the faces on with a Sharpie!

DIY Jack-o-Lantern Soda Bottles | Vicky Barone | Places for Faces DIY Jack-o-Lantern Soda Bottles | Vicky Barone | Places for Faces

DIY Jack-o-Lantern Soda Bottles | Vicky Barone | Places for Faces

Every DIY project is better with a little personality from Places for Faces! Head over to placesforfaces.com and get started making your own straw toppers, thank you notes, gift tags, and so much more. There are lots of brand new Halloween sticker options to choose from! How will you use Places for Faces?

Categories
DIY Holidays

DIY Ghost Garland

Boo! Today we’re sharing a Halloween garland that only requires 3 supplies! Here’s how to make your own ghost garland…

DIY Ghost Garland | Vicky Barone

Supplies: white yarn, googly eyes, and glue.

Directions:
1. Begin by wrapping yarn around your hand (or a pre-cut piece of cardboard) until you reach desired fullness.
2. Thread another piece of yarn into the loop you created and tie it tight.
3. This method is similar to making a yarn pom pom, but instead of tying a second piece of string around the center of the loop, you’ll tie it closer to the top to create a little round ghost head!
4. Cut the bottom larger part of the loop and trim to even out.
5. Add googly eyes with glue.
6. String together on another piece of yarn!

What other fun Halloween projects are you working on? We’d love to hear!

Categories
DIY Holidays Recipes

Halloween Cupcakes

This post contains affiliate links. If purchased, I will receive a commission, but the price stays the same for you!

Happy Chocolate Cupcake Day! Doesn’t that sound like the most delicious holiday ever?! To celebrate, we are sharing some super cute and fun Halloween cupcakes! Here’s how to make your own…

Halloween Cupcakes | Vicky Barone

Supplies: chocolate cupcakes, chocolate icing, Ziploc bag, mini Oreos, regular sized Oreos, candy eyes, and white candy melts.

For the bats:
1. Ice a chocolate cupcake with chocolate frosting.
2. Split an Oreo in half and use the side without frosting for the wings. Break this cookie in half down the middle and press into the chocolate frosting.
3. Using chocolate frosting for the glue, add candy eyes to a mini Oreo.
4. Press the mini Oreo into the center of the cupcake!

For the mummies:
1. Melt white candy melts according to directions.
2. Scoop into a Ziploc bag and cut a corner off.
3. Pipe the candy melts onto a chocolate cupcake from side to side.
4. Press candy eyes on top.

Halloween Cupcakes | Vicky BaroneHalloween Cupcakes | Vicky Barone Halloween Cupcakes | Vicky Barone Halloween Cupcakes | Vicky Barone Halloween Cupcakes | Vicky Barone Halloween Cupcakes | Vicky Barone Halloween Cupcakes | Vicky Barone Halloween Cupcakes | Vicky Barone

Halloween Cupcakes | Vicky Barone Halloween Cupcakes | Vicky Barone

Aren’t they the cutest? Watch out for little hands scooping them up! Happy Chocolate Cupcake Day, everyone. We hope you celebrate accordingly! 🙂

Categories
DIY Holidays

DIY Metallic Skull

This post contains affiliate links. If purchased, I will receive a commission, but the price stays the same for you!

Are you ready for the easiest Halloween DIY ever? We LOVE finding holiday treasures at the Dollar Store and transforming them into fun decor. All you need to make this metallic skull is a Dollar Store skull and some spray paint! Here’s how…

DIY Metallic Skull | Vicky Barone

Supplies: a plastic skull from the Dollar Store (or styrofoam or any other type of skull you can find!), and metallic gold spray paint.

The above supplies contain an affiliate link. If purchased, I will receive a commission, but the price stays the same for you!

Directions: This could not be easier! Simply spray paint the skull in a well-ventilated area (preferably outside) and let dry completely. This spray paint is our favorite metallic spray paint yet! It is super shiny and makes everything look so beautiful!

DIY Metallic Skull | Vicky Barone DIY Metallic Skull | Vicky Barone DIY Metallic Skull | Vicky Barone DIY Metallic Skull | Vicky Barone

Like these spray painted pumpkins? They’ll be coming to the blog soon too so stay tuned!

Categories
Holidays Recipes Things I Love

Favorite Halloween Treats

Happy Monday, guys and ghouls! We are in the studio this week creating TONS of fun new Fall content and we can’t wait to share it all with you! In the meantime, we thought we’d share some of our favorite treats from Halloweens past. Click on the links below to see how to make each delicious dessert. Enjoy!

Favorite Halloween Treats | Vicky Barone

1. Graveyard Cake | 2. Owl Cupcakes
3. Spiderweb Cupcakes | 4. Sprinkle Rimmed Glasses
5. Rice Krispie Characters | 6. Candy Corn Marshmallows

Categories
DIY Holidays

Happy Halloween!

Yay! Halloween is finally here! Have any fun plans for the day? If you’re looking for some fun Halloween projects to make, check out our Halloween 2015 Round Up and our Halloween 2014 Round Up!

Have you seen the beautiful burlap wreaths you can buy on Etsy? I’ve had my eye on a few until I decided to go ahead and make my own. As it turns out, they are a lot easier to make than they seem. We’ll be sharing our own tutorial soon, but in the meantime, here are some shots of my Halloween Burlap Wreath if you’d like to see:

Happy Halloween | DIY Burlap Wreath | Vicky Barone

Happy Halloween | DIY Burlap Wreath | Vicky Barone Happy Halloween | DIY Burlap Wreath | Vicky Barone

Happy Halloween | DIY Burlap Wreath | Vicky Barone

We hope you have a super fun day and a safe and candy-filled evening. See you Monday for all things Fall!

Categories
DIY Holidays Things I Love

Halloween Round-Up 2015

Halloween is tomorrow! We are so excited that it’s finally here, and we’ve had so much fun preparing and creating for it. Here are all of the Halloween-inspired projects we made this year, if you’d like to see!

Halloween Round-Up 2015 | Vicky Barone1. Wine Cork Pumpkin | 2. Ghost Finger Puppets | 3. Bat Garland
4. Pumpkin Ice Bucket | 5. Rice Krispie Characters | 6. Apple Pumpkin Stamps
7. Black & Gold Vase | 8. Graveyard Cake | 9. Toilet Paper Pumpkins
10. Pumpkin Garland | 11. Bat Pumpkins | 12. Googly Eyed Monster Door

We hope everyone has a safe and happy Halloween weekend!

P.S. Here’s last year’s Halloween Round-Up 🙂

Categories
DIY Holidays Parties and Events

Pumpkin Ice Bucket

We’ve seen this amazing idea all over Pinterest and we just had to try it for ourselves. We figured it was only appropriate to fill such an ice bucket with pumpkin beer…but you can also use it for wine bottles, champagne, or even soda!

Pumpkin Ice Bucket | Halloween Party Ideas | Vicky Barone

All you need is a large, squat pumpkin, a bowl, ice, and your drink of choice. Here’s how to make your very own pumpkin ice bucket:

Pumpkin Ice Bucket | Halloween Party Ideas | Vicky Barone

Step 1: Cut off the top of the pumpkin and scoop out the insides. You’ll want to cut lower than you usually would when carving a jack-o-lantern so that you have the biggest opening possible.

Step 2: Find a bowl that fits inside the pumpkin. We used the outside of a salad spinner! It was the perfect size.

Step 3: Add ice.

Step 4: Add beer!

Step 5: Throw a Halloween party!

Pumpkin Ice Bucket | Halloween Party Ideas | Vicky BaroneFelt Pumpkin Garland | Bat Pumpkins | Graveyard Cake

Pumpkin Ice Bucket | Halloween Party Ideas | Vicky Barone

What do you think? Does your next party need a pumpkin ice bucket? It would look great with your Thanksgiving spread!

pumpkinicebucket_6

Find more pumpkin ideas here. Have a wonderful weekend!