Categories
Holidays Kids Recipes

Chocolate Covered Oreo Turkeys

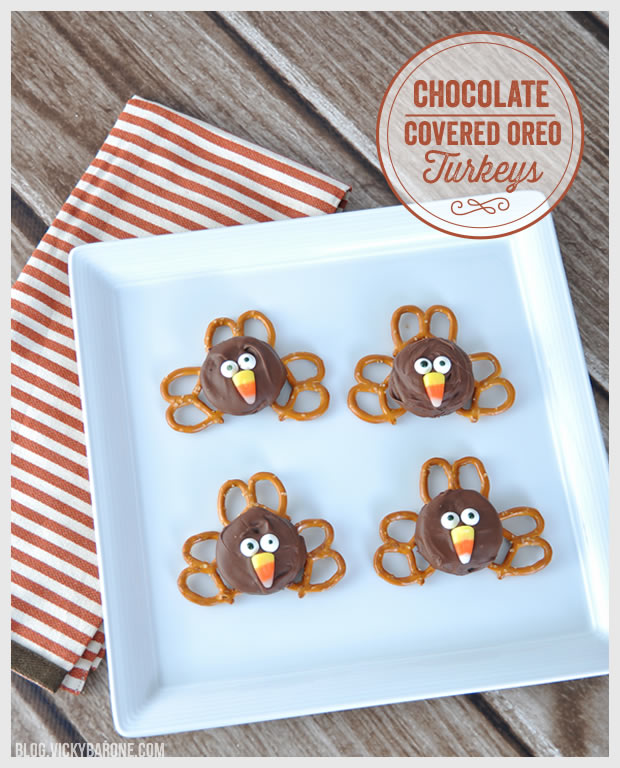
How about a sweet treat for after Thanksgiving dinner? We grabbed Oreos, pretzels, and some leftover Halloween candy to make these hilarious chocolate turkeys. Keep scrolling to see how you can make them too!

Chocolate Covered Oreo Turkeys | Vicky Barone

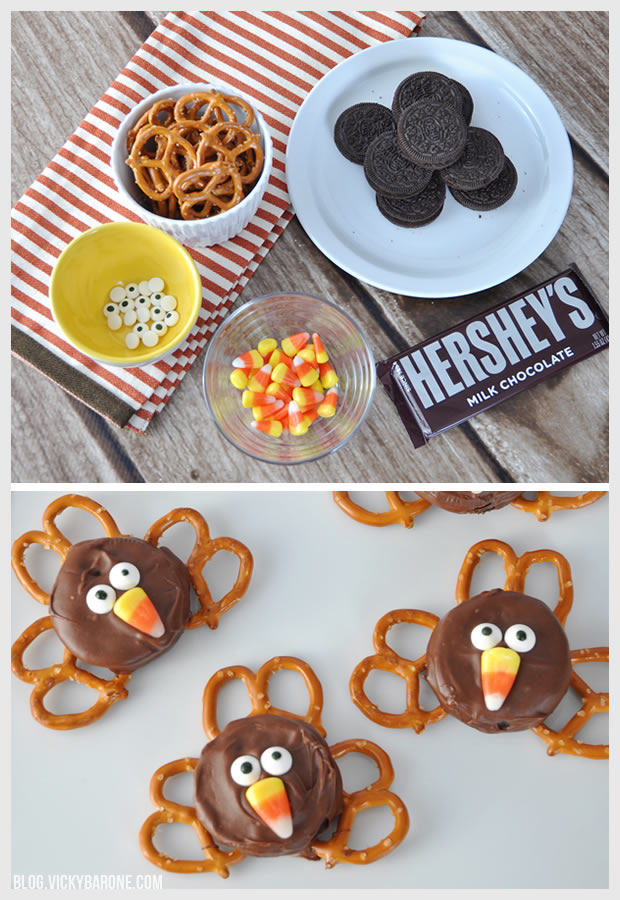
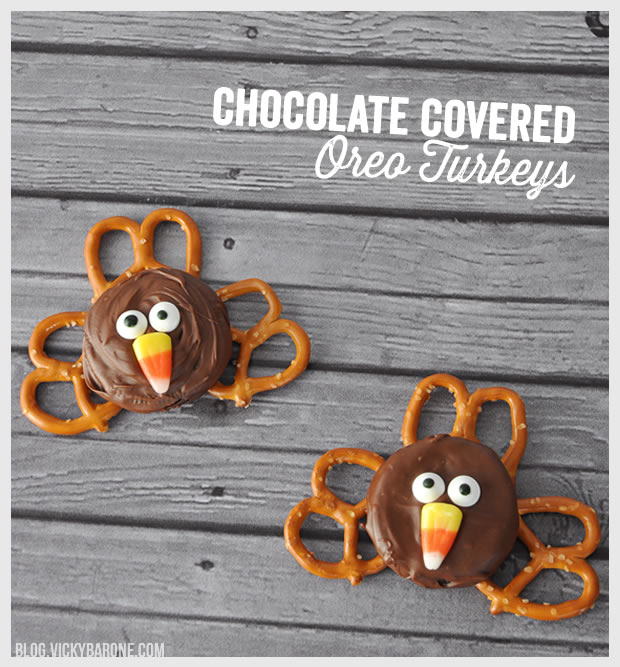
Ingredients: Oreos, pretzels, chocolate (for melting), candy corn, and candy eyes.

Directions:
1. Melt chocolate in a microwave safe bowl. We used a Hershey bar, but you can also use candy melts.
2. Arrange three pretzels on a cookie sheet lined with wax paper, with the bases facing each other, leaving 1/4 inch gap between them.
3. Dip an Oreo into the melted chocolate and cover completely. Use a fork to remove the Oreo from the bowl and let the excess chocolate drip off. Sit the chocolate covered Oreo in the center of the three pretzels.
4. Immediately press in two candy eyes and a piece of candy corn.
5. Repeat process on the rest of the cookies and place cookie sheet into the fridge or freezer to set the chocolate.

Serve immediately or store in an airtight container.

Chocolate Covered Oreo Turkeys | Vicky Barone

Chocolate Covered Oreo Turkeys | Vicky Barone

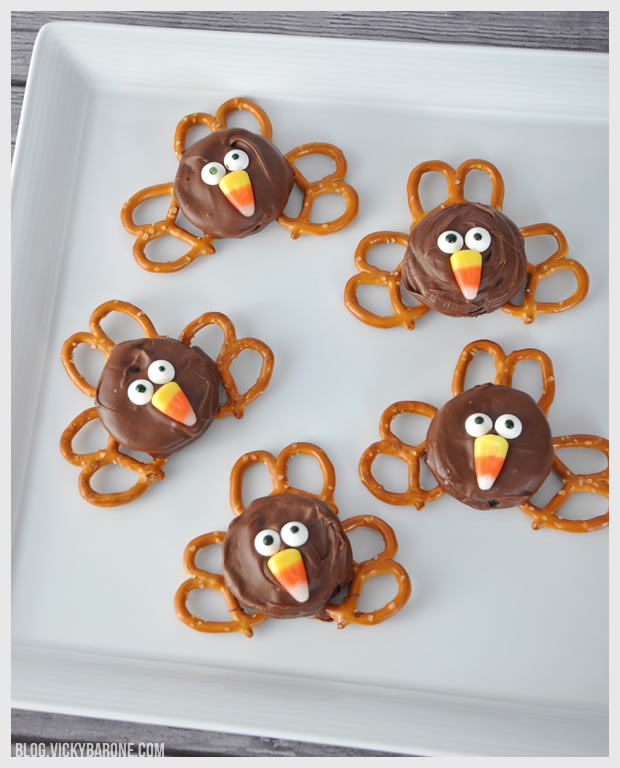
Our favorites are the ones with two different sized pupils. They look like they’ve been electrocuted! You can also turn the candy eyes in different directions to make the turkeys look extra goofy.

Chocolate Covered Oreo Turkeys | Vicky Barone

What fun treats are you making this Thanksgiving? We’d love to hear!


Categories
Holidays Recipes

Owl Cupcakes

We are LOVING all of the fun Halloween ideas circulating Pinterest and Craftgawker, especially these owl cupcakes! They are so delicious and make us laugh every time we see them. Wouldn’t they make a fun addition to a Halloween party or an owl-themed birthday party?

Owl Cupcakes | Vicky Barone

Look at that cute little face! How can you resist? Here’s how we made ours:

Owl Cupcakes | Vicky Barone

Ingredients: chocolate cake mix, eggs, oil, chocolate icing, brown and orange m&ms, and Oreos.

Directions:
1. Make cupcakes according to mix directions. Let cool completely.
2. Carefully separate Oreos with a slow twisting motion. One half should keep all of the filling; discard the other half (preferably in your mouth).
3. Ice cupcakes and immediately press two Oreos with filling onto each cupcake.
4. Add an orange m&m to each cupcake for the beak.
5. Use a small dot of chocolate icing to attach the brown m&ms to the Oreos for pupils.

Owl Cupcakes | Vicky Barone

We hope you enjoy these chocolaty owls. Happy almost-Halloween!

Categories
Recipes Things I Love

Things I Love: Homemade Candy Bars

1. Reese’s Peanut Butter Cups | 2. Snickers
3. Kit Kat | 4. Almond Joy
5. Butterfinger | 6. Twix

Did you know that there is a recipe out there for just about every one of your favorite candy bars? We collected six classics to share with you today that we’re sure you’ll love. Dig in!

Categories
DIY Holidays Kids Recipes

Chick & Bunny Marshmallow Pops

How ridiculously cute are these Easter marshmallow pops? We had so much fun making these characters come to life and we’re excited to share them with you today!

Chick & Bunny Easter Marshmallow Pops | Vicky BaroneIngredients: Marshmallows, white, pink, and yellow candy melts, cake pop sticks, and candy eyes.

Directions:
1. Put each marshmallow on a cake pop stick.
2. Dip the marshmallows in melted yellow candy melts for the chicks and white candy melts for the bunnies.
3. Place coated marshmallows on a waxed paper lined cookie sheet and let set in the refrigerator.
4. Cut extra marshmallows into triangles for the ears and wings*
5. To coat the wings and ears with candy melts, first put each on a toothpick and dip them like you did the whole marshmallows. Then place coated wings and ears in fridge to set as well.
6. When everything has set, remove the toothpicks from the wings and ears, dip the bases in candy melts, and attach to the whole marshmallows.
7. To attach the candy eyes: add a little melted chocolate to the back of each eye using a toothpick. Adhere to marshmallow.
8. To make the bunny nose: melt the pink candy melts and use a toothpick to carefully paint a triangle just below the eyes.
9. To make the chick’s beak: add red food coloring to the remaining yellow candy melts to create an orange color. Repeat step 8.

*Tip for cutting marshmallows: Keep a glass of water next to your cutting board and dip the knife into it between each cut. Keeping the knife wet will prevent the marshmallow from sticking to the blade. It will also help create clean cuts when cutting small shapes.

Easter Marshmallow Pops | Vicky BaroneWe hope you enjoy our silly marshmallow friends! What other Easter characters will you make? We’d love to see!


Categories
Holidays Recipes Things I Love

Things I Love: Easter Egg-Shaped Treats

1. Cake | 2. Cheesecake Chocolates | 3. Popsicles | 4. Doughnuts | 5. Rice Krispies | 6. Popcorn | 7. Jello

If you gave up sweets for Lent, this post is not for you! Here are seven delicious treats shaped like Easter eggs you might just want to start making now.

Follow Vicky Barone on Bloglovin’ for more fun and tasty Easter ideas!

Categories
DIY Holidays Recipes

Chocolate Covered Marshmallow Peeps

We love a good box of pink and yellow Peeps this time of year, but we love them even more when they’re dipped in chocolate! Take your Peeps to the next level this Easter by adding a cake pop stick, melted chocolate, and sprinkles!

Chocolate Covered Marshmallow Peeps | Vicky BaroneIngredients: Peeps (we used the bunnies in pink and yellow), dark chocolate, white chocolate, and pink candy melts, assorted sprinkles, and cake pop sticks. You can get Peeps at your local grocery store or dollar store and the rest of the ingredients and materials at a craft store!

Directions:
1. Push cake pop sticks into the base of the marshmallow about 3/4 of the way in.
2. Melt chocolates according to the directions.
3. Dip marshmallows in melted chocolate to coat them as much as you’d like.
4. Before the chocolate cools, add sprinkles!
5. Lay finished marshmallows on a cookie sheet lined with waxed paper.
6. Cool in refrigerator until the chocolate is set.
7. Store in airtight container.

Stay tuned for more fun Easter recipes and DIY projects on the blog!

Categories
DIY Parties and Events Recipes

Super Bowl Strawberries

Looking for a football-themed treat for your Super Bowl Party this weekend? These chocolate covered strawberries are easy to make and are sure to impress your party guests.

Chocolate Covered Super Bowl Football Strawberries | Vicky BaroneIngredients: Strawberries, milk or dark chocolate candy melts, white chocolate candy melts, and a Ziploc bag.

Directions:
1. Wash and dry strawberries.
2. Melt dark chocolate and dip strawberries.
3. Lay dipped strawberries on a cookie sheet lined with waxed paper.
4. Melt white chocolate and spoon into a Ziploc bag.
5. Cut the tip of the Ziploc bag and squeeze the white chocolate onto the strawberries to create laces and stripes.
6. Move to the refrigerator to cool and harden.
7. Store in an air-tight container in the fridge until ready to serve.

We hope all of our east coast neighbors are enjoying their snow day and staying safe!


Categories
DIY Holidays Recipes

Chocolate Valentine Hearts

We have another treat that uses our silicone heart mold! These chocolate hearts are easy to make and look like they came out of a chocolate shop!

DIY Chocolate Valentine Hearts | Vicky Barone

We loved the look of these two-toned chocolate hearts, but we swapped the cream colored vanilla for pink vanilla and added the heart sprinkles we got for these sprinkle rimmed glasses.

DIY Chocolate Valentine Hearts | Vicky BaroneIngredients:
1. Candy Melts in dark cocoa and pink (we got ours from Michael’s).
2. Silicone Heart Mold (we got ours from Marshall’s but you can find them at most craft stores or on Amazon).
3. Heart Sprinkles (we got ours from Michael’s).

Directions:
1. Melt chocolate in a bowl in the microwave 30 seconds at a time, stirring in between until smooth.
2. Fill half of each heart mold with either pink or dark cocoa.
3. Tap the silicone tray gently against your work surface to settle the melted chocolate and create a straight line.
4. Place silicone tray on a cookie sheet in the freezer for 5-10 minutes.
5. Remove tray from freezer and fill the rest of each heart with either pink or dark cocoa – the opposite of whatever you added first.
6. Tap the tray to settle the chocolate and immediately add sprinkles to the top of each heart.
7. Return tray to freezer for 10 minutes or until chocolate sets.

DIY Chocolate Valentine Hearts | Vicky BaroneThere are so many things you can make with your silicone heart mold. We hope you enjoy these fancy chocolates! Follow Vicky Barone on Pinterest to see more Valentine’s Day ideas!