Categories
DIY Holidays

DIY Bunny Garland

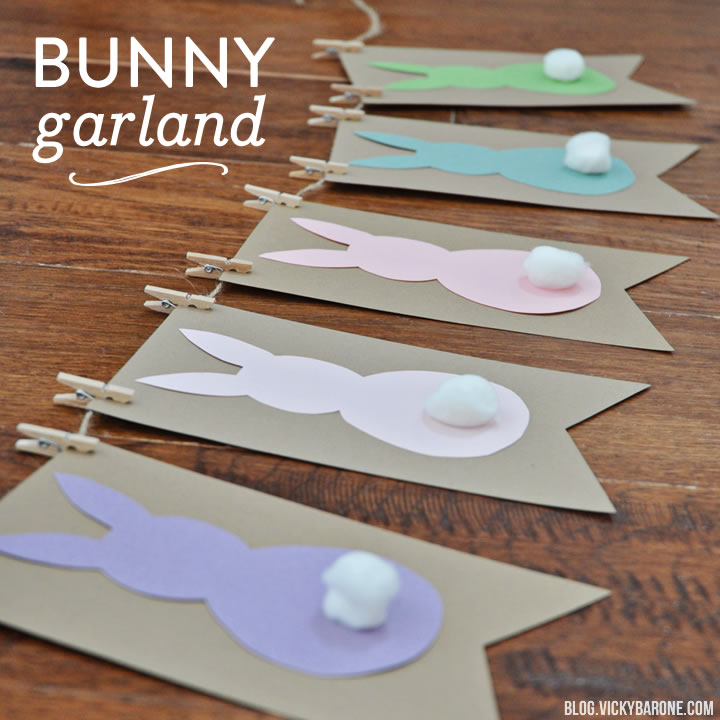
We can’t pass up a colorful garland no matter the holiday! This DIY Bunny Garland is no exception. All you need is some scrapbook paper and mini white pom poms to create these sweet little bunnies. For most of our garlands, we like to keep twine and mini clothes pins on hand. It’s so easy to swap out garlands depending on the season and store the ones not in use. Keep reading to learn how to make your own!

DIY Bunny Garland | Vicky Barone
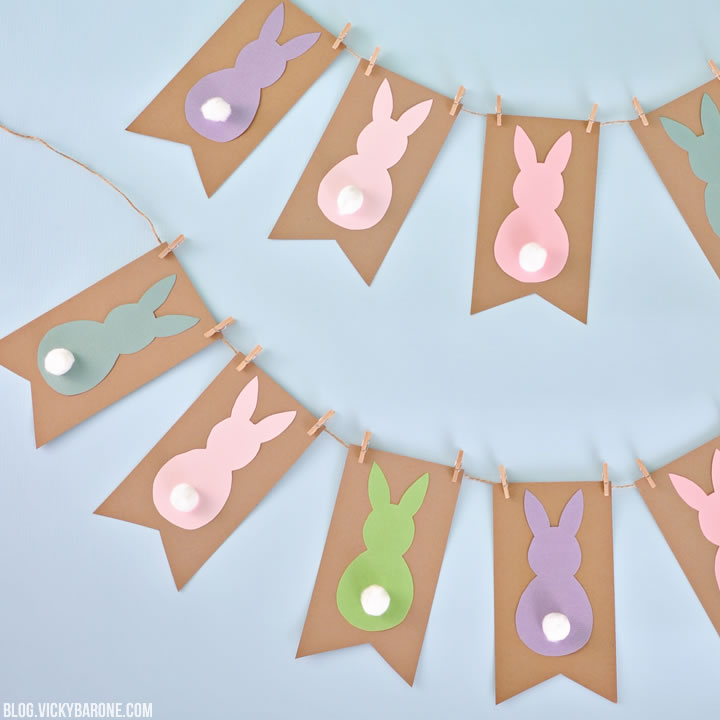
Supplies: kraft paper, scrapbook paper in pastel colors, scissors, pom poms, glue, twine, and mini clothespins.

Directions:
1. Using a paper cutter or scissors, cut rectangles out of the brown kraft paper.
2. Cut a triangle out of the bottom of each rectangle with scissors.
3. Draw a bunny shape onto a piece of kraft paper and cut it out. This will be your stencil.
4. Use the bunny stencil to trace the shape onto the pastel scrapbook paper and cut.
5. Glue the bunny shapes to the kraft paper flags and glue a pom pom to each bunny for the tail.
6. When the glue is dry, clip each flag to the twine using the mini clothes pins and hang your garland.

DIY Bunny Garland | Vicky Barone

DIY Bunny Garland | Vicky Barone

What are your favorite ways to decorate for Easter? Find even more fun Easter ideas here!


Categories
DIY Holidays Kids

DIY Bunny Jars

These little bunny jars are the perfect way to share some sweets on Easter. We filled ours up with jelly beans and we’re thinking they might nestle in some Easter baskets!

DIY Bunny Jars | Vicky Barone

Supplies: glass jars, white acrylic paint (or spray paint!), a paint brush, white and pink felt, scissors, hot glue, pink and black markers.

Directions:
1. Paint the jars with the white acrylic paint. If you intend to fill the jars with candy later, remove the lid before painting and try not to paint too far up the neck of the glass jar. This will help the lid twist on and off easily.
2. Cut bunny ear shapes out of the felt using sharp scissors. Make the white ears a little larger than the pink and hot glue them together.
3. When the jar is completely dry, twist on the cap and add hot glue to the side of it. Carefully press the felt ears onto the hot glue.
4. Using a pink marker, draw a little upside-down triangle in the center of the jar for a nose. Use a fine black marker to create the eyes and the mouth.

DIY Bunny Jars | Vicky Barone

Find more Easter ideas on our Pinterest board here and don’t forget to follow Vicky Barone on Instagram and Facebook for more inspiration!

Categories
DIY Holidays Kids

DIY Felt Bunny Ears

Here’s our last Easter post of the season, and it sure is a cute one! These felt bunny ears are perfect for your little ones to wear while they hop around looking for treats on Easter morning!

DIY Felt Bunny Ears | Vicky BaroneMaterials: felt, scissors, craft glue, and a needle and thread.

Directions:
1. Cut two strips of gray felt about 2.5″ thick. Glue or sew these strips together to create a headband that fits your child’s head comfortably.
2. Cut two ear shapes out of gray felt and two ear shapes about 1/4 of an inch smaller around the edges in pink or blue felt.
3. Glue the inside of the ears to the bigger gray ears. Set aside to dry.
4. Once the ears are dry, pinch the base of an ear and sew two or three stitches into it to create the folded ear look. This helps the ears stick straight up when your child is wearing them. *Feel free to skip this step if you’d like the ears to appear flat. If they’re tall enough, they might flop over which would also be very cute!
5. Sew each ear to the headband until secure.

DIY Felt Bunny Ears | Vicky BaroneHere they are on our one cooperative little bunny 🙂

DIY Felt Bunny Ears | Vicky BaroneWe hope everyone has a wonderful Easter!

Categories
DIY Holidays Kids Recipes

Chick & Bunny Marshmallow Pops

How ridiculously cute are these Easter marshmallow pops? We had so much fun making these characters come to life and we’re excited to share them with you today!

Chick & Bunny Easter Marshmallow Pops | Vicky BaroneIngredients: Marshmallows, white, pink, and yellow candy melts, cake pop sticks, and candy eyes.

Directions:
1. Put each marshmallow on a cake pop stick.
2. Dip the marshmallows in melted yellow candy melts for the chicks and white candy melts for the bunnies.
3. Place coated marshmallows on a waxed paper lined cookie sheet and let set in the refrigerator.
4. Cut extra marshmallows into triangles for the ears and wings*
5. To coat the wings and ears with candy melts, first put each on a toothpick and dip them like you did the whole marshmallows. Then place coated wings and ears in fridge to set as well.
6. When everything has set, remove the toothpicks from the wings and ears, dip the bases in candy melts, and attach to the whole marshmallows.
7. To attach the candy eyes: add a little melted chocolate to the back of each eye using a toothpick. Adhere to marshmallow.
8. To make the bunny nose: melt the pink candy melts and use a toothpick to carefully paint a triangle just below the eyes.
9. To make the chick’s beak: add red food coloring to the remaining yellow candy melts to create an orange color. Repeat step 8.

*Tip for cutting marshmallows: Keep a glass of water next to your cutting board and dip the knife into it between each cut. Keeping the knife wet will prevent the marshmallow from sticking to the blade. It will also help create clean cuts when cutting small shapes.

Easter Marshmallow Pops | Vicky BaroneWe hope you enjoy our silly marshmallow friends! What other Easter characters will you make? We’d love to see!


Categories
DIY Holidays Kids

Chick & Bunny Easter Craft

Inspired by this picture on Pinterest, we went out and bought a handful of wooden spoons for this sweet and easy kids craft for Easter.

Chick & Bunny Easter Craft | Vicky BaroneMaterials: Wooden spoons, acrylic paint, scrapbook paper, googly eyes, feathers, felt, glue, and a marker.

Directions:
1. Paint both spoons with white acrylic paint. Let dry.
2. Paint one of the white spoons yellow (the white will have acted as a primer so that the yellow paint would pop without the need for too many coats).
3. Make bunny ears by cutting out small pieces of white felt and coloring the insides pink with the marker.
4. Glue bunny ears onto the back of the white spoon and yellow feathers onto the back of the yellow spoon. Let dry.
5. Glue on googly eyes to each spoon.
6. Draw a small triangle with pink marker onto the white spoon to create the bunny’s nose.
7. Cut out a small diamond from the scrapbook paper, fold in half, and glue onto the yellow spoon to create the chick’s beak.

Chick & Bunny Easter Craft | Vicky Barone

Just like with our chick and lamb paper plate craft, the googly eyes really give the Easter characters personality (and they crack us up!).


Categories
Holidays Products

Personalized Holiday Ornaments

We are so excited to announce that my Personalized Holiday Ornaments are now available on Etsy! Each ceramic ornament features different playful characters to match the personalities of your family members, including your pets! These ornaments are a beautiful and thoughtful gift for the holidays and are sure to remain precious keepsakes for years to come.

Click through the pictures below to see the listings on Etsy!
Dressed Up Dachshund - Personalized Holiday Ornament by Vicky Barone on Etsy Holiday Hound - Personalized Holiday Ornament by Vicky Barone on Etsy Delightful Deer - Personalized Holiday Ornament by Vicky Barone on Etsy
Snuggly Bunny - Personalized Holiday Ornament by Vicky Barone on Etsy Stocking Birdies - Personalized Holiday Ornament by Vicky Barone on Etsy Holiday Moose - Personalized Holiday Ornament by Vicky Barone on Etsy
Little Boy Elf - Personalized Holiday Ornament by Vicky Barone on Etsy Little Girl Elf - Personalized Holiday Ornament by Vicky Barone on Etsy Snowy Snowman - Personalized Holiday Ornament by Vicky Barone on Etsy
Plump Penguin - Personalized Holiday Ornament by Vicky Barone on Etsy Opossum Presents - Personalized Holiday Ornament by Vicky Barone on Etsy Super Santa - Personalized Holiday Ornament by Vicky Barone on Etsy
Festive Fox - Personalized Holiday Ornament by Vicky Barone on Etsy Dapper Owl - Personalized Holiday Ornament by Vicky Barone on Etsy

Last year’s ornaments have also been renewed and are available again!
Bow Tie Teddy Pink - Personalized Holiday Ornaments by Vicky Barone on Etsy Bow Tie Teddy Green - Personalized Holiday Ornaments by Vicky Barone on Etsy


We know it’s not even Halloween yet, but Christmas is always right around the corner! Make sure you order your ornaments now!