Categories
DIY Holidays

DIY Hocus Pocus Halloween Banner

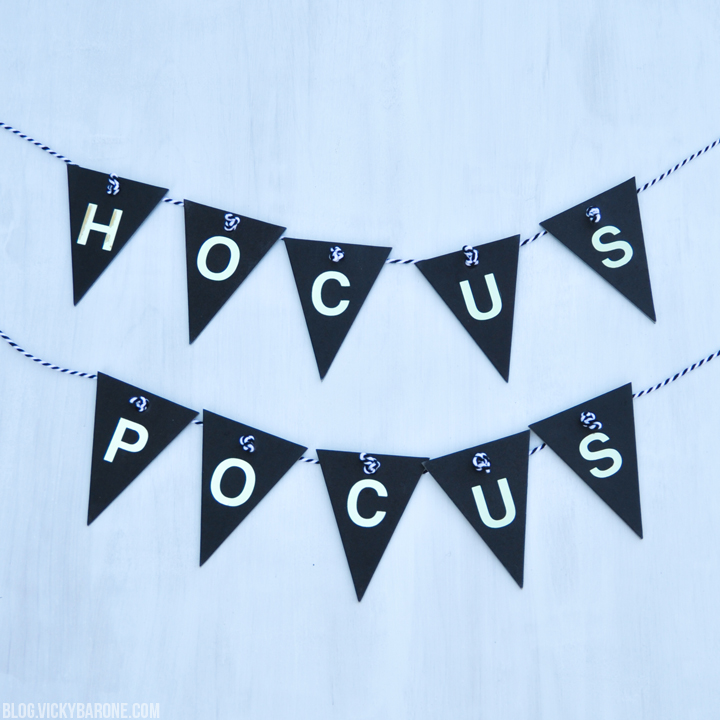
Halloween is coming up fast and we still have so many fun projects to share with you all! Today we have an easy banner that can decorate any room, space, or party! Here’s how to make your own Hocus Pocus banner…

DIY Hocus Pocus Halloween Banner | Vicky Barone

Supplies: chalkboard tags, metallic alphabet stickers, and baker’s twine.

Directions:
1. String baker’s twine through each tag by pushing a folded section of the string through and tying a knot to secure.
2. Add stickers to each tag to create your phrase.
3. Hang and enjoy!

DIY Hocus Pocus Halloween Banner | Vicky Barone

So easy, right? What fun Halloween projects are you working on? We’d love to hear!

Categories
DIY Holidays Kids Recipes

DIY Cheese Dip Bats

In honor of National Food Day, we thought we’d take a break from our normal sweet treats to bring you a salty snack (don’t worry, National Chocolate Day is on Friday 😉 )! We found the idea for these adorably cheesy bats on Pinterest and decided to make a version of our own! Here’s how…

DIY Cheese Dip Bats | Vicky Barone

Ingredients:
8oz cream cheese
8oz shredded cheese (use whatever you like! Italian, Parmesan, or even goat cheese!)
poppy seeds
blue torilla chips
candy eyes

Directions:
1. Mix cheeses in a bowl until blended.
2. Scoop out some of the cheese mixture and roll it into a ball.
3. Roll the ball in a bowl of poppy seeds until covered.
4. Break some tortilla chips in half to make wings and stick them into the cheese balls.
5. Press candy eyes into each cheese ball.
6. Serve immediately or leave in refrigerator to keep cool until ready to serve.

DIY Cheese Dip Bats | Vicky Barone

The best part about these cute little guys? You can add Places for Faces to give them even MORE personality!

DIY Cheese Dip Bats | Vicky Barone

Places for Faces now has lots of new Halloween stickers to choose from! Upload a face, add stickers, and choose the dessert topper template. Print and cut out faces and tape them to colorful toothpicks. Serve with your cheese dip bats to excite your little guys and ghouls! Enjoy!

Categories
DIY Recipes

Milano Mummies

This post contains affiliate links. If purchased, I will receive a commission, but the price stays the same for you!

Hooray for Friday! Today we’re sharing a sweet treat  you can make for Halloween. Here’s how…

Milano Mummies | Vicky Barone

Ingredients: Milano cookies, white candy melts, and candy eyes.

Directions:
1. Melt candy melts in the microwave according to directions. Stir until smooth.
2. Scoop into a plastic bag and cut off the corner.
3. Lay Milano cookies on a wax paper lined cookie sheet.
4. Take the cookies one at a time and place them on a plate where you will add the candy melts.
5. Pipe candy melts onto a cookie moving side to side until covered. Don’t be afraid to pour the candy melts past the cookie’s edges!
6. Once the cookie is covered, carefully lift it up by holding it from the top and bottom. This will help the candy melts fold over the sides.
7. Lay the cookie back in its place on the cookie sheet.
8. Quickly and carefully press candy eyes into the cookie.
9. Place cookie sheet in fridge until candy melts harden.

Eat and enjoy!

Milano Mummies | Vicky Barone Milano Mummies | Vicky Barone

Aren’t they just the cutest little mummies? And they’re SO delicious. Happy Friday, everyone! Hope it’s wonderful.

Categories
DIY Holidays

DIY Jack-o-Lantern Soda Bottles

Looking to add some spooky details to your Halloween party? How about these jack-o-lantern soda bottles with sweet faces and even sweeter orange soda! Here’s how we made our own and topped them off with Places for Faces…

DIY Jack-o-Lantern Soda Bottles | Vicky Barone | Places for Faces

Supplies: glass bottles, black vinyl stickers, scissors, Places for Faces, tape, and paper straws.

Directions:
1. Clean your soda bottles thoroughly and let dry.
2. Cut silly jack-o-lantern faces out of the black vinyl (we used scraps from other sticker projects!).**
3. Add the stickers to the soda bottles to create faces.
4. Use Places for Faces to create your own personalized dessert toppers.
5. Print out the template and cut out the faces.
6. Tape each one to a paper straw.
4. Add some orange soda and the straw to the bottle and enjoy!

**you can also draw the faces on with a Sharpie!

DIY Jack-o-Lantern Soda Bottles | Vicky Barone | Places for Faces DIY Jack-o-Lantern Soda Bottles | Vicky Barone | Places for Faces

DIY Jack-o-Lantern Soda Bottles | Vicky Barone | Places for Faces

Every DIY project is better with a little personality from Places for Faces! Head over to placesforfaces.com and get started making your own straw toppers, thank you notes, gift tags, and so much more. There are lots of brand new Halloween sticker options to choose from! How will you use Places for Faces?

Categories
DIY Holidays

DIY Ghost Garland

Boo! Today we’re sharing a Halloween garland that only requires 3 supplies! Here’s how to make your own ghost garland…

DIY Ghost Garland | Vicky Barone

Supplies: white yarn, googly eyes, and glue.

Directions:
1. Begin by wrapping yarn around your hand (or a pre-cut piece of cardboard) until you reach desired fullness.
2. Thread another piece of yarn into the loop you created and tie it tight.
3. This method is similar to making a yarn pom pom, but instead of tying a second piece of string around the center of the loop, you’ll tie it closer to the top to create a little round ghost head!
4. Cut the bottom larger part of the loop and trim to even out.
5. Add googly eyes with glue.
6. String together on another piece of yarn!

What other fun Halloween projects are you working on? We’d love to hear!

Categories
DIY Holidays Recipes

Halloween Cupcakes

This post contains affiliate links. If purchased, I will receive a commission, but the price stays the same for you!

Happy Chocolate Cupcake Day! Doesn’t that sound like the most delicious holiday ever?! To celebrate, we are sharing some super cute and fun Halloween cupcakes! Here’s how to make your own…

Halloween Cupcakes | Vicky Barone

Supplies: chocolate cupcakes, chocolate icing, Ziploc bag, mini Oreos, regular sized Oreos, candy eyes, and white candy melts.

For the bats:
1. Ice a chocolate cupcake with chocolate frosting.
2. Split an Oreo in half and use the side without frosting for the wings. Break this cookie in half down the middle and press into the chocolate frosting.
3. Using chocolate frosting for the glue, add candy eyes to a mini Oreo.
4. Press the mini Oreo into the center of the cupcake!

For the mummies:
1. Melt white candy melts according to directions.
2. Scoop into a Ziploc bag and cut a corner off.
3. Pipe the candy melts onto a chocolate cupcake from side to side.
4. Press candy eyes on top.

Halloween Cupcakes | Vicky BaroneHalloween Cupcakes | Vicky Barone Halloween Cupcakes | Vicky Barone Halloween Cupcakes | Vicky Barone Halloween Cupcakes | Vicky Barone Halloween Cupcakes | Vicky Barone Halloween Cupcakes | Vicky Barone Halloween Cupcakes | Vicky Barone

Halloween Cupcakes | Vicky Barone Halloween Cupcakes | Vicky Barone

Aren’t they the cutest? Watch out for little hands scooping them up! Happy Chocolate Cupcake Day, everyone. We hope you celebrate accordingly! 🙂

Categories
DIY Holidays

DIY Metallic Skull

This post contains affiliate links. If purchased, I will receive a commission, but the price stays the same for you!

Are you ready for the easiest Halloween DIY ever? We LOVE finding holiday treasures at the Dollar Store and transforming them into fun decor. All you need to make this metallic skull is a Dollar Store skull and some spray paint! Here’s how…

DIY Metallic Skull | Vicky Barone

Supplies: a plastic skull from the Dollar Store (or styrofoam or any other type of skull you can find!), and metallic gold spray paint.

The above supplies contain an affiliate link. If purchased, I will receive a commission, but the price stays the same for you!

Directions: This could not be easier! Simply spray paint the skull in a well-ventilated area (preferably outside) and let dry completely. This spray paint is our favorite metallic spray paint yet! It is super shiny and makes everything look so beautiful!

DIY Metallic Skull | Vicky Barone DIY Metallic Skull | Vicky Barone DIY Metallic Skull | Vicky Barone DIY Metallic Skull | Vicky Barone

Like these spray painted pumpkins? They’ll be coming to the blog soon too so stay tuned!

Categories
DIY Holidays

Halloween Countdown Frame

Today marks 17 days until Halloween! Hooray! To keep track of all the exciting holiday countdowns coming up, we made a framed dry erase board! This seasonal DIY only takes a few minutes to create and can be personalized in so many different ways. Here’s how to make your own…

Halloween Countdown Frame | Vicky Barone

Supplies: 8×10 frame, scrapbook paper, printer, dry erase marker.

Directions:
1. Choose a frame! We used a simple one from the Dollar Store.
2. Cut a piece of scrapbook paper to 8.5×11 so it fits in the printer.
3. Create a Word Document or a Google Document and type out “Days Until Halloween” at the bottom.
4. Print onto scrapbook paper and cut down to fit into the frame.
5. Add to frame and start writing with the dry erase marker!

This frame is perfect for all holidays. Just swap out the Halloween page for Thanksgiving once the big day is over! There is always something to celebrate, so the possibilities are endless.

Halloween Countdown Frame | Vicky Barone

Halloween Countdown Frame | Vicky Barone

Happy Almost-Halloween! Now to decide on a costume…