Categories
DIY Holidays Kids Parties and Events

DIY New Year’s Eve Piñatas

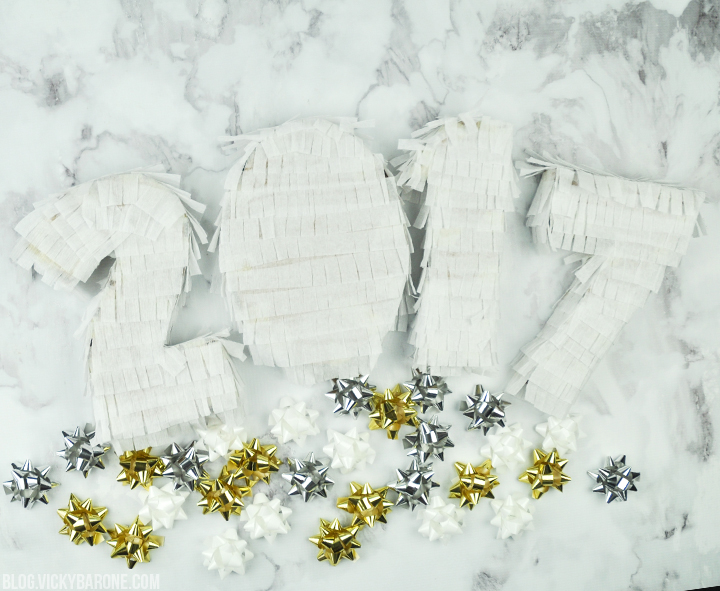
New Year’s Eve is just a few days away and we are busy decorating for the festivities! Today we’re sharing a DIY piñata project that’s perfect for candy or simply decor. Here’s how…

DIY New Year's Eve Piñatas | Vicky Barone

Supplies: cardboard, scissors, masking tape, white crepe paper, and Elmer’s glue.

Directions:
1. Cut out the numbers 2017 twice from cardboard.
2. With the remaining cardboard, cut out 1.5″ strips. The strips will go between the numbers to create the 3D shape.
3. Stack two matching numbers on top of one another.
4. Bend cardboard strips around the outside shape of the numbers and tape together.
5. If you want to fill these with candy, cut a hole in the top and pour candy inside before continuing.
6. Cut a length of crepe paper and fold accordion-style.
7. Cut fringe into the crepe paper and unfold.
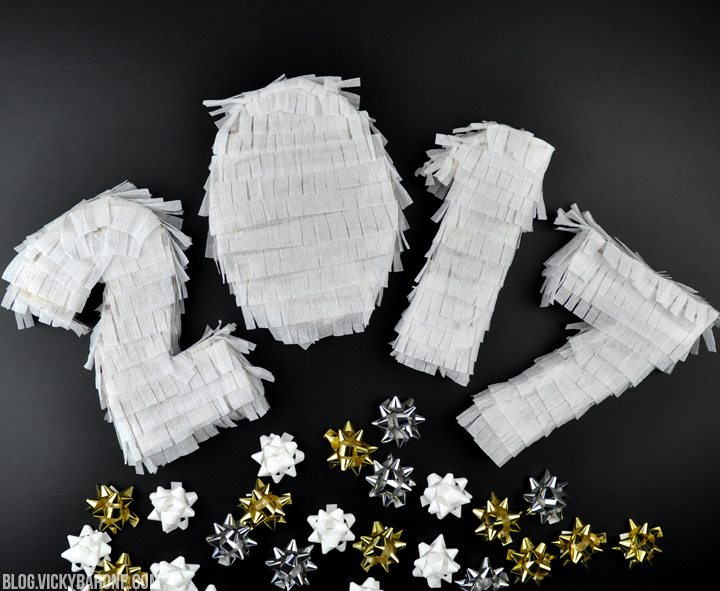
8. Starting from the bottom of a piñata shape, glue strips of the fringed crepe paper, stacking them on top of one another as you move up the shape.
9. Hang from strings or use to decorate in any way you’d like!

DIY New Year's Eve Piñatas | Vicky Barone

Wishing you all a very happy, healthy, and safe new year!

Categories
DIY Holidays Parties and Events

DIY New Year’s Eve Canvas

We think 2017 is going to be our best year yet! Here’s how to make a gold cut-out canvas to display at your New Year’s Eve party to celebrate that sentiment…

DIY New Year's Eve Canvas | Best Year Yet | Vicky Barone

Supplies: a canvas, an X-acto knife, a printed quote, self-healing mat, and gold spray paint.

Directions:
1. Create a design or quote you’d like on your canvas and print it backwards (this will create a stencil that you will use on the back of the canvas!).
2. Place the canvas on a self-healing mat, face down.
3. Tape the stencil to the inside of the canvas.
4. Use the X-acto knife to cut away the letters or design (you will be cutting through the paper stencil and the canvas)
5. Neaten up the canvas with an X-acto knife or small scissors.
6. In a well-ventilated area (preferably outside!) cover the canvas with gold spray paint and let dry.
7. Decorate with your new canvas and celebrate the new year!

DIY New Year's Eve Canvas | Best Year Yet | Vicky Barone DIY New Year's Eve Canvas | Best Year Yet | Vicky Barone

For even more NYE ideas, click here!

Categories
DIY Holidays Parties and Events

DIY Starry Headbands

It’s not even Christmas yet, but we are already getting so excited for New Year’s Eve! To celebrate, we created these sparkly headbands to wear while you watch the ball drop. Here’s how to make your own…

DIY Starry Headbands | Vicky Barone

Supplies: plastic headbands, wire, scissors, glittery paper, and hot glue.

Directions:
1. Cut different sized star shapes out of glitter paper.
2. Cut a length of wire and roll the end of it into a flat coil (this will give more surface area for the hot glue to stick to).
3. Attach a star to the coil using hot glue. Repeat until all of the stars are glued to pieces of wire.
4. Wrap the other end of the wire to the headband until the star is at the desired height.
5. Repeat with the rest of the stars until the headband is full.
6. Wear and enjoy!

DIY Starry Headbands | Vicky Barone DIY Starry Headbands | Vicky Barone

What are your plans for ringing in the new year? We’d love to hear!

Categories
DIY Holidays Parties and Events

DIY Thanksgiving Place Cards

Happy Thanksgiving week! Today we’re sharing a super easy, last-minute place card tutorial to spice up your Thanksgiving tablescape! Here’s how to make your own…

DIY Thanksgiving Place Cards | Vicky Barone

Materials:
– Faux pears (we got ours at Marshalls, but you can find faux fruit at any craft store!)
– An X-acto knife
– White card stock
– A pen or marker (we used Tombow Dual Brush Pens)

DIY Thanksgiving Place Cards | Vicky Barone

Directions:
1. Cut white card stock into small rectangles. Ours were about 2×3″
2. Use the X-acto knife to make a slit in the top of each of the pears.
3. Use a pen or marker to write names on each card (you can also print out name cards with your favorite font!).
4. Insert cards into pears and set on the table!

DIY Thanksgiving Place Cards | Vicky Barone DIY Thanksgiving Place Cards | Vicky Barone DIY Thanksgiving Place Cards | Vicky Barone

We hope you have the most wonderful Thanksgiving! For even more table setting ideas, click here!

For ideas about how to put together a functional and elegant table setting, check this out!

Categories
Holidays Parties and Events Things I Love

Christmas Cocktail Party with Paperless Post

The holidays are coming up and we are so excited for all the fun festivities! Today we’re sharing a inspiration board with our favorite ideas for holiday entertaining including personalized invitations from Paperless Post! From party attire to cocktail recipes and decor, we are prepared for the perfect low-key cocktail party and thanks to Paperless Post, we’ll have unique invitations to set the tone for our guests.

Christmas Cocktail Party with Paperless Post | Vicky Barone-1

Shoes | Dress | White Cranberry Mimosas
Table Runner | Glasses | Invitations

How are you celebrating the holidays this year? We’d love to hear!

Categories
DIY Parties and Events

DIY Pineapple Gift Bags

Happy Monday, everyone! We are in the studio this week working on lots of new content and we can’t wait to share it all with you! You can follow @vicky_barone on Instagram for some behind the scenes looks!

In the meantime, here is a super easy favor bag tutorial from our Pineapple Party!

DIY Pineapple Gift Bags | Vicky Barone

Supplies: yellow gift bags, a white paint pen, a ruler, and green tissue paper.

Directions: Using the ruler as a guide, draw diagonal lines with the paint pen onto a bag. You can start by drawing a line from corner to corner and then working your way out. Draw diagonal lines going in the opposite direction next. Once the paint is dry, open up the bags, add your favors, and top it all off with some green tissue paper. Tada! A pineapple gift bag!

DIY Pineapple Gift Bags | Vicky Barone DIY Pineapple Gift Bags | Vicky Barone

Check out the rest of the details from the Pineapple Party right here! Have a wonderful week!

Categories
DIY Parties and Events Uncategorized

DIY Pineapple Garland

Good morning, party people! In case you missed it, earlier this week we wrote about our Pineapple Party! Today we’re sharing the details on how to make the felt pineapple garland we used for decoration…

DIY Pineapple Garland | Vicky Barone

Supplies: yellow and green felt, card stock, scissors, a pencil, hot glue, and string.

Directions:
1. Trace pineapple shapes onto card stock. You will want two templates, so trace one shape of the base of the pineapple and one of the crown. Make sure the crown template comes to a point at the bottom. This will be glued to the back of the base. Cut out shapes.
2. Use the base template to trace onto the yellow felt. Use the crown template to trace onto the green felt. Cut out shapes from felt.
3. Add hot glue to the bottom point of the green crown and attach to a yellow base. Repeat with the rest of the shapes.
4. To make the pineapples into a garland, attach to a piece of string or twine using more hot glue.
5. Hang and enjoy!

Pineapple Party | Vicky Barone

Does’t it make a great addition to the Pineapple Party?

DIY Pineapple Garland | Vicky Barone DIY Pineapple Garland | Vicky Barone

DIY Pineapple Garland | Vicky Barone

DIY Pineapple Garland | Vicky Barone DIY Pineapple Garland | Vicky Barone

Check back next week for even more details from the Pineapple Party!

Categories
DIY Parties and Events Recipes

Pineapple Party with Places for Faces!

If you follow Vicky Barone on Instagram, you might have already noticed that we have a serious thing for pineapples. It’s no wonder that we decided to throw a party dedicated to our favorite tropical fruit! Over the next few weeks, we’ll be sharing tutorials and recipes for the details you see below, so stay tuned! But first, check out how Places for Faces added some personality to our party!

Pineapple Party | Vicky Barone

We used Places for Faces to create appetizer toppers! Just upload a photo, crop the face, add a sticker and choose a template. You are always just a few minutes away from personalized cupcake toppers, thank you notes, signs, and so much more.

Pineapple Party | Vicky Barone

The yellow crown sticker and the pink tiara sticker matched the party perfectly. There are so many stickers and colors to choose from and we are adding new ones all the time!

Pineapple Party | Vicky Barone

To make the pineapple appetizers, you will need deli ham, fresh pineapple, Places for Faces toppers, and party picks.

Directions:
1. Take a slice of deli ham and roll it into a tube.
2. Cut the ham tube into pieces and set aside.
3. Cube a pineapple.
4. Create toppers with Places for Faces (we used the “Dessert Topper” template!).
5. Cut out the toppers and tape them to the party picks.
6. Stack the ham on top of the pineapple and insert a party pick.
7. Serve immediately or keep in fridge until ready to serve.

Pineapple Party | Vicky Barone

Don’t forget to check back for details on the rest of the party!