Categories
DIY Holidays Kids

Snowman Mason Jar

Just because the holiday season is over, doesn’t mean we can’t keep celebrating Winter! The Christmas tree, the lights, and the gifts may all be packed away, but we are still having fun creating snow-inspired decor and crafts like this snowman mason jar! Here’s how you can make your own…

DIY Snowman Mason Jar | Vicky Barone

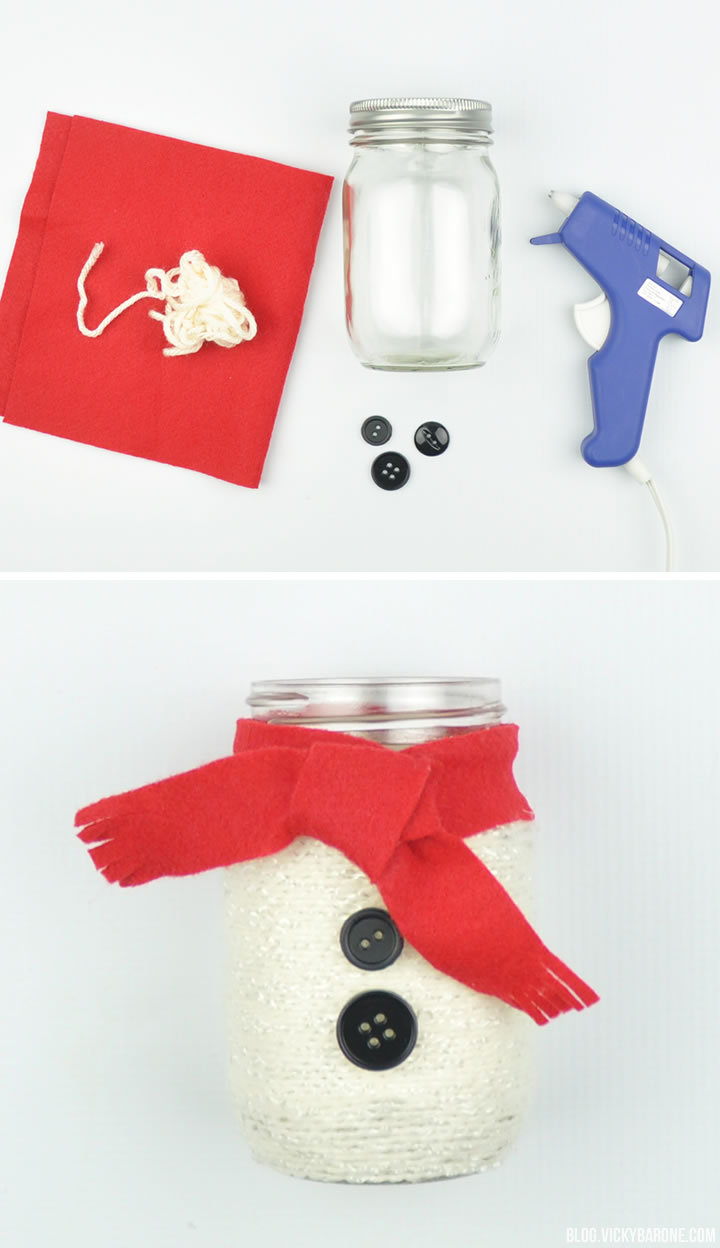
Supplies: a mason jar, white yarn, hot glue, buttons, red felt, and scissors.

Directions:
1. Run a line of hot glue around the base of the mason jar and begin wrapping with yarn. You won’t need to cover the entire jar with the hot glue, but rather every few rows, put a dot or a line of glue on the side or the back of the jar. Continue to wind the yarn around until you reach the neck.
2. Cut an inch wide piece of felt from the longest side of the sheet to make the scarf. Wrap it around the jar to see if you’d like it longer or shorter.
3. Use scissors at the ends of the scarf to create fringe.
4. Tie the scarf around the neck of the jar. Optional: hot glue in place.
5. Use hot glue to secure two or three buttons on the front of the jar.

DIY Snowman Mason Jar | Vicky Barone

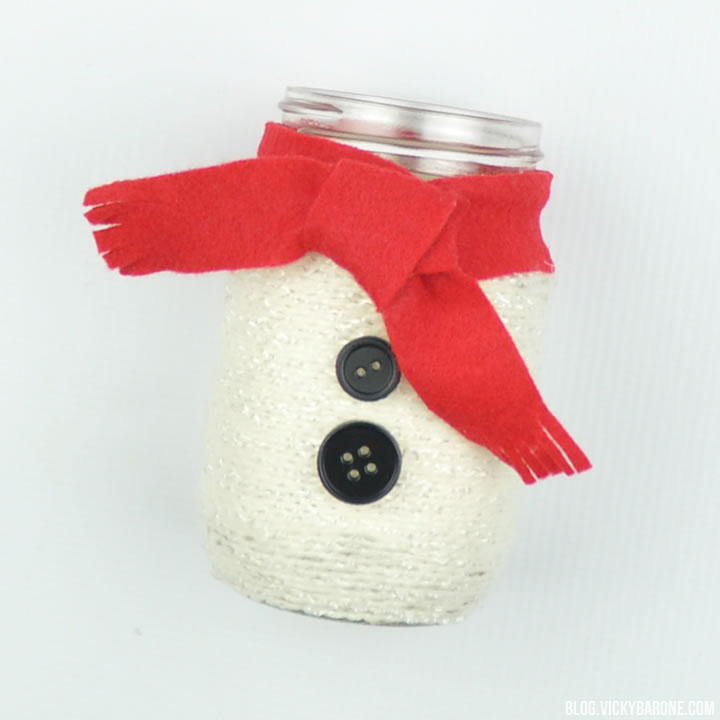
That’s it! Now you have your completed snowman, ready to add to your wintry wonderland. Fill the jar with candy, use it as a vase for flowers, or simply leave it out as decoration all on its own.

DIY Snowman Mason Jar | Vicky Barone

Is it snowing where you are? How are you celebrating Winter?

Categories
DIY

DIY Black & Gold Mason Jar Vase

Not all DIY projects have to be super complicated with tons of supplies. This polka dotted vase took no time at all and only required TWO things!

DIY Black & Gold Mason Jar Vase | Vicky Barone

We found the black mason jar at Joann’s (similar here) as well as a beautiful metallic gold paint pen. If you can’t find a black mason jar, you can either spray paint a clear mason jar with black paint OR fill the mason jar with  black paint, swirl it around, and let it dry upside down.

Hold the mason jar upside down and start dotting with the gold paint pen at the base. Concentrate the dots at the base, and have them diffuse as you work your way up the jar.

DIY Black & Gold Mason Jar Vase | Vicky Barone

Let dry, and fill with your favorite flowers. This would make a great gift or even a pretty Fall wedding centerpiece. Don’t pack them up after Halloween! They will look great with your New Year’s Eve decor as well 🙂

Categories
DIY Kids Printables

“I’m Bored” Jar + A Free Printable

Summer is right around the corner, and with it comes the incessant “Moooooommm, I’m booooored.” You know the phrase.

Well today we have the solution! Introducing the “I’m Bored” Jar. The best part about it is that you can fill it up in advance with lots of fun and simple activities. Get your little ones to help you come up with ideas for the jar, so they’ll be extra excited to see which idea they draw.

We made two different sized jars for you to choose from with two FREE labels to print here. The smaller jar is filled with popsicle sticks that read quick and simple activities like “ride your bike” or “write a letter.” The large jar is for folded up pieces of paper containing longer and more in-depth activities such as “Write a story about a boy who sneaks on board a pirate ship with his pet iguana.”

"I'm Bored" Kids Summer Activity Jar + A Free Printable | Vicky Barone

Big Jar Supplies: glass jar with a lid, the large printable label, double stick tape or glue, colorful scrapbook paper cut into squares, and a pen.
Directions: Cut out the large circle label and attach it to the jar using double stick tape or glue. Write activities on the pieces of scrapbook paper, fold them up, and place them in the jar.

"I'm Bored" Kids Summer Activity Jar + A Free Printable | Vicky Barone

"I'm Bored" Kids Summer Activity Jar + A Free Printable | Vicky Barone

Small Jar Supplies: a mason jar, the small printable label, glue or double stick tape, craft popsicle sticks, acrylic paint, a paint brush, and a pen.
Directions: Cut out the small circle label and attach it to the jar using double stick tape or glue. Paint the ends of the popsicle sticks with acrylic paint. When the paint is dry, write activities on the sticks using a pen and add them to the jar.

"I'm Bored" Kids Summer Activity Jar + A Free Printable | Vicky Barone

"I'm Bored" Kids Summer Activity Jar + A Free Printable | Vicky Barone

So the next time you’re on a conference call, cooking dinner, or even just trying to take an after-work nap, when you hear the inevitable “I’m Bored,” you can send those kiddos off to the jar. Pretty soon, they’ll be so creatively inspired that they may just abandon their favorite phrase. Enjoy!

Categories
DIY Parties and Events

DIY Football Mason Jars

We saw the CUTEST little football party on The Frosted Petticoat complete with root beer bottles with white football stitches. Since we have tons of mason jars laying around from our numerous projects, we thought we’d recreate the look on a reusable container!

DIY Football Mason Jars | Vicky Barone

All you need are some glass jars and white tape! You can also use pieces of paper and a little glue to create the stitches. Whatever you have on hand!

Add some beer or soda and a fun paper straw and you have a simple party detail that your guests will love.

Categories
DIY

DIY Gold Dipped Mason Jars

Mason jars are so versatile when it comes to crafting, you really can’t go wrong. This is especially true with these beautiful gold dipped jars. We are so pleased with how they turned out that we want to share just how easy the process is!

DIY Gold Dipped Mason Jars | Vicky Barone

Supplies: Mason Jars, metallic spray paint, blue painter’s tape, and a plastic bag

Directions:
1. First make sure the jars are clean, dry, and dust-free.
2. Tape off a line around the jar with painter’s tape. Seal the tape with your fingernail or a credit card to press out any air bubbles.
3. Rip a small piece of a plastic bag and use it to cover the rest of the exposed jar so no rogue paint gets to it. Tape it in place with another piece of painter’s tape.
4. Following the instructions on the paint can, spray paint the jar.
5. Let dry completely before removing the tape.

DIY Gold Dipped Mason Jars | Vicky Barone

These painted jars would make beautiful centerpieces at a wedding, don’t you think? For now, they are perfect for holding fresh blooms on our office desks 🙂