Categories
Holidays Kids Recipes

Chocolate Easter Gardens

Today we’re sharing some delicious “Easter Garden” desserts! They’re a spin on the classic “dirt cup” complete with yummy “carrots” and they’re just in time for some Spring celebrations.

Chocolate Easter Gardens | Vicky Barone

Supplies: chocolate pudding, Oreos, strawberries, orange candy melts, and gummy worms.
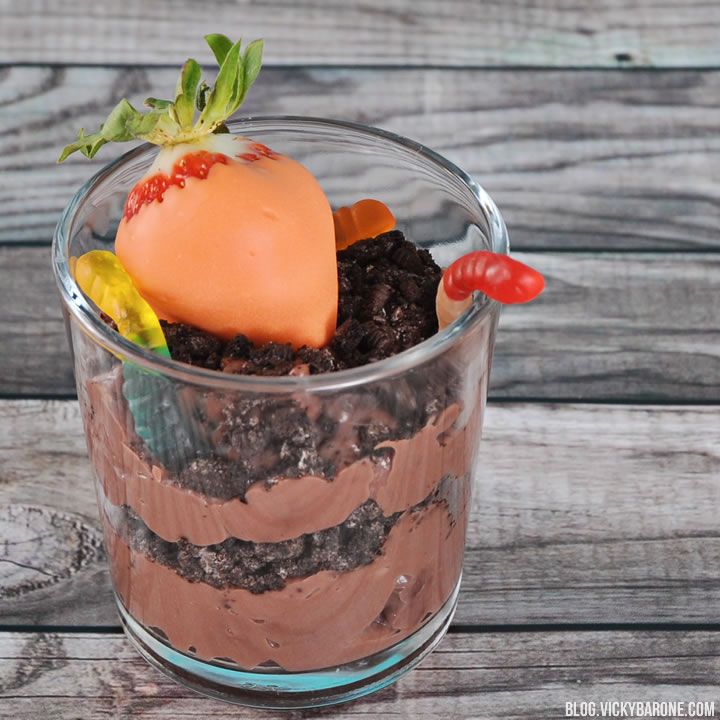
Chocolate Easter Gardens | Vicky Barone

Directions:
1. Make the chocolate pudding according to the directions on the package.
2. Put some Oreos in a plastic Ziploc bag and crush them to make the “dirt.”
3. Melt the orange candy melts in the microwave according to the directions on the package.
4. Dip the strawberries into the candy melts to coat them, then place them on a cookie sheet lined with wax paper to set.
5. Spoon alternating layers of pudding and cookie crumbs into a glass.
6. When the strawberries are set, place them into the dirt cups and add gummy worms.

Chocolate Easter Gardens | Vicky BaroneNow you have individual “gardens” full of tasty treats!

Happy Spring!


Categories
DIY Holidays Kids

DIY Bunny Jars

These little bunny jars are the perfect way to share some sweets on Easter. We filled ours up with jelly beans and we’re thinking they might nestle in some Easter baskets!

DIY Bunny Jars | Vicky Barone

Supplies: glass jars, white acrylic paint (or spray paint!), a paint brush, white and pink felt, scissors, hot glue, pink and black markers.

Directions:
1. Paint the jars with the white acrylic paint. If you intend to fill the jars with candy later, remove the lid before painting and try not to paint too far up the neck of the glass jar. This will help the lid twist on and off easily.
2. Cut bunny ear shapes out of the felt using sharp scissors. Make the white ears a little larger than the pink and hot glue them together.
3. When the jar is completely dry, twist on the cap and add hot glue to the side of it. Carefully press the felt ears onto the hot glue.
4. Using a pink marker, draw a little upside-down triangle in the center of the jar for a nose. Use a fine black marker to create the eyes and the mouth.

DIY Bunny Jars | Vicky Barone

Find more Easter ideas on our Pinterest board here and don’t forget to follow Vicky Barone on Instagram and Facebook for more inspiration!

Categories
Press

The 27th Annual LOUIE Awards

I am so excited to announce that I am a finalist in the 27th Annual LOUIE Awards! One of my Easter cards (with the cutest little bunny!) is being considered under the Seasonal Celebrations category alongside some incredibly talented artists. The greeting card industry includes so many amazing people that it’s a special honor to be a part of this year’s finalists.

From the LOUIE Awards website: “The 27th Annual LOUIE Awards Judges carefully reviewed and scored nearly 1,100 entries from more than 200 companies worldwide based on the competition’s established criteria: originality, impact, design excellence, sendability, and value.”

I am absolutely flattered to be considered for this honor and I feel so fortunate to be a part of this industry. I love sharing joy and helping people express their thoughts and feelings through greeting cards.
Categories
DIY Holidays Kids

DIY Felt Bunny Ears

Here’s our last Easter post of the season, and it sure is a cute one! These felt bunny ears are perfect for your little ones to wear while they hop around looking for treats on Easter morning!

DIY Felt Bunny Ears | Vicky BaroneMaterials: felt, scissors, craft glue, and a needle and thread.

Directions:
1. Cut two strips of gray felt about 2.5″ thick. Glue or sew these strips together to create a headband that fits your child’s head comfortably.
2. Cut two ear shapes out of gray felt and two ear shapes about 1/4 of an inch smaller around the edges in pink or blue felt.
3. Glue the inside of the ears to the bigger gray ears. Set aside to dry.
4. Once the ears are dry, pinch the base of an ear and sew two or three stitches into it to create the folded ear look. This helps the ears stick straight up when your child is wearing them. *Feel free to skip this step if you’d like the ears to appear flat. If they’re tall enough, they might flop over which would also be very cute!
5. Sew each ear to the headband until secure.

DIY Felt Bunny Ears | Vicky BaroneHere they are on our one cooperative little bunny 🙂

DIY Felt Bunny Ears | Vicky BaroneWe hope everyone has a wonderful Easter!

Categories
DIY Holidays

Metallic Easter Eggs

One more Easter egg post for you all! We just adored these pretty pastel pink and gold eggs so much that we grabbed our materials and made our own brighter versions with gold AND silver!

Metallic Easter Eggs | Vicky BaroneMaterials: Hard-boiled eggs, an egg dye kit, tape, and metallic paint pens in gold and silver.

We chose to use paint pens to create the illusion of dipping the eggs in paint because they dried quicker and gave us more control over the design.

Directions:
1. Dye eggs according to the directions on the egg dye kit. Let dry completely.
2. Tape off lines where you would like the “dip” line to reach on the egg.
3. Using the tape line as a guide, draw a line with the paint pen and then fill in the rest of the egg (since the eggs are porous and the paint pens are runny, its hard to get tape to seal a perfect paint line on the egg that the paint pen won’t run under. We suggest you use the tape solely as a rough guide).
4. Let eggs rest upside down until the paint dries completely.

We hope you have fun making these fancy eggs! Does dipping them in paint work better for you? We’d love to see!


Categories
DIY Holidays

DIY Hoppy Easter Garland

We’ve mastered the art of paper buntings (seeing as how we’ve made one for nearly every holiday), and decided to create this Easter garland to add to our collection. And while we had enough chipboard As, we thought the Easter bunny would appreciate our creative spelling. 🙂

DIY Easter Garland | Vicky Barone

Materials: Scrapbook paper in Spring colors, adhesive chipboard alphabet letters, a paper cutter and/or scissors, mini clothespins, and twine. You can find all of these materials in your local craft store!

Directions:
1. Using a paper cutter, cut scrapbook paper into 2.5 x 5 inch rectangles.
2. Cut a triangle out of the bottom of each paper rectangle using scissors. We made a stencil out of scrap paper to make sure each triangle cut was the same.
3. Remove the backing from the letters and attach to each paper flag.
4. Cut one long piece of twine (or two medium length pieces) and attach each flag with two mini clothespins, leaving equal space between the flags and extra twine on each end for hanging.

Follow Vicky Barone on Bloglovin’ for more fun Easter ideas!

Categories
DIY Holidays Kids Recipes

Chick & Bunny Marshmallow Pops

How ridiculously cute are these Easter marshmallow pops? We had so much fun making these characters come to life and we’re excited to share them with you today!

Chick & Bunny Easter Marshmallow Pops | Vicky BaroneIngredients: Marshmallows, white, pink, and yellow candy melts, cake pop sticks, and candy eyes.

Directions:
1. Put each marshmallow on a cake pop stick.
2. Dip the marshmallows in melted yellow candy melts for the chicks and white candy melts for the bunnies.
3. Place coated marshmallows on a waxed paper lined cookie sheet and let set in the refrigerator.
4. Cut extra marshmallows into triangles for the ears and wings*
5. To coat the wings and ears with candy melts, first put each on a toothpick and dip them like you did the whole marshmallows. Then place coated wings and ears in fridge to set as well.
6. When everything has set, remove the toothpicks from the wings and ears, dip the bases in candy melts, and attach to the whole marshmallows.
7. To attach the candy eyes: add a little melted chocolate to the back of each eye using a toothpick. Adhere to marshmallow.
8. To make the bunny nose: melt the pink candy melts and use a toothpick to carefully paint a triangle just below the eyes.
9. To make the chick’s beak: add red food coloring to the remaining yellow candy melts to create an orange color. Repeat step 8.

*Tip for cutting marshmallows: Keep a glass of water next to your cutting board and dip the knife into it between each cut. Keeping the knife wet will prevent the marshmallow from sticking to the blade. It will also help create clean cuts when cutting small shapes.

Easter Marshmallow Pops | Vicky BaroneWe hope you enjoy our silly marshmallow friends! What other Easter characters will you make? We’d love to see!


Categories
DIY Holidays Kids

Chick & Bunny Easter Craft

Inspired by this picture on Pinterest, we went out and bought a handful of wooden spoons for this sweet and easy kids craft for Easter.

Chick & Bunny Easter Craft | Vicky BaroneMaterials: Wooden spoons, acrylic paint, scrapbook paper, googly eyes, feathers, felt, glue, and a marker.

Directions:
1. Paint both spoons with white acrylic paint. Let dry.
2. Paint one of the white spoons yellow (the white will have acted as a primer so that the yellow paint would pop without the need for too many coats).
3. Make bunny ears by cutting out small pieces of white felt and coloring the insides pink with the marker.
4. Glue bunny ears onto the back of the white spoon and yellow feathers onto the back of the yellow spoon. Let dry.
5. Glue on googly eyes to each spoon.
6. Draw a small triangle with pink marker onto the white spoon to create the bunny’s nose.
7. Cut out a small diamond from the scrapbook paper, fold in half, and glue onto the yellow spoon to create the chick’s beak.

Chick & Bunny Easter Craft | Vicky Barone

Just like with our chick and lamb paper plate craft, the googly eyes really give the Easter characters personality (and they crack us up!).