Categories
DIY Parties and Events

DIY Chalkboard Wine Glasses

We have seen these chalkboard-dipped wine glasses all over Pinterest for years now so it’s about time we tried them out! One thing that held us back was the thought of potentially ruining perfectly good wine glasses, but we have a solution! The glasses we used are from the Dollar Tree! Lots of dollar stores have great glassware to choose from that’s perfect for crafts like this. Target even has some inexpensive stemware to choose from!

DIY Chalkboard Wine Glasses | Vicky Barone

This DIY could not be simpler, and it’s an awesome way to save your glass during a dinner party or get together! Here’s how to make your own:

DIY Chalkboard Wine Glasses | Vicky Barone

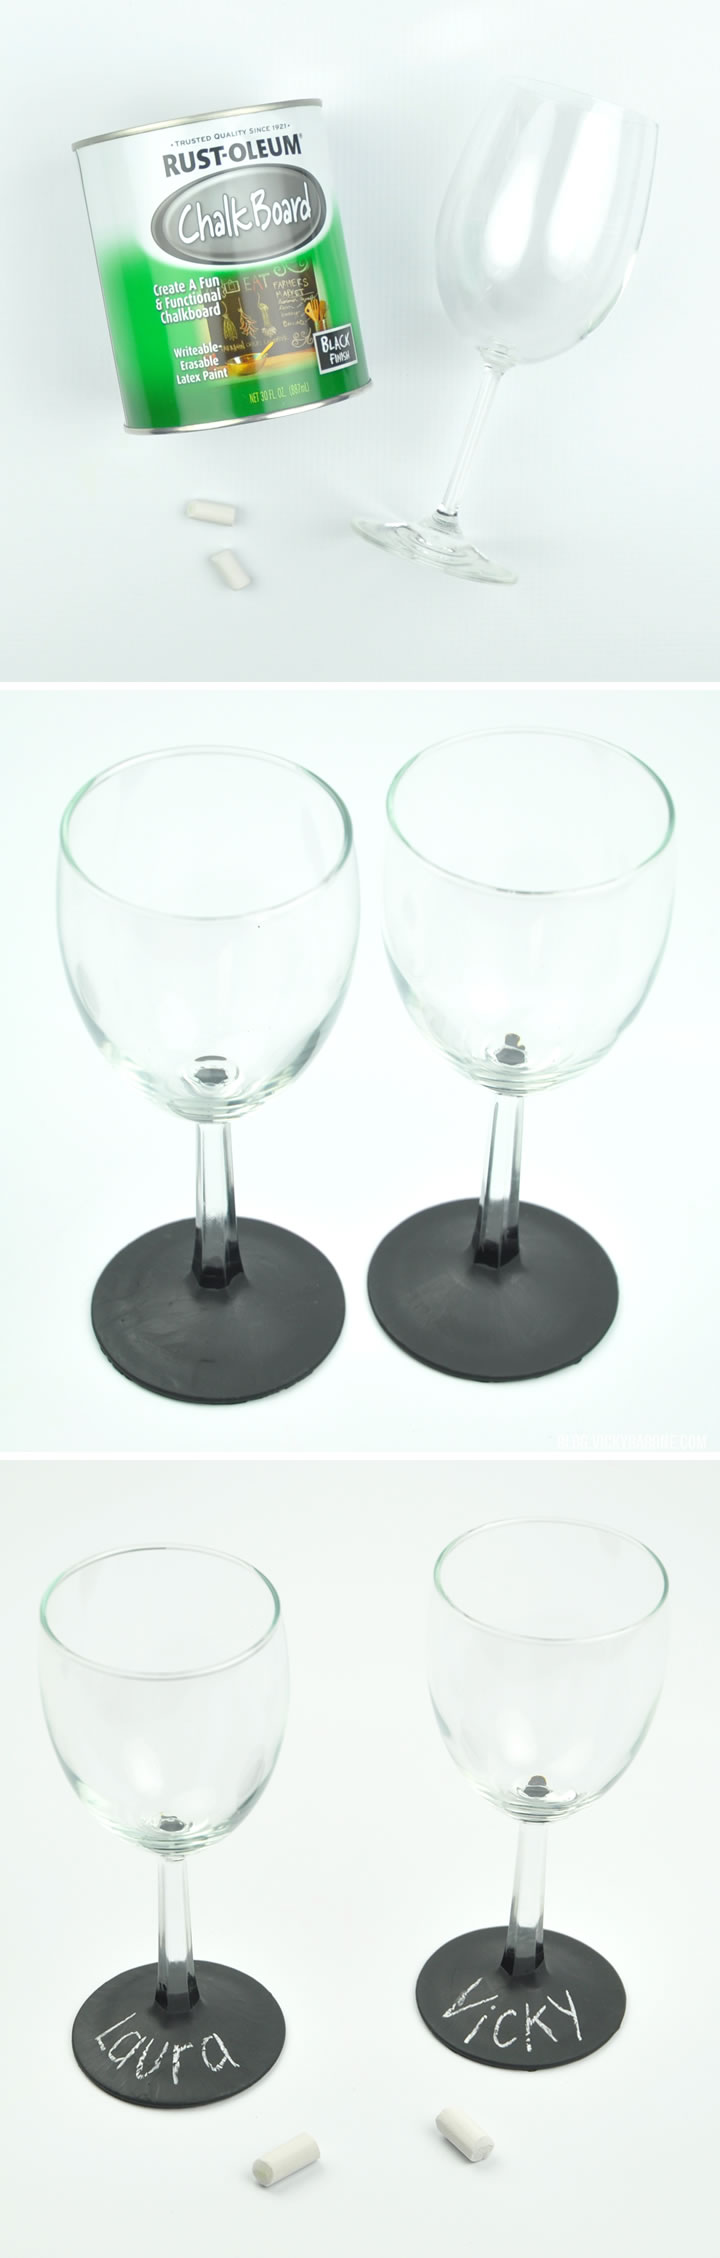
Supplies: wine glasses, chalkboard paint, aluminum foil, a paint brush, and chalk.

Directions:
1. Make sure your glasses are clean and dust-free. Use rubbing alcohol to make them squeaky clean and ready for paint!
2. Open your can of chalkboard paint and give it a good stir.
3. Lay out a piece of aluminum foil to rest the painted glasses on. You can also use wax paper or newspaper, but we found that the paint stuck to those surfaces and had to be picked off later. They peeled right off the aluminum foil though with no trouble at all!
4. Dip the base of a wine glass into the chalkboard paint container.
5. Tap the base of the glass on the insides of the paint can in a back and forth motion to shake off the excess paint.
6. Use the paint brush to clean off the bottom of the glass and remove and drips.
7. Set the glass down on the aluminum foil and move on to the next glass!
8. Let the glasses dry overnight. While they’re drying, if you see that the paint is puddling, just simply move each glass to a new spot on the aluminum foil.

DIY Chalkboard Wine Glasses | Vicky Barone

Set the glasses out for your guests with a bowl full of chalk and they’ll be good to go. These glasses would be perfect for Christmas dinner or even New Year’s Eve!

DIY Chalkboard Wine Glasses | Vicky Barone

We hope everyone has a wonderful holiday and safe travels to those of you visiting friends and family!

Categories
DIY Holidays Kids

DIY Chalkboard Ornaments

Looking for a fun and easy Holiday DIY to make this weekend? These chalkboard ornaments are super simple and can be personalized however you’d like! They would also make great gifts, stocking stuffers, or even gift tags!

DIY Chalkboard Ornaments | Vicky Barone

Supplies:
– white polymer clay
– cookie cutters (we got ours from the Dollar Store to use specifically for clay. Play it safe and refrain from using the cookie cutters in your kitchen!)
– wooden skewer
– chalkboard paint
– paint brush
– white paint pen
– ribbon

DIY Chalkboard Ornaments | Vicky Barone

Directions:
1. Roll out clay according to directions until you reach a desired thickness. Ours were a little less than 1/8 of an inch thick, but were pretty sturdy when baked.
2. Use cookie cutters to make shapes. Remove excess clay from around cookie cutter before picking it up to reveal the shape. This will help make cleaner edges!
3. Use a wooden skewer to create a hole in each shape. Make sure it goes all the way through. This will be where you tie ribbon to hang the ornament when it’s complete.
4. Place shapes on a cookie sheet lined with aluminum foil. Bake according to directions on package. Let cool completely.
5. Paint shapes with chalkboard paint (2 coats should do). Let dry.
6. Decorate the ornaments with white paint pens however you’d like!
7. Tie a ribbon through the hole and hang on a tree.

DIY Chalkboard Ornaments | Vicky Barone

DIY Chalkboard Ornaments | Vicky Barone

DIY Chalkboard Ornaments | Vicky Barone

DIY Chalkboard Ornaments | Vicky Barone

Have a wonderful weekend, everyone! Happy crafting!

P.S. Speaking of ornaments, don’t forget to order your personalized ornaments from Vicky Barone Designs by December 7, 2015 for guaranteed Christmas delivery!

Categories
DIY Holidays Parties and Events

Chalkboard Silverware

Today we’re sharing a clever and cost-effective way to add a personalized touch to your Thanksgiving table: silverware that doubles as a name tag! Show your guests to their seats in style and reuse them year after year!

Chalkboard Silverware | Vicky Barone

We used a paint pen on our silverware to make hand lettering the names a bit easier than with chalk. If you’d like to use chalk, leave some extra pieces on the table and have your guests write what they are thankful for on their knives and spoons!Chalkboard Silverware | Vicky Barone

Chalkboard Silverware | Vicky Barone

Supplies: silverware (ours was from Goodwill: 12 pieces for $2.25!), chalkboard paint, a white paint pen (or chalk), and a paint brush (optional).

Directions:
1. Thoroughly clean and dry the silverware.
2. To paint each piece of flatware you can either dip it into the chalk paint container or use a paint brush to paint it on. Use blue tape to create sharp lines if you’d like!
3. Let dry completely. Once dry, use a white paint pen to add names to each fork.

**After use, hand wash only to preserve the paint.**

Chalkboard Silverware | Vicky Barone

Later this week we’ll be sharing even more Thanksgiving name tag ideas, so stay tuned!

And don’t forget about the GIVEAWAY that ends tonight at 11:59pm EST! See this Instagram post for details.

Categories
DIY Family Kids Projects

DIY Back To School Chalkboard

We have a very bittersweet DIY project today that you and your little ones are sure to enjoy. We’ve seen lots of different “First Day of School” pictures on Pinterest and we thought we’d make our own.

My oldest son just started Pre-K, so he and I decorated a little framed chalkboard to commemorate his big day. He loves to paint (and he LOVES the color red) so this project was right up his alley.

8_22_13_BackToSchoolChalkboard

Materials: Chalkboard, acrylic paint, painter’s tape, a foam brush, and chalk (you can find all of these things at any craft store).

What to do: Tape off the chalkboard with painter’s tape and paint the frame. Once the paint is dry, remove the tape and write on the board with chalk!

We hope you like our super easy project! It is sure to make for wonderful pictures and memories as the years go on.