Categories
DIY Parties and Events

DIY Popsicle Garland

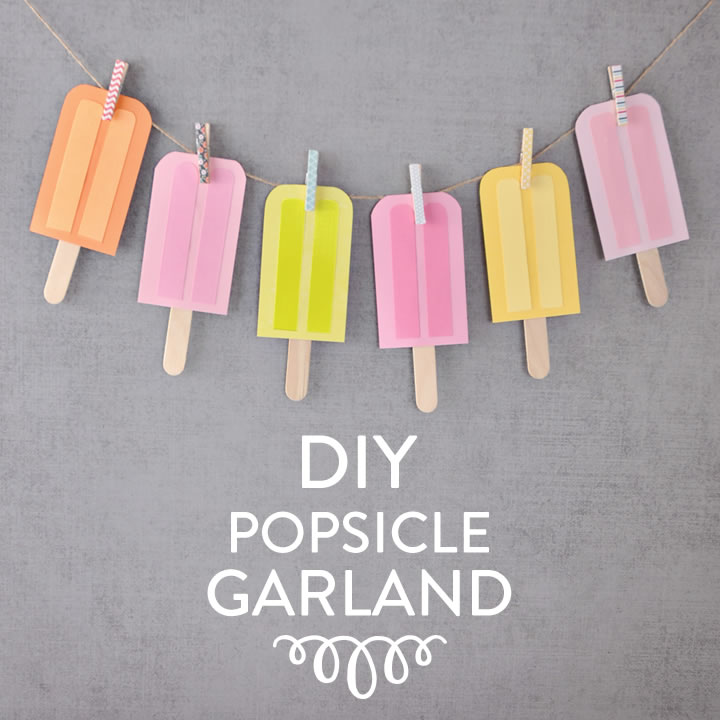
Summer is in full swing and so is the HEAT! Since our go-to method for keeping cool is chowing down on some frosty Popsicles, we decided to make a little party decor to celebrate our favorite treat.

DIY Paper Popsicle Garland | Vicky Barone

These paper Popsicles look good enough to eat! We were inspired to make this garland when we saw one made out of pool noodles (!!) here. We loved it so much, we went digging into our scrapbook paper collection for just the right Popsicle-inspired colors.

DIY Paper Popsicle Garland | Vicky Barone

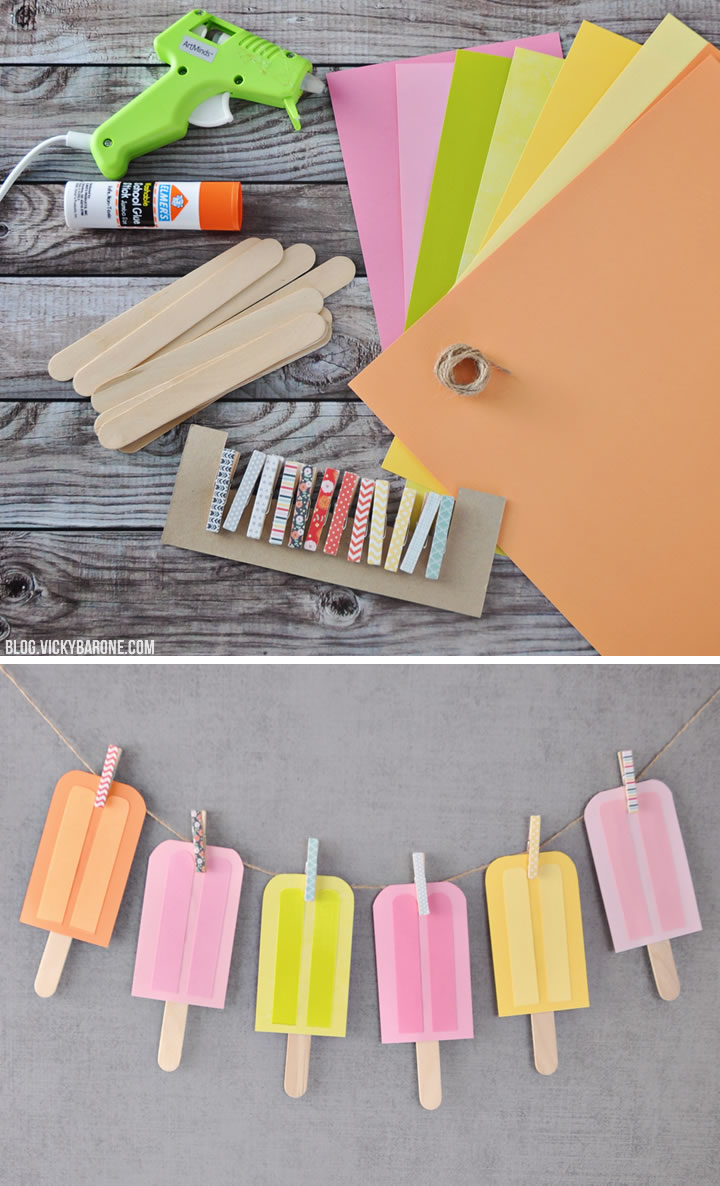
Supplies: scrapbook paper, tongue depressors, a paper cutter and/or scissors, glue stick, hot glue, twine, and clothespins.

Directions:
1. Each Popsicle will be two-toned to mimic the shaded inset of a Popsicle made from a traditional mold. Pick two shades of each color Popsicle you’d like to make.
2. Using a paper cutter, cut the lighter shade of each color into rectangles (ours were about 3×5.5″). Round off the top of each rectangle using scissors.
3. Next, cut the darker shade of each color into thinner rectangles (ours were about 0.5×5″). Round off the top of each of these rectangles. You should have twice the amount of thin rectangles as you do larger rectangles.
4. Glue two thin rectangles to a larger rectangle in a coordinating color using a glue stick.
5. Flip each paper Popsicle over and glue a tongue depressor to the back using a glue gun.
6. When all the glue is dry, clip each Popsicle to a piece of twin using mini clothespins.

Hang your bright Summer garland and enjoy!

Categories
DIY Holidays

DIY Bunny Garland

We can’t pass up a colorful garland no matter the holiday! This DIY Bunny Garland is no exception. All you need is some scrapbook paper and mini white pom poms to create these sweet little bunnies. For most of our garlands, we like to keep twine and mini clothes pins on hand. It’s so easy to swap out garlands depending on the season and store the ones not in use. Keep reading to learn how to make your own!

DIY Bunny Garland | Vicky BaroneSupplies: kraft paper, scrapbook paper in pastel colors, scissors, pom poms, glue, twine, and mini clothespins.

Directions:
1. Using a paper cutter or scissors, cut rectangles out of the brown kraft paper.
2. Cut a triangle out of the bottom of each rectangle with scissors.
3. Draw a bunny shape onto a piece of kraft paper and cut it out. This will be your stencil.
4. Use the bunny stencil to trace the shape onto the pastel scrapbook paper and cut.
5. Glue the bunny shapes to the kraft paper flags and glue a pom pom to each bunny for the tail.
6. When the glue is dry, clip each flag to the twine using the mini clothes pins and hang your garland.

DIY Bunny Garland | Vicky Barone

DIY Bunny Garland | Vicky Barone

What are your favorite ways to decorate for Easter? Find even more fun Easter ideas here!


Categories
DIY Holidays

DIY Paper Heart Garland + A Free Printable

We LOVE paper garlands! Especially this heart-filled one we made for Valentine’s Day. It adds the perfect loving touch to an office space, classroom, or even your kitchen! Hang it anywhere you want to spread the love.

DIY Paper Heart Garland | Vicky BaroneSupplies: card stock in shades of pink, two free Vicky Barone printables, scissors, and a sewing machine.

Click on the templates below to download!

FREE PRINTABLE Heart Template | Vicky Barone

FREE PRINTABLE Heart Template | Vicky Barone

Directions:
1. Download this heart template and this template with smaller hearts.
2. Feed the pink card stock into your printer and print the templates.
3. Use scissors to cut out the hearts.
4. Thread your sewing machine with white, pink, or red thread.
5. From the bottom tip of the hearts, to the top middle, feed each paper heart into the sewing machine one by one.
6. Hang your garland and enjoy!


[This post was shared on The Makers Link Party!]

Categories
DIY Holidays

DIY “Merry & Bright” Christmas Garland

We can’t stop making these fabric garlands! This new Christmas bunting makes us so happy and looks great hanging on the mantle AND the Christmas tree! The instructions are just about the same as the “Thankful” garland, but we’ve added them here as well. Keep reading to see how you can make your own…

DIY Fabric Christmas Garland | Merry & Bright | Vicky Barone

Supplies: linen or muslin fabric, red and green fabric, fabric scissors, a sewing machine(optional!), Mod Podge, a paint brush, twine, and mini clothes pins.

Directions:
1. Print out a word or phrase you’d like the banner to read. This will be your stencil and guide for how big to make each pennant.
2. Cut the linen into rectangles (ours were about 3.5″ by 5″).
3. Create a 1/4″ hem on the longer sides of the rectangle and either sew or glue them down. Create the same hem on the top of the rectangle and sew or glue as well.
4. With the rectangle face down, make a 1.5″ cut with scissors in the middle of the base. Fold the two corners created by the cut up and to the sides to create the two points. Glue into place or sew along the edges to match the rest of the hems.
5. Paint both sides of the green and red fabrics with Mod Podge and let dry. This will stiffen the fabric and prevent it from fraying when cut.
6. When the green and red fabric is dry, cut out the letters with scissors using the printed stencil you created.
7. Use more Mod Podge to attach the letters to each linen pennant. (Optional: give each pennant an extra coat of Mod Podge to seal the letters).
8. When the pennants are dry, use mini clothes pins to attach them to a piece of twine. Hang your garland and enjoy!

DIY Fabric Christmas Garland | Merry & Bright | Vicky Barone

DIY Fabric Christmas Garland | Merry & Bright | Vicky Barone

DIY Fabric Christmas Garland | Merry & Bright | Vicky Barone

Follow Vicky Barone on Instagram, Facebook, andPinterest to see all of our Christmas decor and recipes this season!

Categories
DIY Holidays

DIY “Thankful” Garland

The last Thanksgiving garland we made is still such a hit that we were more than excited to create a new one this year! We made this “Thankful” bunting using fabric and Mod Podge, with the method we used for this Inspirational Pennant. Keep scrolling to see more!

DIY Fabric "Thankful" garland for Thanksgiving | Vicky BaroneSupplies: linen or muslin fabric, orange patterned fabric, fabric scissors, a sewing machine(optional!), Mod Podge, a paint brush, twine, and mini clothes pins.

Directions:
1. Print out a word you’d like the banner to read. This will be your stencil and guide for how big to make each pennant.
2. Cut the linen into rectangles (ours were about 4.5″ by 6.5″).
3. Create a 1/4″ hem on the longer sides of the rectangle and either sew or glue them down. Create the same hem on the top of the rectangle and sew or glue as well.
4. With the rectangle face down, fold the un-sewn bottom up by the corners to create the point. Glue into place or sew along the edge to match the rest of the hems.
5. Paint both sides of the orange fabric with Mod Podge and let dry. This will stiffen the fabric and prevent it from fraying when cut.
6. When the orange fabric is dry, cut out the letters with scissors using the printed stencil you created.
7. Use more Mod Podge to attach the letters to each linen pennant. (Optional: give each pennant an extra coat of Mod Podge to seal the letters).
8. When the pennants are dry, use mini clothes pins to attach them to a piece of twine. Hang your garland and enjoy!

DIY Fabric "Thankful" Garland for Thanksgiving | Vicky Barone

DIY Fabric "Thankful" garland for Thanksgiving | Vicky Barone


If you like what you see here, we’d love for you to follow us on Instagram, Facebook, and Pinterest! We’ll be sharing our Thanksgiving table next week and we’re so excited!

Categories
DIY Holidays

DIY Halloween Fabric Scrap Garland

Here is an easy no-sew garland that can be made in any color scheme for any holiday. We used some black and gray scrap fabric we had left over from past projects, mixed with two orange fabric quarters we picked up at the craft store to make this Halloween-inspired garland.

DIY Halloween Fabric Scrap Garland | Vicky Barone

Supplies: scrap fabric, black cord, and fabric scissors.

Directions:
1. Cut fabric strips about 8″ long and 1/2″ to 1″ wide.
2. Tie the fabric strips onto the cord by making loop knots: Fold a fabric strip in half and place it behind the cord. Take the bottom ends of the strip and fold them up over the cord and into the loop. Pull to secure.
3. Alternate fabric colors to create a pattern as you attach them to the cord.
4. Hang the garland and enjoy!

This garland looks great hanging on a mantle or across a window! It’s a great way to utilize leftover fabric and we might just have to try it for Christmas.

Click here for more Halloween ideas!

Categories
DIY Holidays

4th of July Star Garland

Independence Day is this Friday! If you’re having a get-together or you’d just like a little patriotic decor, this paper garland adds the perfect touch of red, white, and blue!

4th of July Star Garland | Vicky Barone

Materials:
1. Scrapbook paper. We used red, burgundy, navy blue, royal blue, and a glimmery silver.
2. Stars to trace. We printed a few stars on a piece of paper, cut them out with an X-acto knife, and used both the cut-out stars and the remaining paper as stencils.
3. X-acto knife. You can also trace the stars with a pencil onto the scrapbook paper and then cut them out with scissors.
4. A sewing machine and all-purpose white thread.

Directions:
1. Use a star stencil to trace and cut out stars from the different colored scrapbook paper.
2. Adjust the sewing machine to a loose stitch.
3. Feed the stars one by one into the sewing machine, leaving tails of thread at the ends to hang the garland (If you don’t have a sewing machine, you can use clear tape or even patterned washi tape to attach the stars to a piece of string).
4. Hang up your garland and enjoy!

4th of July Star Garland | Vicky Barone

4th of July Star Garland | Vicky Barone

Have any fun plans this weekend? We’re hoping to relax and watch some fireworks. Happy Independence Day!

Categories
DIY Holidays

DIY Hoppy Easter Garland

We’ve mastered the art of paper buntings (seeing as how we’ve made one for nearly every holiday), and decided to create this Easter garland to add to our collection. And while we had enough chipboard As, we thought the Easter bunny would appreciate our creative spelling. 🙂

DIY Easter Garland | Vicky Barone

Materials: Scrapbook paper in Spring colors, adhesive chipboard alphabet letters, a paper cutter and/or scissors, mini clothespins, and twine. You can find all of these materials in your local craft store!

Directions:
1. Using a paper cutter, cut scrapbook paper into 2.5 x 5 inch rectangles.
2. Cut a triangle out of the bottom of each paper rectangle using scissors. We made a stencil out of scrap paper to make sure each triangle cut was the same.
3. Remove the backing from the letters and attach to each paper flag.
4. Cut one long piece of twine (or two medium length pieces) and attach each flag with two mini clothespins, leaving equal space between the flags and extra twine on each end for hanging.

Follow Vicky Barone on Bloglovin’ for more fun Easter ideas!