Categories
DIY Family Printables

Happy Things Memory Jar 2017

Happy New Year, everyone! Back by popular demand is our “Happy Things” memory jar printable! We love that you commemorate all the wonderful things you have experienced throughout the year and we are so excited to hear about all your happy moments in 2017!

Happy Things Jar Free Printable | Vicky Barone

Way back in 2014 we decided to create a memory jar to collect all the highlights of the year. From funny quotes from little ones, to memorable outings as a family, to exciting milestones, the possibilities are endless.

Happy Things Jar Free Printable | Vicky Barone

As the years went on, we were so thrilled to receive more and more requests for updated versions of the printable!

Find the original post here and click here to download the 2017 printable!

Happy Things Memory Jar 2017 | Vicky Barone

We can’t wait to hear all about your happy 2017 moments!

***UPDATE***

Each year we hear more requests for an updated Happy Things Printable and we are here to deliver! Click below to download the newest printables!
2017
2018
2019
2020

Categories
DIY Holidays Kids Parties and Events

DIY New Year’s Eve Piñatas

New Year’s Eve is just a few days away and we are busy decorating for the festivities! Today we’re sharing a DIY piñata project that’s perfect for candy or simply decor. Here’s how…

DIY New Year's Eve Piñatas | Vicky Barone

Supplies: cardboard, scissors, masking tape, white crepe paper, and Elmer’s glue.

Directions:
1. Cut out the numbers 2017 twice from cardboard.
2. With the remaining cardboard, cut out 1.5″ strips. The strips will go between the numbers to create the 3D shape.
3. Stack two matching numbers on top of one another.
4. Bend cardboard strips around the outside shape of the numbers and tape together.
5. If you want to fill these with candy, cut a hole in the top and pour candy inside before continuing.
6. Cut a length of crepe paper and fold accordion-style.
7. Cut fringe into the crepe paper and unfold.
8. Starting from the bottom of a piñata shape, glue strips of the fringed crepe paper, stacking them on top of one another as you move up the shape.
9. Hang from strings or use to decorate in any way you’d like!

DIY New Year's Eve Piñatas | Vicky Barone

Wishing you all a very happy, healthy, and safe new year!

Categories
DIY Holidays Parties and Events

DIY New Year’s Eve Canvas

We think 2017 is going to be our best year yet! Here’s how to make a gold cut-out canvas to display at your New Year’s Eve party to celebrate that sentiment…

DIY New Year's Eve Canvas | Best Year Yet | Vicky Barone

Supplies: a canvas, an X-acto knife, a printed quote, self-healing mat, and gold spray paint.

Directions:
1. Create a design or quote you’d like on your canvas and print it backwards (this will create a stencil that you will use on the back of the canvas!).
2. Place the canvas on a self-healing mat, face down.
3. Tape the stencil to the inside of the canvas.
4. Use the X-acto knife to cut away the letters or design (you will be cutting through the paper stencil and the canvas)
5. Neaten up the canvas with an X-acto knife or small scissors.
6. In a well-ventilated area (preferably outside!) cover the canvas with gold spray paint and let dry.
7. Decorate with your new canvas and celebrate the new year!

DIY New Year's Eve Canvas | Best Year Yet | Vicky Barone DIY New Year's Eve Canvas | Best Year Yet | Vicky Barone

For even more NYE ideas, click here!

Categories
DIY Holidays Parties and Events

DIY Starry Headbands

It’s not even Christmas yet, but we are already getting so excited for New Year’s Eve! To celebrate, we created these sparkly headbands to wear while you watch the ball drop. Here’s how to make your own…

DIY Starry Headbands | Vicky Barone

Supplies: plastic headbands, wire, scissors, glittery paper, and hot glue.

Directions:
1. Cut different sized star shapes out of glitter paper.
2. Cut a length of wire and roll the end of it into a flat coil (this will give more surface area for the hot glue to stick to).
3. Attach a star to the coil using hot glue. Repeat until all of the stars are glued to pieces of wire.
4. Wrap the other end of the wire to the headband until the star is at the desired height.
5. Repeat with the rest of the stars until the headband is full.
6. Wear and enjoy!

DIY Starry Headbands | Vicky Barone DIY Starry Headbands | Vicky Barone

What are your plans for ringing in the new year? We’d love to hear!

Categories
DIY

DIY Felt Holly Coffee Sleeve

Christmas is just 11 days away, can you believe it?! Today we’re sharing a holly coffee sleeve to get you and your coffee into the Christmas spirit!

DIY Felt Holly Coffee Sleeve | Vicky Barone

Supplies: red and green felt, scissors, and hot glue.

Directions:
1. Cut holly leaves out of the green felt. We sketched up a holly leaf we liked on card stock and cut it out to make a stencil so each of the leaves were identical.
2. Cut holly berries out of the red felt.
3. Glue holly pieces together in sections. Glue two holly leaves together and add berries on top until you have three holly shapes.
4. Measure around your to-go cup to see how much length you will need.
5. Glue holly shapes together, overlapping them if necessary to make the circle the right size for the cup.
6. Slide the holly sleeve over your cup and enjoy!

DIY Felt Holly Coffee Sleeve | Vicky Barone DIY Felt Holly Coffee Sleeve | Vicky Barone

These would make great last minute DIY gifts for friends and family! We hope you’re having a wonderful week and getting excited for the holidays!

Categories
Holidays Things I Love

Holiday Gift Guide 2016: For Him

This post contains affiliate links. If purchased, I will received a commission, but the price stays the same for you!

We are back with another gift guide! Our yearly “Gift Guide for Him” is always our most popular so we hope we inspire you with this round-up yet again! Click through the links below to check out our fun finds. Happy shopping!

Holiday Gift Guide 2016: For Him | Vicky Barone

1 | 2 | 3 | 4 | 5 | 6 | 7 | 8

For even more gift guides click here! Happy Monday!


Categories
DIY Holidays Recipes

Rice Krispie Christmas Characters

This post contains affiliate links. If purchased, I will receive a commission, but the price stays the same for you!

Today we’re sharing a mid-week treat we are sure you’ll just adore. Inspired by our Halloween Rice Krispie Characters and our love for candy eyes, we created some sweet chocolate covered characters that are perfect for Christmas! Here’s how to make your own…

Rice Krispie Christmas Characters | Vicky Barone

Supplies: rice krispie treats (store bought or homemade), cake pop sticks, candy eyes, pretzels, M&Ms, silver nonpareils, candy corn, vanilla cake frosting, and candy melts in light cocoa, dark cocoa, white, and red.

Rice Krispie Christmas Characters | Vicky Barone

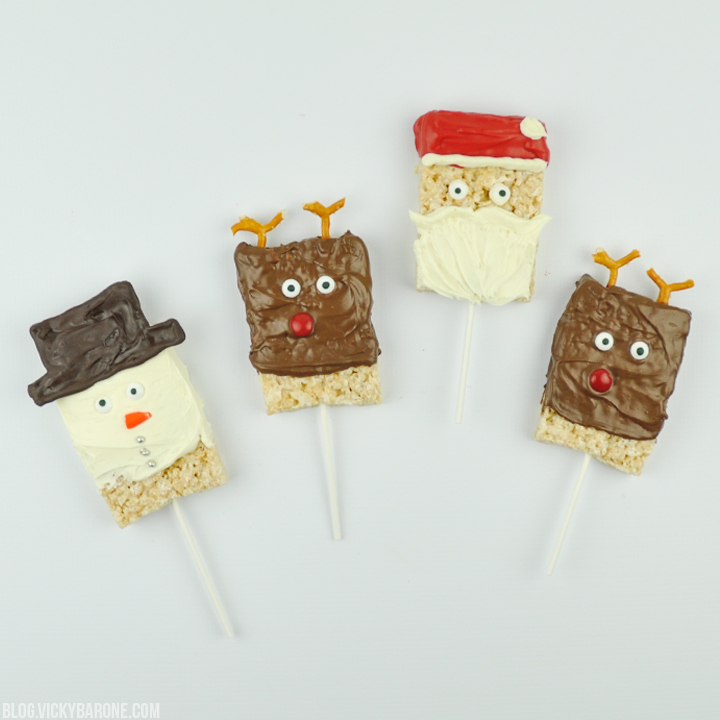
Snowmen: Add a cake pop stick to the center of a rice krispie treat. Spread vanilla frosting on the rice krispie treat using a knife or a spoon (you can also substitute white candy melts for frosting!). Melt dark cocoa candy melts, scoop into a Ziploc bag, and cut a corner. On a cookie sheet lined with wax paper, pipe the chocolate into a top hat shape. Let cool in the fridge until hardened. When the hat is ready, press it gently onto the top of the snowman. Cut a triangle out of a candy corn to create the carrot nose and press it into the frosting. Add candy eyes and silver nonpareils for buttons.

Rice Krispie Christmas Characters | Vicky Barone

Reindeer: Melt a bowl of light cocoa candy melts. Add a cake pop stick to the center of the rice krispie treat and dip the top of the treat into the melted chocolate. Use a spoon to help spread the chocolate around. Place treat on a cookie sheet lined with wax paper. Immediately add candy eyes and a red M&M before the chocolate hardens. Break off pieces of pretzels and stick them into the top for antlers. Place in fridge to harden chocolate.

Rice Krispie Christmas Characters | Vicky Barone

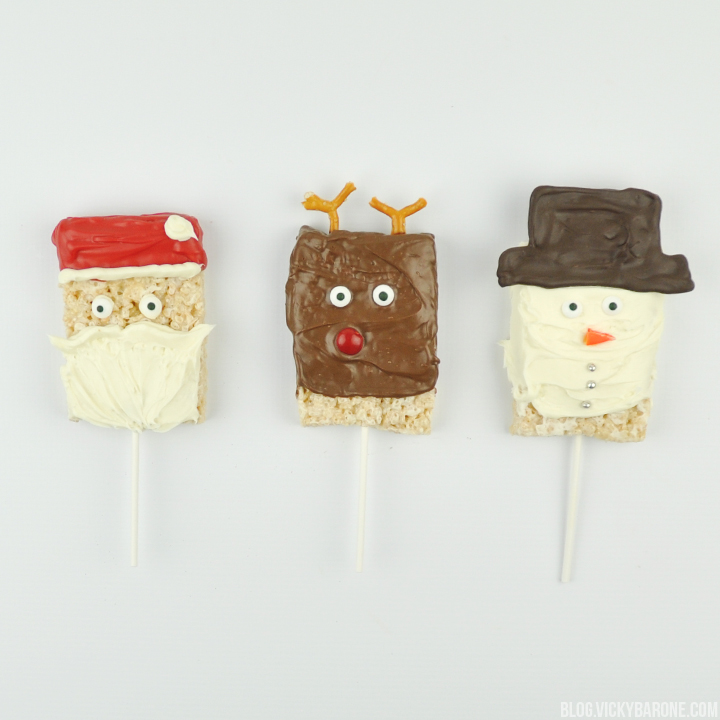
Santa: Add a cake pop stick to a rice krispie treat. Melt a bowl of red candy melts, scoop into a Ziploc bag, and cut off a corner. Pipe the red chocolate onto the top of the rice krispie treat to create a hat. Let sit in fridge to harden. Remove from fridge and spread white frosting onto the bottom of the treat to create a beard. Scoop more frosting into a Ziploc bag and cut off a corner. Pipe this frosting onto the base of the hat to create trim and add a pom pom to the top. You can also use this frosting to create a mustache. Add two dots of frosting to attach candy eyes.

Rice Krispie Christmas Characters | Vicky Barone Rice Krispie Christmas Characters | Vicky Barone

We hope you enjoy this delicious treat as much as we did! Don’t forget to follow Vicky Barone on Instagram and use #vickybaroneblog if you try out any of our projects! We’d LOVE to see!

Categories
Holidays Things I Love

Holiday Gift Guide 2016 : For the Host

Happy Monday! We are back with another Holiday Gift Guide, this time to celebrate the host! As you head off to countless holiday parties, you may be searching for the perfect gift to bring along as a thanks to the lovely host. We have gathered some of our favorite items from around the web and we hope you like them!

Holiday Gift Guide 2016 | For the Host | Vicky Barone

1 | 2 | 3 | 4 | 5 | 6 | 7 | 8 | 9 | 10 |11

The above contains an affiliate link. If purchased, I will receive a commission, but the price stays the same for you!

For ever more holiday gift guides click here!