Categories
DIY Holidays

DIY Ghost Garland

Boo! Today we’re sharing a Halloween garland that only requires 3 supplies! Here’s how to make your own ghost garland…

DIY Ghost Garland | Vicky Barone

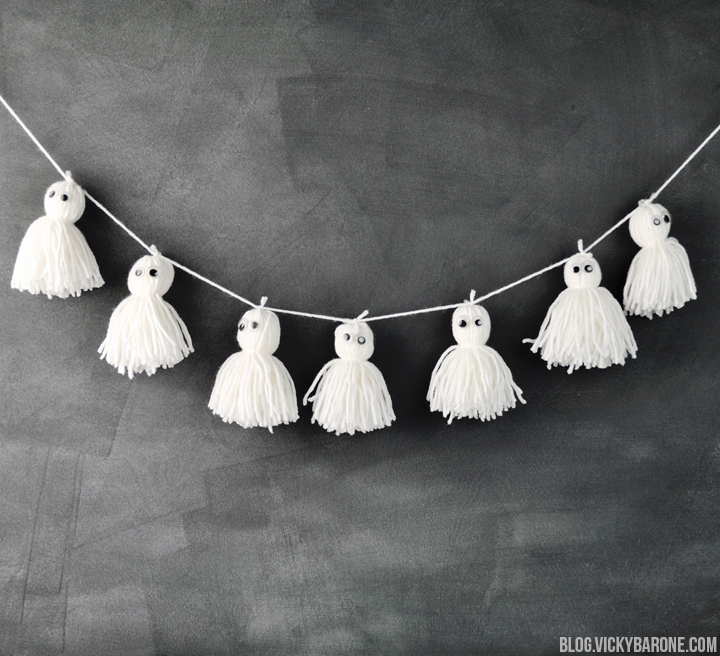
Supplies: white yarn, googly eyes, and glue.

Directions:
1. Begin by wrapping yarn around your hand (or a pre-cut piece of cardboard) until you reach desired fullness.
2. Thread another piece of yarn into the loop you created and tie it tight.
3. This method is similar to making a yarn pom pom, but instead of tying a second piece of string around the center of the loop, you’ll tie it closer to the top to create a little round ghost head!
4. Cut the bottom larger part of the loop and trim to even out.
5. Add googly eyes with glue.
6. String together on another piece of yarn!

What other fun Halloween projects are you working on? We’d love to hear!

Categories
DIY Holidays Recipes

Halloween Cupcakes

This post contains affiliate links. If purchased, I will receive a commission, but the price stays the same for you!

Happy Chocolate Cupcake Day! Doesn’t that sound like the most delicious holiday ever?! To celebrate, we are sharing some super cute and fun Halloween cupcakes! Here’s how to make your own…

Halloween Cupcakes | Vicky Barone

Supplies: chocolate cupcakes, chocolate icing, Ziploc bag, mini Oreos, regular sized Oreos, candy eyes, and white candy melts.

For the bats:
1. Ice a chocolate cupcake with chocolate frosting.
2. Split an Oreo in half and use the side without frosting for the wings. Break this cookie in half down the middle and press into the chocolate frosting.
3. Using chocolate frosting for the glue, add candy eyes to a mini Oreo.
4. Press the mini Oreo into the center of the cupcake!

For the mummies:
1. Melt white candy melts according to directions.
2. Scoop into a Ziploc bag and cut a corner off.
3. Pipe the candy melts onto a chocolate cupcake from side to side.
4. Press candy eyes on top.

Halloween Cupcakes | Vicky BaroneHalloween Cupcakes | Vicky Barone Halloween Cupcakes | Vicky Barone Halloween Cupcakes | Vicky Barone Halloween Cupcakes | Vicky Barone Halloween Cupcakes | Vicky Barone Halloween Cupcakes | Vicky Barone Halloween Cupcakes | Vicky Barone

Halloween Cupcakes | Vicky Barone Halloween Cupcakes | Vicky Barone

Aren’t they the cutest? Watch out for little hands scooping them up! Happy Chocolate Cupcake Day, everyone. We hope you celebrate accordingly! 🙂

Categories
DIY Holidays

DIY Metallic Skull

This post contains affiliate links. If purchased, I will receive a commission, but the price stays the same for you!

Are you ready for the easiest Halloween DIY ever? We LOVE finding holiday treasures at the Dollar Store and transforming them into fun decor. All you need to make this metallic skull is a Dollar Store skull and some spray paint! Here’s how…

DIY Metallic Skull | Vicky Barone

Supplies: a plastic skull from the Dollar Store (or styrofoam or any other type of skull you can find!), and metallic gold spray paint.

The above supplies contain an affiliate link. If purchased, I will receive a commission, but the price stays the same for you!

Directions: This could not be easier! Simply spray paint the skull in a well-ventilated area (preferably outside) and let dry completely. This spray paint is our favorite metallic spray paint yet! It is super shiny and makes everything look so beautiful!

DIY Metallic Skull | Vicky Barone DIY Metallic Skull | Vicky Barone DIY Metallic Skull | Vicky Barone DIY Metallic Skull | Vicky Barone

Like these spray painted pumpkins? They’ll be coming to the blog soon too so stay tuned!

Categories
DIY Holidays

Halloween Countdown Frame

Today marks 17 days until Halloween! Hooray! To keep track of all the exciting holiday countdowns coming up, we made a framed dry erase board! This seasonal DIY only takes a few minutes to create and can be personalized in so many different ways. Here’s how to make your own…

Halloween Countdown Frame | Vicky Barone

Supplies: 8×10 frame, scrapbook paper, printer, dry erase marker.

Directions:
1. Choose a frame! We used a simple one from the Dollar Store.
2. Cut a piece of scrapbook paper to 8.5×11 so it fits in the printer.
3. Create a Word Document or a Google Document and type out “Days Until Halloween” at the bottom.
4. Print onto scrapbook paper and cut down to fit into the frame.
5. Add to frame and start writing with the dry erase marker!

This frame is perfect for all holidays. Just swap out the Halloween page for Thanksgiving once the big day is over! There is always something to celebrate, so the possibilities are endless.

Halloween Countdown Frame | Vicky Barone

Halloween Countdown Frame | Vicky Barone

Happy Almost-Halloween! Now to decide on a costume…

Categories
Holidays Recipes Things I Love

Favorite Halloween Treats

Happy Monday, guys and ghouls! We are in the studio this week creating TONS of fun new Fall content and we can’t wait to share it all with you! In the meantime, we thought we’d share some of our favorite treats from Halloweens past. Click on the links below to see how to make each delicious dessert. Enjoy!

Favorite Halloween Treats | Vicky Barone

1. Graveyard Cake | 2. Owl Cupcakes
3. Spiderweb Cupcakes | 4. Sprinkle Rimmed Glasses
5. Rice Krispie Characters | 6. Candy Corn Marshmallows

Categories
DIY Holidays

DIY Patriotic Wreath

Labor Day Weekend is here! To celebrate, we made our trusty interchangeable wreath proudly display the red white and blue. Can you believe we made this wreath 3 years ago and it’s still going strong? We LOVE it and highly recommend making your own!

DIY Patriotic Wreath | Labor Day | 4th of July | Vicky Barone

We hope to have a fun-filled weekend celebrating the end of Summer. What are your plans this weekend?

DIY Patriotic Wreath | Labor Day | 4th of July | Vicky Barone

Click here to learn how to make your own interchangeable wreath! Happy Labor Day Weekend!

Categories
DIY Holidays Recipes

4th of July Rice Krispie Pops

This post contains affiliate links. If purchased, I will receive a commission.

4th of July Weekend is almost here! To celebrate the red white and blue, we made some tasty treats. These Rice Krispie Treat pops are dipped in melted chocolate and decorated with patriotic colors! Here’s how to make your own:

4th of July Rice Krispie Pops | Vicky Barone

Supplies: Rice Krispie Treats (you can buy these from the store, but homemade are SO much tastier!), candy melts in white, blue, and red, wax paper, a cookie sheet, Ziploc sandwich bags, and striped paper straws.

The supplies above contain affiliate links. If purchased, I will receive a commission.

Directions:
1. Melt candy melts in the microwave (each color in its own bowl) according to directions on package.
2. Line a cookie sheet with wax paper.
3. Insert paper straws into each Rice Krispie Treat.
4. When the chocolate is melted, dip a Rice Krispie Treat into one of the colors. You may need to use a spoon to spread the chocolate onto the Rice Krispie Treat. Set on wax paper and dip the next treat until all are covered.
5. Scoop the remaining chocolate into Ziploc bags and cut one corner. Squeeze the chocolate out of the bags in a zig-zag or striped pattern on the treats!
6. Let the chocolate harden (you may need to pop these in the fridge for a few minutes!) and serve!

4th of July Rice Krispie Pops | Vicky Barone

4th of July Rice Krispie Pops | Vicky Barone

4th of July Rice Krispie Pops | Vicky Barone

You can find even more 4th of July treats and DIYs right here. And don’t forget to follow Vicky Barone on Instagram!


Categories
DIY Family Holidays Kids

Father’s Day Shadow Sign

Father’s Day is this Sunday! If you are looking for a sweet last-minute gift, we have just the idea for you: Create a DIY shadow sign message for Dad to let him know how much you love him!

Father's Day Shadow Sign DIY | Vicky Barone

Supplies: a piece of cardboard, a pencil, an X-acto knife, a camera, and a frame.

Directions:
1. On the cardboard, trace the message you would like to share with Dad.
2. Using the X-acto knife, carefully cut the message out and discard cut-out pieces.
3. Have your little one stand outside and hold up the sign on a sunny day. Make sure the shadow is reading correctly on the ground! If it’s not, flip the sign around.
4. Take a picture of the shadow on the ground, making sure to get your sweet little one’s shadow in the photo as well.
5. Print and frame the photo and gift to Dad!

Father's Day Shadow Sign DIY | Vicky Barone

Father's Day Shadow Sign DIY | Vicky Barone

Such a sweet and simple DIY gift he is sure to love. For more gift ideas, check out this post!