Categories
Freebies Giveaways Press Printables Products Projects Uncategorized

DIY Teacher Appreciation Gift

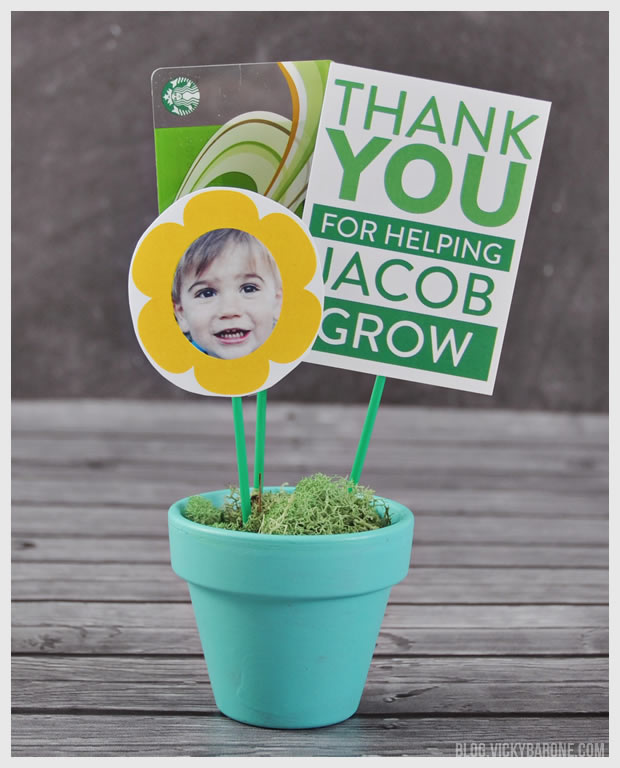
Teacher Appreciation Week is next week! Here is the gift we made for my boys’ teachers, complete with Starbucks gift cards and their sweet little faces.

We are also excited to introduce a new service we’ve been working on for quite some time now. Places for Faces is an application that helps you to personalize any party with faces! Using Places for Faces, you can upload an image of yourself or a friend and add a variety of stickers that match the occasion such as birthday hats, bow ties, tiaras, veils, and so much more. You then choose from a range of templates such as cupcake toppers and thank you notes that save directly to your computer to print as many times as you like. Here is the birthday party that inspired Places for Faces one year ago!

We are thrilled to be in the final stages of preparation and cannot WAIT to launch Places for Faces! If you are interested in being one of the first to try the application, add your email to the subscription list at the bottom of this post. We can’t wait to share it with you!

For this project, we uploaded the boys’ pictures to Places for Faces and added the yellow flower sticker. We are constantly finding more and more ways to use Places for Faces, especially when we’ve got these cute little mugs to work with!

DIY Teacher Appreciation Gift Featuring Places for Faces by Vicky Barone
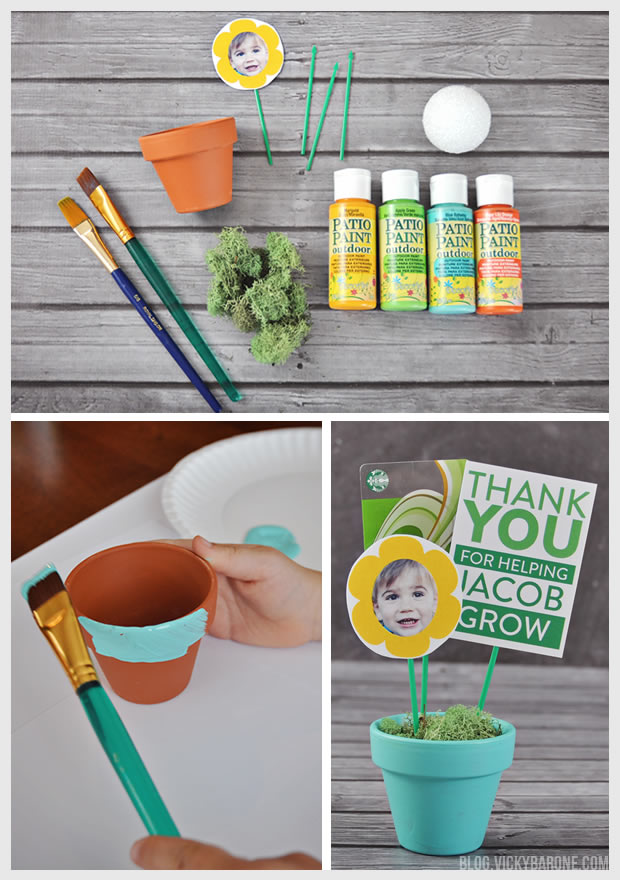
Materials: A small terracotta pot, acrylic paint (we used outdoor patio paint), paint brushes, a Styrofoam ball, moss, plastic party picks, tape, a gift card, and this free printable thank you note.

Click the link above or the image below to download the free PDF! I left a space for you to hand write your child’s name or have them sign it themselves!

Thank You For Helping Me Grow | Free Printable by Vicky Barone

Directions:
1. Have your child help paint the terracotta pot. Let dry completely.
2. Add the Styrofoam ball to the bottom of the pot (this is to help the picks to stay where you want them).
3. Cover the Styrofoam with moss.
4. Attach the thank you note, face, gift card, or anything else you’d like to add to the plastic picks using tape or glue.
5. Insert gift card and thank you note into the pot, stabilizing it within the foam ball.

DIY Teacher Appreciation Gift Featuring Places for Faces by Vicky Barone

This sweet craft would make a great Mother’s Day or Father’s Day gift as well!

Are you making anything for Teacher Appreciation week? We’d love to see it!

Don’t forget to subscribe to Places for Faces to be the first to know about the launch AND be one of the first participants! Just add your email in the space below and click subscribe!


Thank you to all those teachers out there! You are so appreciated!

P.S. Here is the Teacher Appreciation gift I made last year!

Categories
Holidays Products

Mother’s Day 2014 Greeting Cards

Mother’s Day is less than two weeks away! Here are a few of my Mother’s Day greeting cards available wherever Recycled Paper Greetings cards are sold or at independent retailers nationwide. Keep an eye out for them the next time you shop!

P.S. Click here to see more of my greeting cards 🙂

Categories
Family Holidays Things I Love

Things I Love: Mother’s Day Gifts on Etsy

1. Art Print | 2. Succulent Planter | 3. Measuring Cups | 4. Name Rings | 5. Aunt Mug |6. Wisteria Pillow

Etsy is a wonderful place to buy handmade goods, especially when you buy them as gifts! We’ve collected six thoughtful and beautiful handmade items to inspire you as you shop (or create!) this Mother’s Day. Enjoy!

Categories
DIY Kids Parties and Events

DIY Flower Crown

We’re jumping on the flower crown bandwagon with this pretty Spring project and we’re inviting you to come along with us! Flower crowns are surprisingly SO easy to make and can be worn in weddings, on birthdays, or just on a regular Spring day to feel special.

DIY Flower Crown | Vicky Barone

Materials: Wire, floral tape, scissors, and fresh flowers (we used two grocery store bouquets!).

Directions:
1. Cut a piece of sturdy wire about two or three times the circumference of your head and wrap it into a circle, securing the ends.
2. Wrap the entire wire halo in floral tape.
3. Cut fresh blooms about three or four inches from the base (you can trim the stems more once they are attached to the crown).
4. Place a flower against the crown and begin taping the stem until it feels secure.
5. Add more flowers moving backwards around the crown so that each flower covers the last flower’s stem.
6. Continue adding flowers until the entire crown is full OR cover only half of the crown to create more of a headband look.

DIY Flower Crown | Vicky Barone

Isn’t that easy? And look how sweet it is on this little angel:

DIY Flower Crown | Vicky BaroneThe boys took turns wearing it as well, but we’ll save those photos as leverage for later on 😉

We hope everyone is enjoying Spring and not getting too bogged down by all this pollen!

Categories
DIY Holidays Kids Recipes Things I Love

Things I Love: Earth Day

1. Cup of Dirt | 2. Plantable Paper | 3. Earth Cupcakes | 4. Bird Feeder | 5. T-shirt Produce Bag | 6. Eggshell Seedlings

Happy Earth Day! Here are 6 last minute projects and treats for you and your family to create as you celebrate our beautiful Earth. Enjoy!

Categories
Recipes Things I Love

Things I Love: Meyer Lemon Recipes

1. Gin & Tonic | 2. Tart | 3. Mini Shells and Ricotta | 4. Risotto | 5. Candied Peels | 6. Quinoa Pudding Cake | 7. Sorbet | 8. Salad Dressing

We are loving the recent surge in popularity of the Meyer Lemon and can’t wait to try each and every one of these recipes. Have you had a Meyer Lemon before? We’d love to hear your favorite recipes using the sweet hybrid fruit.

Categories
DIY Holidays Kids

DIY Felt Bunny Ears

Here’s our last Easter post of the season, and it sure is a cute one! These felt bunny ears are perfect for your little ones to wear while they hop around looking for treats on Easter morning!

DIY Felt Bunny Ears | Vicky BaroneMaterials: felt, scissors, craft glue, and a needle and thread.

Directions:
1. Cut two strips of gray felt about 2.5″ thick. Glue or sew these strips together to create a headband that fits your child’s head comfortably.
2. Cut two ear shapes out of gray felt and two ear shapes about 1/4 of an inch smaller around the edges in pink or blue felt.
3. Glue the inside of the ears to the bigger gray ears. Set aside to dry.
4. Once the ears are dry, pinch the base of an ear and sew two or three stitches into it to create the folded ear look. This helps the ears stick straight up when your child is wearing them. *Feel free to skip this step if you’d like the ears to appear flat. If they’re tall enough, they might flop over which would also be very cute!
5. Sew each ear to the headband until secure.

DIY Felt Bunny Ears | Vicky BaroneHere they are on our one cooperative little bunny 🙂

DIY Felt Bunny Ears | Vicky BaroneWe hope everyone has a wonderful Easter!

Categories
DIY Holidays

Metallic Easter Eggs

One more Easter egg post for you all! We just adored these pretty pastel pink and gold eggs so much that we grabbed our materials and made our own brighter versions with gold AND silver!

Metallic Easter Eggs | Vicky BaroneMaterials: Hard-boiled eggs, an egg dye kit, tape, and metallic paint pens in gold and silver.

We chose to use paint pens to create the illusion of dipping the eggs in paint because they dried quicker and gave us more control over the design.

Directions:
1. Dye eggs according to the directions on the egg dye kit. Let dry completely.
2. Tape off lines where you would like the “dip” line to reach on the egg.
3. Using the tape line as a guide, draw a line with the paint pen and then fill in the rest of the egg (since the eggs are porous and the paint pens are runny, its hard to get tape to seal a perfect paint line on the egg that the paint pen won’t run under. We suggest you use the tape solely as a rough guide).
4. Let eggs rest upside down until the paint dries completely.

We hope you have fun making these fancy eggs! Does dipping them in paint work better for you? We’d love to see!